OPEN-SOURCE SCRIPT
تم تحديثه PA Intraday Setups
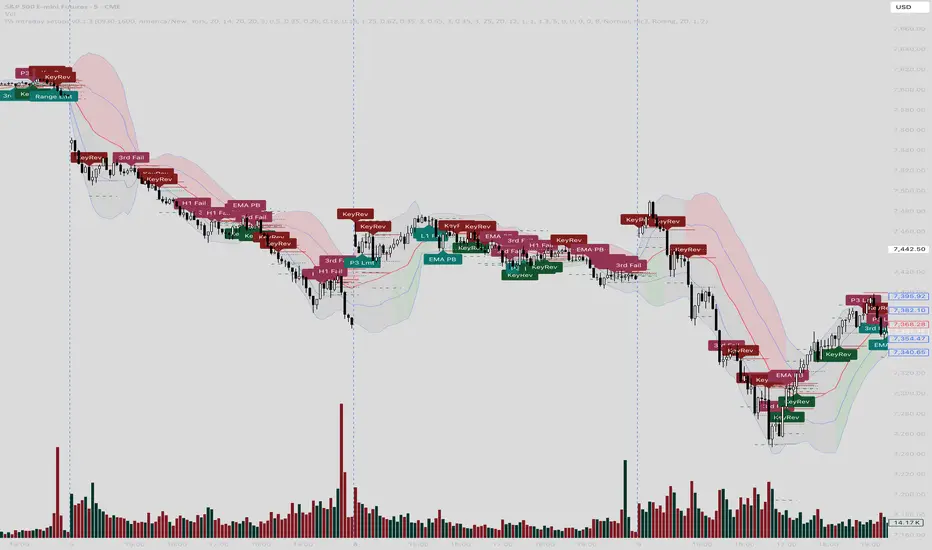
PA Intraday Setups — Publication Description
OVERVIEW
PA Intraday Setups is a heuristic execution assistant for discretionary intraday price-action traders. Instead of generating a single buy/sell arrow, it watches the chart for eleven of the most common Brooks-style price-action setups and labels each one as it confirms — so you can keep your eyes on structure and let the indicator handle the pattern-recognition bookkeeping.
It is built around one idea: context first, setup second. The script continuously classifies the market into trend / range / wide-channel / always-in context, and only fires a setup when the context that setup requires is actually present. This mirrors how a discretionary trader thinks — "what is the market doing right now, and is this a setup I'm allowed to take?"
This is NOT a fully automated strategy and NOT a signal service. It is an education-and-discipline tool: it shows you where a textbook setup exists, draws suggested entry / stop / target guide lines, and stays silent everywhere else.
WHAT IT DETECTS
The eleven setups are grouped exactly the way a price-action trader files them — by order type and market context.
PART 1 — BREAKOUT SETUPS (stop entries beyond a signal bar)
1. TREND PULLBACK H2 / L2 — In a confirmed trend (and only after a strong breakout or tight channel, not inside a broad channel), a clean two-legged counter-trend pullback whose signal bar closes in the trend direction.
2. BREAK-FAIL-BREAK — A failed breakout that re-breaks the same level within a few bars (default 3). Confirms the breakout direction after trapping the first movers.
3. KEY-LEVEL STRUCTURE REVERSAL — A reversal off a key level that coincides with a recognizable structure: double top/bottom, wedge, head-and-shoulders, or an inside/outside-bar (OB/IB) signal bar.
PART 2 — LIMIT SETUPS (limit entries at a pre-marked price)
4. RANGE HIGH / LOW LIMIT FADE — Inside a balanced range, fade the prior high/low back toward the middle with a fixed risk.
5. WIDE-CHANNEL POINT 3 FADE — A counter-channel limit fade at the third touch ("Point 3") of a wide channel.
6. TREND 50% PULLBACK — In a strong trend, a limit entry at the 50% retrace of the most recent impulse leg, provided the pullback stays weak (no three consecutive strong counter-trend bars).
7. TRUE-BREAKOUT TRAPPED PULLBACK — After a genuine breakout holds, a with-trend limit entry on the retest that traps the counter-side. Requires a strong breakout bar AND a strong follow-through bar; dojis or weak bodies disqualify it.
PART 3 — ALWAYS-IN / STRONG-TREND SETUPS
8. L1 / H1 FAILURE — In an always-in trend, the first counter-trend attempt fails at the prior with-trend follow-through extreme.
9. THIRD-BAR FAILURE — A counter-trend attempt that fails to print a third consecutive counter-trend bar, faded in the trend direction.
10. EMA20 PULLBACK — The first pullback to the EMA in an always-in trend, entered with-trend near the moving average.
11. TREND BREAKOUT SCALP — A with-trend strong-body breakout bar (close beyond the 50% mark) taken as a quick scalp with an ATR-based target.
The script also prints INVALIDATION and FORCED-EXIT labels (e.g. an H2 that turns into a reversal bar, a 50%/trapped/EMA setup that breaks its premise, or three consecutive counter-trend bars against an open trend) so you can see when a setup is voided.
CONTEXT LABELS
When enabled, the indicator drops a small label the moment the market context changes, so you always know which "regime" you're in:
TRADE GUIDES
For each confirmed setup the script can draw three short guide lines projected to the right:
These are suggestions for visual reference only — they are not orders and do not account for slippage, spread, or your own risk rules.
SETTINGS
SESSION
GENERAL
THRESHOLDS (the heart of the tool)
MANUAL KEY LEVELS
DISPLAY
SETUPS
HOW TO USE
1. Add the indicator and pick your timeframe (designed for intraday — e.g. 1m–15m on index futures, FX, or liquid stocks).
2. Decide your context. Watch the CTX labels: trend regimes favor the breakout and always-in setups; range regimes favor the limit fades.
3. Mark your own key levels in the Manual Key Levels group — the quality of the key-level setups depends heavily on good levels, and no algorithm marks them as well as you do.
4. Turn off the setups you don't trade. Most traders do better with three or four setups than with all eleven.
5. Use the guide lines as a starting point, then size and place your real orders by your own risk plan.
6. Optionally create alerts — there is one alert per setup, plus aggregate "any long setup / any short setup / forced exit / invalid" alerts.
IMPORTANT NOTES & LIMITATIONS
OPEN SOURCE
Published open-source under the Mozilla Public License 2.0. You are free to study, fork and improve it. If you build on it, a link back is appreciated.
Built by WuDaiChuan
DISCLAIMER
This script is for educational and informational purposes only. It is not financial advice and not a recommendation to buy or sell any instrument. Trading involves substantial risk of loss. Past behavior of any setup does not guarantee future results. Test thoroughly on a demo account and trade your own plan.
OVERVIEW
PA Intraday Setups is a heuristic execution assistant for discretionary intraday price-action traders. Instead of generating a single buy/sell arrow, it watches the chart for eleven of the most common Brooks-style price-action setups and labels each one as it confirms — so you can keep your eyes on structure and let the indicator handle the pattern-recognition bookkeeping.
It is built around one idea: context first, setup second. The script continuously classifies the market into trend / range / wide-channel / always-in context, and only fires a setup when the context that setup requires is actually present. This mirrors how a discretionary trader thinks — "what is the market doing right now, and is this a setup I'm allowed to take?"
This is NOT a fully automated strategy and NOT a signal service. It is an education-and-discipline tool: it shows you where a textbook setup exists, draws suggested entry / stop / target guide lines, and stays silent everywhere else.
WHAT IT DETECTS
The eleven setups are grouped exactly the way a price-action trader files them — by order type and market context.
PART 1 — BREAKOUT SETUPS (stop entries beyond a signal bar)
1. TREND PULLBACK H2 / L2 — In a confirmed trend (and only after a strong breakout or tight channel, not inside a broad channel), a clean two-legged counter-trend pullback whose signal bar closes in the trend direction.
2. BREAK-FAIL-BREAK — A failed breakout that re-breaks the same level within a few bars (default 3). Confirms the breakout direction after trapping the first movers.
3. KEY-LEVEL STRUCTURE REVERSAL — A reversal off a key level that coincides with a recognizable structure: double top/bottom, wedge, head-and-shoulders, or an inside/outside-bar (OB/IB) signal bar.
PART 2 — LIMIT SETUPS (limit entries at a pre-marked price)
4. RANGE HIGH / LOW LIMIT FADE — Inside a balanced range, fade the prior high/low back toward the middle with a fixed risk.
5. WIDE-CHANNEL POINT 3 FADE — A counter-channel limit fade at the third touch ("Point 3") of a wide channel.
6. TREND 50% PULLBACK — In a strong trend, a limit entry at the 50% retrace of the most recent impulse leg, provided the pullback stays weak (no three consecutive strong counter-trend bars).
7. TRUE-BREAKOUT TRAPPED PULLBACK — After a genuine breakout holds, a with-trend limit entry on the retest that traps the counter-side. Requires a strong breakout bar AND a strong follow-through bar; dojis or weak bodies disqualify it.
PART 3 — ALWAYS-IN / STRONG-TREND SETUPS
8. L1 / H1 FAILURE — In an always-in trend, the first counter-trend attempt fails at the prior with-trend follow-through extreme.
9. THIRD-BAR FAILURE — A counter-trend attempt that fails to print a third consecutive counter-trend bar, faded in the trend direction.
10. EMA20 PULLBACK — The first pullback to the EMA in an always-in trend, entered with-trend near the moving average.
11. TREND BREAKOUT SCALP — A with-trend strong-body breakout bar (close beyond the 50% mark) taken as a quick scalp with an ATR-based target.
The script also prints INVALIDATION and FORCED-EXIT labels (e.g. an H2 that turns into a reversal bar, a 50%/trapped/EMA setup that breaks its premise, or three consecutive counter-trend bars against an open trend) so you can see when a setup is voided.
CONTEXT LABELS
When enabled, the indicator drops a small label the moment the market context changes, so you always know which "regime" you're in:
- CTX Range — balanced, mean-reverting range (use the Limit setups)
- CTX AI Long / CTX AI Short — always-in long/short, a strong directional regime
- CTX Wide Ch Up / CTX Wide Ch Dn — wide channel, where Point 3 fades live
TRADE GUIDES
For each confirmed setup the script can draw three short guide lines projected to the right:
- Entry (dotted) — the stop-order or limit price
- Stop (solid red) — the protective stop
- Target (dashed green) — a fixed reward based on the configurable RR or an ATR multiple
These are suggestions for visual reference only — they are not orders and do not account for slippage, spread, or your own risk rules.
SETTINGS
SESSION
- Optional trading session + timezone. When off, the script treats every bar as active and resets session stats daily.
GENERAL
- EMA length (default 20), ATR length (14), trend lookback, range/breakout lookback, pivot strength.
THRESHOLDS (the heart of the tool)
- Strong-bar body %, max entry-side tail %, doji body %, near-key/near-EMA buffers (in ATR), minimum trend move / closes-on-side / efficiency, range width & overlap, wide-channel width & overlap, break-fail-break window, trapped-pullback window, structure confirm window, impulse lookback, ATR scalp target multiple, default RR. Tighten these for fewer / cleaner signals; loosen for more.
MANUAL KEY LEVELS
- Up to four price levels you type in yourself (e.g. overnight high/low, a daily pivot). Setups that depend on "key levels" will respect these in addition to the auto-detected prior-session H/L/C, session open, range extremes, and EMA.
DISPLAY
- Toggle the EMA plot, context labels, trade guides, invalidation labels, range lines, and manual-level lines; set guide-line length.
SETUPS
- Independent on/off switch for each of the eleven setups, so you can run only the ones that fit your style.
HOW TO USE
1. Add the indicator and pick your timeframe (designed for intraday — e.g. 1m–15m on index futures, FX, or liquid stocks).
2. Decide your context. Watch the CTX labels: trend regimes favor the breakout and always-in setups; range regimes favor the limit fades.
3. Mark your own key levels in the Manual Key Levels group — the quality of the key-level setups depends heavily on good levels, and no algorithm marks them as well as you do.
4. Turn off the setups you don't trade. Most traders do better with three or four setups than with all eleven.
5. Use the guide lines as a starting point, then size and place your real orders by your own risk plan.
6. Optionally create alerts — there is one alert per setup, plus aggregate "any long setup / any short setup / forced exit / invalid" alerts.
IMPORTANT NOTES & LIMITATIONS
- This is an APPROXIMATION. Setups that a human reads from key levels, channels, wedges, head-and-shoulders and channel "Point 3" are estimated here using pivots, EMA/ATR context, prior ranges and your manual levels. It will sometimes label a setup you would skip, and skip one you would take.
- Labels confirm on bar close (barstate.isconfirmed). They do not repaint after a bar closes, but live bars can change until close.
- Thresholds are general-purpose defaults. Different instruments and timeframes need retuning — treat the Thresholds group as your edge, not a fixed recipe.
- No setup is a recommendation. Discretion, context, and risk management remain entirely yours.
OPEN SOURCE
Published open-source under the Mozilla Public License 2.0. You are free to study, fork and improve it. If you build on it, a link back is appreciated.
Built by WuDaiChuan
DISCLAIMER
This script is for educational and informational purposes only. It is not financial advice and not a recommendation to buy or sell any instrument. Trading involves substantial risk of loss. Past behavior of any setup does not guarantee future results. Test thoroughly on a demo account and trade your own plan.
ملاحظات الأخبار
Release notes — v0.1.2Maintenance and usability update. No changes to entry logic, thresholds, or any
of the eleven setups — signals are identical to v0.1.0.
Updated to Pine Script v6. Migrated the source from v5 to v6 for forward
compatibility (replaced a now-invalid bool nz() call with equivalent logic).
Behavior is unchanged.
Separated label visibility into two independent switches. The old single "Show
invalid / forced exit labels" toggle has been split so you can control them
independently: "Show invalid / prohibited labels" now governs only the
void/prohibited markers (Invalid H2, Invalid L2, Trap invalid), and a new "Show
exit labels" toggle governs only the forced-exit markers (EMA exit, 50% exit,
Trap exit, 3-bar exit).
Added granular context-label controls. Under the master "Show context labels"
switch there are now three sub-toggles — Range context, Always-in context, and
Wide-channel context — so you can hide a single category (e.g. the CTX Wide Ch Up
/ Dn labels) without turning off the others.
All new toggles default to on, so the indicator looks and behaves exactly as
before until you change them.
ملاحظات الأخبار
Release notes — v0.1.3Added VWAP value zones (long/short high-value areas) and an adjustable label
size. No changes to the eleven setups or their entry logic.
VALUE ZONES (VWAP)
A new overlay marks where the high-value long and short areas are, relative to a
volume-weighted anchor, and shades them by market context so the color tells you
whether to follow or fade:
- Green = high-value LONG area. Below VWAP in a range (fade back up to the mean)
or on the pullback side of an uptrend (buy the dip toward VWAP).
- Red = high-value SHORT area. Above VWAP in a range (fade back down to the mean)
or on the rally side of a downtrend (sell the bounce toward VWAP).
- Gray = neutral. The trend-extension side, where there is no value edge — stay
out.
The anchor has two modes: Session (cumulative session-anchored VWAP, the true
daily value area) and Rolling (a responsive volume-weighted moving average,
default length 20) for traders who want less lag. Inner and outer bands are drawn
at adjustable standard-deviation multiples (default 1 and 2), and the regime
read also reacts faster now: a large strong-body bar that closes beyond the prior
range extreme immediately cancels the range verdict for a few bars, so the zones
flip to trend coloring right away instead of waiting for the lookback stats to
catch up.
Everything is optional and adjustable in the new "Value Zones (VWAP)" settings
group: show/hide the VWAP line, the band lines, and the shading independently;
pick the source, mode, length, band multipliers; and set the three zone colors.
ADJUSTABLE LABEL SIZE
A new "Label size" control in the Display group (Tiny / Small / Normal / Large /
Huge) sets the font size for every label at once — setup, context, and
exit/invalid labels.
All new features default to on and behave sensibly out of the box, so nothing
changes until you tune them.
نص برمجي مفتوح المصدر
بروح TradingView الحقيقية، قام مبتكر هذا النص البرمجي بجعله مفتوح المصدر، بحيث يمكن للمتداولين مراجعة وظائفه والتحقق منها. شكرا للمؤلف! بينما يمكنك استخدامه مجانًا، تذكر أن إعادة نشر الكود يخضع لقواعد الموقع الخاصة بنا.

إخلاء المسؤولية
لا يُقصد بالمعلومات والمنشورات أن تكون، أو تشكل، أي نصيحة مالية أو استثمارية أو تجارية أو أنواع أخرى من النصائح أو التوصيات المقدمة أو المعتمدة من TradingView. اقرأ المزيد في شروط الاستخدام.
نص برمجي مفتوح المصدر
بروح TradingView الحقيقية، قام مبتكر هذا النص البرمجي بجعله مفتوح المصدر، بحيث يمكن للمتداولين مراجعة وظائفه والتحقق منها. شكرا للمؤلف! بينما يمكنك استخدامه مجانًا، تذكر أن إعادة نشر الكود يخضع لقواعد الموقع الخاصة بنا.
إخلاء المسؤولية
لا يُقصد بالمعلومات والمنشورات أن تكون، أو تشكل، أي نصيحة مالية أو استثمارية أو تجارية أو أنواع أخرى من النصائح أو التوصيات المقدمة أو المعتمدة من TradingView. اقرأ المزيد في شروط الاستخدام.