Active Target (RichPole)
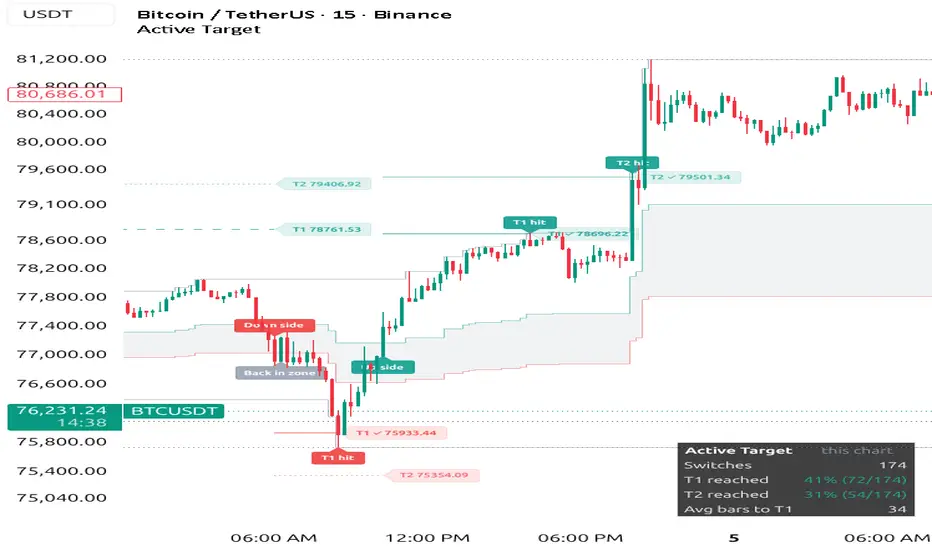
Active Target maps the recent price range, marks a switch zone in the middle of it, and draws two targets beyond the range as soon as price picks a side. A panel on the chart shows how often those targets were actually reached on your symbol and settings.
HOW IT WORKS
- Range: the highest high and lowest low of the last N bars (default 100; presets "About 1 day" and "About 1 week" use the chart timeframe).
- Switch zone: the area between the 38.2% and 61.8% levels of the range (adjustable).
- Up side: a candle CLOSES above the upper switch line. Down side: a candle CLOSES below the lower switch line. Inside the zone the last side stays active, so the side does not flicker.
- Targets: at the switch, Target 1 is set at the 127.2% extension of the range and Target 2 at the 161.8% extension (both adjustable). Targets are fixed at the switch and never move or repaint.
- Notes on the chart: Up side, Down side, T1 hit, T2 hit, Back in zone (price closed back inside the switch zone after a switch). Hover a note for details.
- Hit-rate panel: counts every switch on the loaded chart and shows how often T1 and T2 were reached before the side switched again, plus the average number of bars to reach T1.
WHAT IS ORIGINAL
Fibonacci levels of a range are a public idea. This script is written from scratch and combines a two-line switch zone (so the side only changes on a clear close through the zone), targets that are fixed at the moment of the switch, and a live hit-rate panel that measures how the targets performed on the user's own chart. The panel lets you tune the range length to your market instead of trusting a fixed number.
HOW TO USE IT
- Use Target 1 as a first take-profit area and Target 2 for a smaller remaining position.
- "Back in zone" means the move is stalling: protect open profit and avoid chasing.
- For a calmer entry, wait for a retest: after a switch, price often comes back to the switch line; a close back on the right side of it is a more controlled spot than the switch candle.
- Check risk first: if Target 1 is closer than your stop, the trade does not pay for its risk.
SETTINGS
Range length (custom bars, about 1 day, about 1 week), switch line %, Target 1 and Target 2 %, number of past switches kept on the chart, range lines, zone, notes, panel and its position, colours.
Alerts (on candle close): up side, down side, Target 1 hit, Target 2 hit, back in zone.
RESULTS AND LIMITATIONS
- In our own test (gold and EURUSD, 15-minute, 2010-2026, range 100 bars) Target 1 was reached on about 35-38% of switches and Target 2 on about 21-25%. That is close to what random price movement gives, so treat the targets as a map, not a prediction. The panel shows the numbers for your chart.
- Results depend on the range length, timeframe and market. Past hit rates do not guarantee future results.
- Calculations use closed candles. Educational tool. It does not place trades and is not financial advice.
HOW IT WORKS
- Range: the highest high and lowest low of the last N bars (default 100; presets "About 1 day" and "About 1 week" use the chart timeframe).
- Switch zone: the area between the 38.2% and 61.8% levels of the range (adjustable).
- Up side: a candle CLOSES above the upper switch line. Down side: a candle CLOSES below the lower switch line. Inside the zone the last side stays active, so the side does not flicker.
- Targets: at the switch, Target 1 is set at the 127.2% extension of the range and Target 2 at the 161.8% extension (both adjustable). Targets are fixed at the switch and never move or repaint.
- Notes on the chart: Up side, Down side, T1 hit, T2 hit, Back in zone (price closed back inside the switch zone after a switch). Hover a note for details.
- Hit-rate panel: counts every switch on the loaded chart and shows how often T1 and T2 were reached before the side switched again, plus the average number of bars to reach T1.
WHAT IS ORIGINAL
Fibonacci levels of a range are a public idea. This script is written from scratch and combines a two-line switch zone (so the side only changes on a clear close through the zone), targets that are fixed at the moment of the switch, and a live hit-rate panel that measures how the targets performed on the user's own chart. The panel lets you tune the range length to your market instead of trusting a fixed number.
HOW TO USE IT
- Use Target 1 as a first take-profit area and Target 2 for a smaller remaining position.
- "Back in zone" means the move is stalling: protect open profit and avoid chasing.
- For a calmer entry, wait for a retest: after a switch, price often comes back to the switch line; a close back on the right side of it is a more controlled spot than the switch candle.
- Check risk first: if Target 1 is closer than your stop, the trade does not pay for its risk.
SETTINGS
Range length (custom bars, about 1 day, about 1 week), switch line %, Target 1 and Target 2 %, number of past switches kept on the chart, range lines, zone, notes, panel and its position, colours.
Alerts (on candle close): up side, down side, Target 1 hit, Target 2 hit, back in zone.
RESULTS AND LIMITATIONS
- In our own test (gold and EURUSD, 15-minute, 2010-2026, range 100 bars) Target 1 was reached on about 35-38% of switches and Target 2 on about 21-25%. That is close to what random price movement gives, so treat the targets as a map, not a prediction. The panel shows the numbers for your chart.
- Results depend on the range length, timeframe and market. Past hit rates do not guarantee future results.
- Calculations use closed candles. Educational tool. It does not place trades and is not financial advice.

إخلاء المسؤولية
لا يُقصد بالمعلومات والمنشورات أن تكون، أو تشكل، أي نصيحة مالية أو استثمارية أو تجارية أو أنواع أخرى من النصائح أو التوصيات المقدمة أو المعتمدة من TradingView. اقرأ المزيد في شروط الاستخدام.
إخلاء المسؤولية
لا يُقصد بالمعلومات والمنشورات أن تكون، أو تشكل، أي نصيحة مالية أو استثمارية أو تجارية أو أنواع أخرى من النصائح أو التوصيات المقدمة أو المعتمدة من TradingView. اقرأ المزيد في شروط الاستخدام.