AUD/JPY: Multi-Layer Execution Strategy | Technical & Macro View
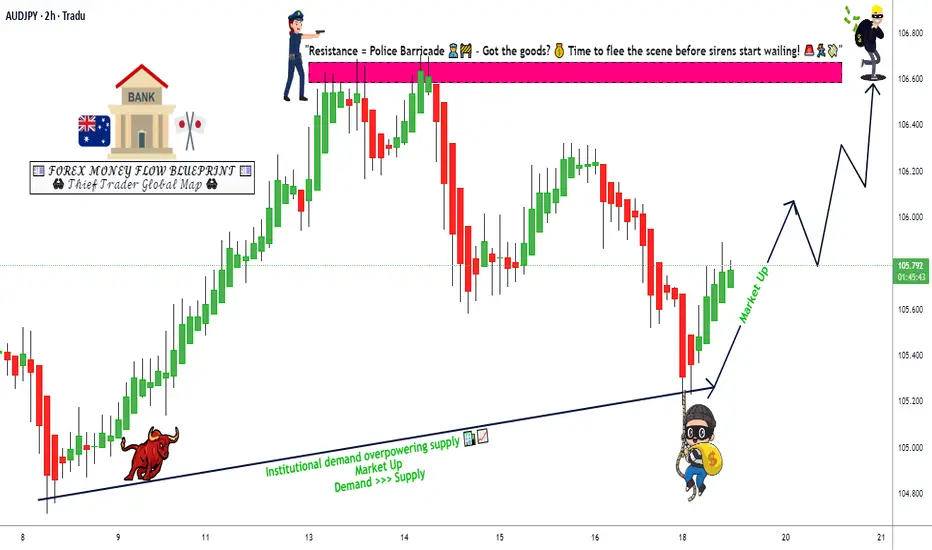
🔥 AUD/JPY Bullish Setup | Layered Buy Strategy | Smart Money Flow 📈
📌 Asset
AUD/JPY – Australian Dollar vs Japanese Yen
Forex Market Trade Opportunity Guide (Day / Swing Trade)
🧠 Market Bias
✅ Bullish Structure Confirmed
Price is holding above key demand with higher-timeframe support intact. Risk sentiment favors AUD strength while JPY remains weak under current macro conditions.
🎯 Trade Plan – Thief Layering Strategy 🧩
This setup uses a multiple limit-order layering method to optimize average entry price and reduce emotional execution.
🟢 Buy Limit Layers (Scale-In):
105.000
105.300
105.600
105.900
👉 (You may add or adjust layers based on your risk profile and capital allocation)
📌 Entry Logic:
Demand zone reaction
Mean reversion opportunity
Liquidity absorption near intraday lows
🏁 Take Profit (TP)
🎯 106.600
📍 Reasoning:
Prior resistance zone
Overbought conditions expected near highs
Possible liquidity trap above → book profits, don’t get greedy
⚠️ TP is flexible — partials are recommended based on price action.
🛑 Stop Loss (SL)
🔻 104.800
📌 SL Logic:
Invalidation of bullish structure
Below demand & liquidity pocket
⚠️ Risk management is personal — adapt SL to your strategy.
🌍 Live Fundamental & Economic Drivers (Macro Watch – London Session ⏱️)
📈 AUD Support Factors
Commodity demand resilience (China-linked exposure)
Risk-on sentiment across Asia-Pacific equities
Stable RBA stance compared to peers
📉 JPY Weakness Factors
Ongoing ultra-loose BoJ policy
Yield-spread favoring higher-yield currencies
Persistent carry-trade demand
🗓️ High-Impact Events to Monitor
🇦🇺 Australia: Employment data, CPI, RBA statements
🇯🇵 Japan: BoJ policy updates, CPI, wage data
🌐 Global: Risk sentiment, equity market flow, bond yields
📌 Always track live macro updates during London hours before execution.
🔗 Correlated & Related Pairs to Watch
💲 AUD/USD – Confirms AUD strength
💲 NZD/JPY – Risk sentiment alignment
💲 USD/JPY – Yen weakness validation
💲 AUD/NZD – Regional currency balance
👉 If AUD strength aligns across pairs and JPY remains soft → bullish AUD/JPY bias stays valid.
🧩 Key Technical Notes
✔️ Structure holding above demand
✔️ Layered entries reduce timing risk
✔️ Liquidity-based TP zone
✔️ Macro + technical confluence
⚠️ Risk Disclaimer
This idea is for educational purposes only.
You control your entries, exits, and risk. Trade responsibly.
💬 If this setup adds value, boost it with a 👍, 💬 your view, and ⭐ follow for more structured trade ideas.
Let the chart do the talking 📊🔥
📌 Asset
AUD/JPY – Australian Dollar vs Japanese Yen
Forex Market Trade Opportunity Guide (Day / Swing Trade)
🧠 Market Bias
✅ Bullish Structure Confirmed
Price is holding above key demand with higher-timeframe support intact. Risk sentiment favors AUD strength while JPY remains weak under current macro conditions.
🎯 Trade Plan – Thief Layering Strategy 🧩
This setup uses a multiple limit-order layering method to optimize average entry price and reduce emotional execution.
🟢 Buy Limit Layers (Scale-In):
105.000
105.300
105.600
105.900
👉 (You may add or adjust layers based on your risk profile and capital allocation)
📌 Entry Logic:
Demand zone reaction
Mean reversion opportunity
Liquidity absorption near intraday lows
🏁 Take Profit (TP)
🎯 106.600
📍 Reasoning:
Prior resistance zone
Overbought conditions expected near highs
Possible liquidity trap above → book profits, don’t get greedy
⚠️ TP is flexible — partials are recommended based on price action.
🛑 Stop Loss (SL)
🔻 104.800
📌 SL Logic:
Invalidation of bullish structure
Below demand & liquidity pocket
⚠️ Risk management is personal — adapt SL to your strategy.
🌍 Live Fundamental & Economic Drivers (Macro Watch – London Session ⏱️)
📈 AUD Support Factors
Commodity demand resilience (China-linked exposure)
Risk-on sentiment across Asia-Pacific equities
Stable RBA stance compared to peers
📉 JPY Weakness Factors
Ongoing ultra-loose BoJ policy
Yield-spread favoring higher-yield currencies
Persistent carry-trade demand
🗓️ High-Impact Events to Monitor
🇦🇺 Australia: Employment data, CPI, RBA statements
🇯🇵 Japan: BoJ policy updates, CPI, wage data
🌐 Global: Risk sentiment, equity market flow, bond yields
📌 Always track live macro updates during London hours before execution.
🔗 Correlated & Related Pairs to Watch
💲 AUD/USD – Confirms AUD strength
💲 NZD/JPY – Risk sentiment alignment
💲 USD/JPY – Yen weakness validation
💲 AUD/NZD – Regional currency balance
👉 If AUD strength aligns across pairs and JPY remains soft → bullish AUD/JPY bias stays valid.
🧩 Key Technical Notes
✔️ Structure holding above demand
✔️ Layered entries reduce timing risk
✔️ Liquidity-based TP zone
✔️ Macro + technical confluence
⚠️ Risk Disclaimer
This idea is for educational purposes only.
You control your entries, exits, and risk. Trade responsibly.
💬 If this setup adds value, boost it with a 👍, 💬 your view, and ⭐ follow for more structured trade ideas.
Let the chart do the talking 📊🔥

Publicações relacionadas
Aviso legal
As informações e publicações não se destinam a ser, e não constituem, conselhos ou recomendações financeiras, de investimento, comerciais ou de outro tipo fornecidos ou endossados pela TradingView. Leia mais nos Termos de Uso.
Publicações relacionadas
Aviso legal
As informações e publicações não se destinam a ser, e não constituem, conselhos ou recomendações financeiras, de investimento, comerciais ou de outro tipo fornecidos ou endossados pela TradingView. Leia mais nos Termos de Uso.