
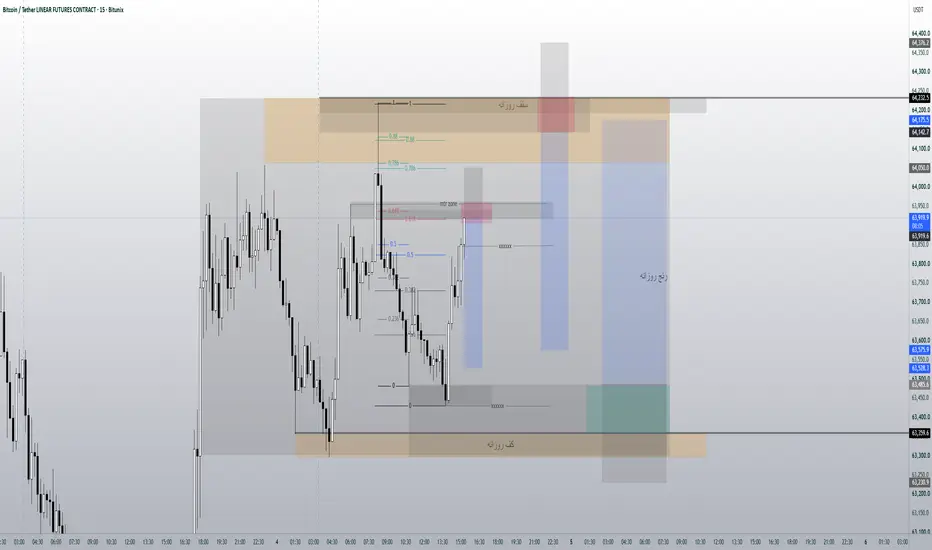
🔴 BTCUSDT Sell Setup #1 | Intraday Resistance
Bitcoin is approaching the first key supply zone, where I'm looking for a potential short opportunity. This area aligns with intraday resistance and could attract sellers.
📌 Trade Plan
Entry: Sell after bearish confirmation inside the first supply zone.
Stop Loss: Above the highlighted resistance.
Take Profit: The mid-range demand zone.
Risk-to-Reward: 1:2.
⚠️ Wait for confirmation before entering. This is my personal market analysis, not financial advice.
🔴 BTCUSDT Sell Setup #2 | Major Supply Zone
The second setup focuses on the higher daily supply zone. If price reaches this area, I'll be watching for strong rejection and bearish confirmation before entering a short position.
📌 Trade Plan
Entry: Sell from the highlighted daily supply zone.
Stop Loss: Above the zone.
Take Profit: Back toward the major demand area.
Risk-to-Reward: 1:2.
This setup offers a high-probability reaction if sellers defend the higher timeframe resistance.
🟢 BTCUSDT Buy Setup | Daily Demand Zone
Bitcoin is approaching a strong daily demand zone, where buyers may step in. I'm planning a Buy Limit order within the highlighted area.
📌 Trade Plan
Order Type: Buy Limit
Entry: Inside the highlighted demand zone.
Stop Loss: Below the demand zone.
Take Profit: The first resistance, with the final target at the upper supply zone.
Risk-to-Reward: 1:2.
Patience is key—I'm waiting for price to reach my level instead of chasing the market.
⚠️ This analysis is for educational purposes only and is not financial advice. Always use proper risk management.
If you enjoy my analysis, don't forget to 👍 Like, 💬 Comment, and ⭐ Follow my TradingView profile for more Crypto, Forex, and Gold trade setups!
Bitcoin is approaching the first key supply zone, where I'm looking for a potential short opportunity. This area aligns with intraday resistance and could attract sellers.
📌 Trade Plan
Entry: Sell after bearish confirmation inside the first supply zone.
Stop Loss: Above the highlighted resistance.
Take Profit: The mid-range demand zone.
Risk-to-Reward: 1:2.
⚠️ Wait for confirmation before entering. This is my personal market analysis, not financial advice.
🔴 BTCUSDT Sell Setup #2 | Major Supply Zone
The second setup focuses on the higher daily supply zone. If price reaches this area, I'll be watching for strong rejection and bearish confirmation before entering a short position.
📌 Trade Plan
Entry: Sell from the highlighted daily supply zone.
Stop Loss: Above the zone.
Take Profit: Back toward the major demand area.
Risk-to-Reward: 1:2.
This setup offers a high-probability reaction if sellers defend the higher timeframe resistance.
🟢 BTCUSDT Buy Setup | Daily Demand Zone
Bitcoin is approaching a strong daily demand zone, where buyers may step in. I'm planning a Buy Limit order within the highlighted area.
📌 Trade Plan
Order Type: Buy Limit
Entry: Inside the highlighted demand zone.
Stop Loss: Below the demand zone.
Take Profit: The first resistance, with the final target at the upper supply zone.
Risk-to-Reward: 1:2.
Patience is key—I'm waiting for price to reach my level instead of chasing the market.
⚠️ This analysis is for educational purposes only and is not financial advice. Always use proper risk management.
If you enjoy my analysis, don't forget to 👍 Like, 💬 Comment, and ⭐ Follow my TradingView profile for more Crypto, Forex, and Gold trade setups!

Aviso legal
As informações e publicações não se destinam a ser, e não constituem, conselhos ou recomendações financeiras, de investimento, comerciais ou de outro tipo fornecidos ou endossados pela TradingView. Leia mais nos Termos de Uso.
Aviso legal
As informações e publicações não se destinam a ser, e não constituem, conselhos ou recomendações financeiras, de investimento, comerciais ou de outro tipo fornecidos ou endossados pela TradingView. Leia mais nos Termos de Uso.