
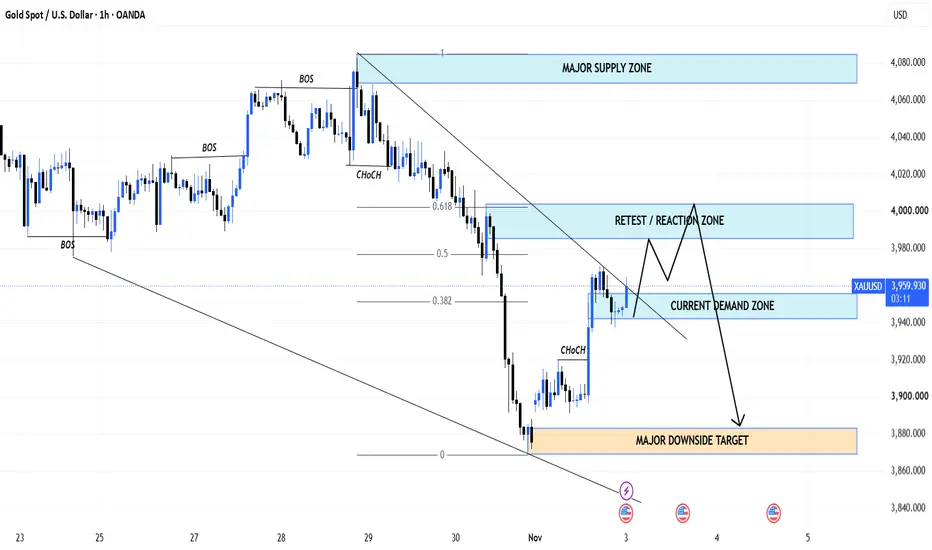
Gold is trading around 3,949, extending its recovery from the recent 3,87x low after a sharp liquidation phase.
The rebound has been supported by softer oil prices and a slightly weaker dollar, but the broader macro environment remains restrictive. The Fed held rates at 3.75%–4.00% last week, while inflation remains elevated and December tightening expectations are still significant.
Technical View
The H1 structure remains bearish despite the current rebound.
Gold previously shifted from the upper channel through a clear CHoCH, followed by strong bearish displacement through the Fibonacci retracement structure and into the 3,87x area.
Price has since produced a short-term bullish reaction and is now holding inside the 3,938–3,956 Current Demand Zone.
This recovery can extend further, but the key technical test sits higher at 3,984–4,003 Retest / Reaction Zone.
That area overlaps with the previous breakdown structure and represents the strongest nearby location to evaluate whether sellers are ready to regain control.
Key Zones
4,068–4,084 — Major Supply Zone
3,984–4,003 — Retest / Reaction Zone
3,938–3,956 — Current Demand Zone
3,868–3,883 — Major Downside Target
Trading Plan
Sell Priority
The main scenario is to allow Gold to extend its corrective recovery from the 3,938–3,956 Current Demand Zone toward 3,984–4,003 Retest / Reaction Zone.
Condition: price reaches the retest zone but fails to establish sustained H1 acceptance above 4,003, followed by renewed bearish confirmation.
If sellers regain control from this area, I will favor a rotation back through 3,938–3,956.
A decisive breakdown below current demand would then reopen the path toward the 3,868–3,883 Major Downside Target.
The projected sequence is:
3,938–3,956 hold → corrective rally into 3,984–4,003 → bearish rejection → continuation toward 3,868–3,883.
Important Note
Gold has already rebounded sharply from deeply oversold conditions, so the current recovery should not automatically be interpreted as a structural bullish reversal.
Today’s U.S. JOLTS release and Friday’s October employment report are the next important labor-market catalysts and could create sharp volatility around the marked zones.
A sustained H1 reclaim above 4,003 would weaken the immediate bearish continuation thesis and increase the probability of a deeper recovery.
Sell View
The sell-side view remains preferred, but location matters.
Selling directly around 3,949 offers less structural advantage while price is still recovering from demand.
The cleaner bearish POI is 3,984–4,003, where the rebound meets previous breakdown structure.
Final View
Gold is recovering, but the broader H1 structure has not yet turned bullish.
The immediate 3,938–3,956 demand zone is supporting the current bounce, while 3,984–4,003 remains the real directional test.
If sellers defend that retest zone, the chart continues to favor renewed downside pressure toward 3,868–3,883.
For now, the approach remains simple: let price complete the retracement first, then judge whether sellers are ready to resume control.
The rebound has been supported by softer oil prices and a slightly weaker dollar, but the broader macro environment remains restrictive. The Fed held rates at 3.75%–4.00% last week, while inflation remains elevated and December tightening expectations are still significant.
Technical View
The H1 structure remains bearish despite the current rebound.
Gold previously shifted from the upper channel through a clear CHoCH, followed by strong bearish displacement through the Fibonacci retracement structure and into the 3,87x area.
Price has since produced a short-term bullish reaction and is now holding inside the 3,938–3,956 Current Demand Zone.
This recovery can extend further, but the key technical test sits higher at 3,984–4,003 Retest / Reaction Zone.
That area overlaps with the previous breakdown structure and represents the strongest nearby location to evaluate whether sellers are ready to regain control.
Key Zones
4,068–4,084 — Major Supply Zone
3,984–4,003 — Retest / Reaction Zone
3,938–3,956 — Current Demand Zone
3,868–3,883 — Major Downside Target
Trading Plan
Sell Priority
The main scenario is to allow Gold to extend its corrective recovery from the 3,938–3,956 Current Demand Zone toward 3,984–4,003 Retest / Reaction Zone.
Condition: price reaches the retest zone but fails to establish sustained H1 acceptance above 4,003, followed by renewed bearish confirmation.
If sellers regain control from this area, I will favor a rotation back through 3,938–3,956.
A decisive breakdown below current demand would then reopen the path toward the 3,868–3,883 Major Downside Target.
The projected sequence is:
3,938–3,956 hold → corrective rally into 3,984–4,003 → bearish rejection → continuation toward 3,868–3,883.
Important Note
Gold has already rebounded sharply from deeply oversold conditions, so the current recovery should not automatically be interpreted as a structural bullish reversal.
Today’s U.S. JOLTS release and Friday’s October employment report are the next important labor-market catalysts and could create sharp volatility around the marked zones.
A sustained H1 reclaim above 4,003 would weaken the immediate bearish continuation thesis and increase the probability of a deeper recovery.
Sell View
The sell-side view remains preferred, but location matters.
Selling directly around 3,949 offers less structural advantage while price is still recovering from demand.
The cleaner bearish POI is 3,984–4,003, where the rebound meets previous breakdown structure.
Final View
Gold is recovering, but the broader H1 structure has not yet turned bullish.
The immediate 3,938–3,956 demand zone is supporting the current bounce, while 3,984–4,003 remains the real directional test.
If sellers defend that retest zone, the chart continues to favor renewed downside pressure toward 3,868–3,883.
For now, the approach remains simple: let price complete the retracement first, then judge whether sellers are ready to resume control.
Trade ativo
Price is developing broadly in line with the projected plan. Gold extended lower from the 3,940–3,956 Current Demand Zone, dropped nearly $90, and produced a strong reaction from the lower structure before recovering back toward 3,952.
The rebound confirms that buyers are responding after the liquidity sweep, but the recovery is not complete yet. The next key area remains 3,984–4,003 Retest / Reaction Zone.
As long as price continues rebuilding above current demand, the corrective recovery remains valid. A rejection from 3,984–4,003 would then bring the bearish continuation scenario back into focus toward the 3,868–3,883 Major Downside Target.

Trading Gold the structured way — liquidity, order blocks, Ichimoku confluence
New idea every session. Follow + tap into the community → t.me/+aYglWgKtiPdkMGI9
Analysis, not advice. Trade your own plan.
New idea every session. Follow + tap into the community → t.me/+aYglWgKtiPdkMGI9
Analysis, not advice. Trade your own plan.
Publicações relacionadas
Aviso legal
As informações e publicações não se destinam a ser, e não constituem, conselhos ou recomendações financeiras, de investimento, comerciais ou de outro tipo fornecidos ou endossados pela TradingView. Leia mais nos Termos de Uso.
Trading Gold the structured way — liquidity, order blocks, Ichimoku confluence
New idea every session. Follow + tap into the community → t.me/+aYglWgKtiPdkMGI9
Analysis, not advice. Trade your own plan.
New idea every session. Follow + tap into the community → t.me/+aYglWgKtiPdkMGI9
Analysis, not advice. Trade your own plan.
Publicações relacionadas
Aviso legal
As informações e publicações não se destinam a ser, e não constituem, conselhos ou recomendações financeiras, de investimento, comerciais ou de outro tipo fornecidos ou endossados pela TradingView. Leia mais nos Termos de Uso.