
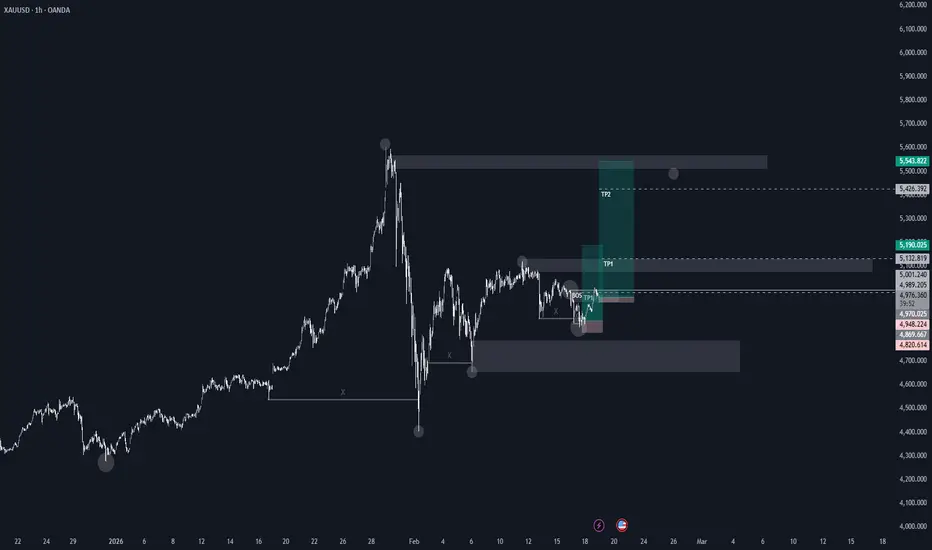
I saw price drop back into a strong demand zone that previously caused a sharp bullish move. That area clearly had strong buyers before, so I was interested to see how price would react when it returned.
When price came into the zone, it showed rejection with a long lower wick and started slowing down. That told me sellers were losing strength and buyers were stepping in again. After that, price broke a small internal structure to the upside, which gave me confirmation to enter long.
I placed my stop loss below the demand zone low, giving the trade room to breathe in case of a small liquidity sweep.
My first target (TP1) was set at the nearest resistance/supply area to secure partial profits. The second target (TP2) was set at the higher supply zone where price previously reacted strongly.
Overall, this was a clean price action setup:
Strong move → return to demand → rejection → structure break → continuation toward supply.
I followed my plan and waited for confirmation instead of entering blindly.
When price came into the zone, it showed rejection with a long lower wick and started slowing down. That told me sellers were losing strength and buyers were stepping in again. After that, price broke a small internal structure to the upside, which gave me confirmation to enter long.
I placed my stop loss below the demand zone low, giving the trade room to breathe in case of a small liquidity sweep.
My first target (TP1) was set at the nearest resistance/supply area to secure partial profits. The second target (TP2) was set at the higher supply zone where price previously reacted strongly.
Overall, this was a clean price action setup:
Strong move → return to demand → rejection → structure break → continuation toward supply.
I followed my plan and waited for confirmation instead of entering blindly.
Nota
2.33 RR Secured, Holding for Full Continuation 🎯Price returned to a strong demand zone that previously created an impulsive bullish move. I waited for confirmation — rejection from the zone and a small break of internal structure to the upside — before entering long.
Stop loss was placed below the demand low, allowing room for a possible liquidity sweep.
Price reacted well and pushed into the first resistance area where I secured 2.33 RR (partial profits).
Now I’m holding the remaining position for full continuation toward the higher supply zone (TP2).
Trade ativo
GOLD STILL BEARISHWait for a clear bullish candle close above the red circle or a liquidity sweep above it (a wick to take out sellers) to confirm the potential for a new HH

Aviso legal
As informações e publicações não se destinam a ser, e não constituem, conselhos ou recomendações financeiras, de investimento, comerciais ou de outro tipo fornecidos ou endossados pela TradingView. Leia mais nos Termos de Uso.
Aviso legal
As informações e publicações não se destinam a ser, e não constituem, conselhos ou recomendações financeiras, de investimento, comerciais ou de outro tipo fornecidos ou endossados pela TradingView. Leia mais nos Termos de Uso.