Atualizado
Multi Pattern Candle Reversal RR System [ChartTechnicalx]
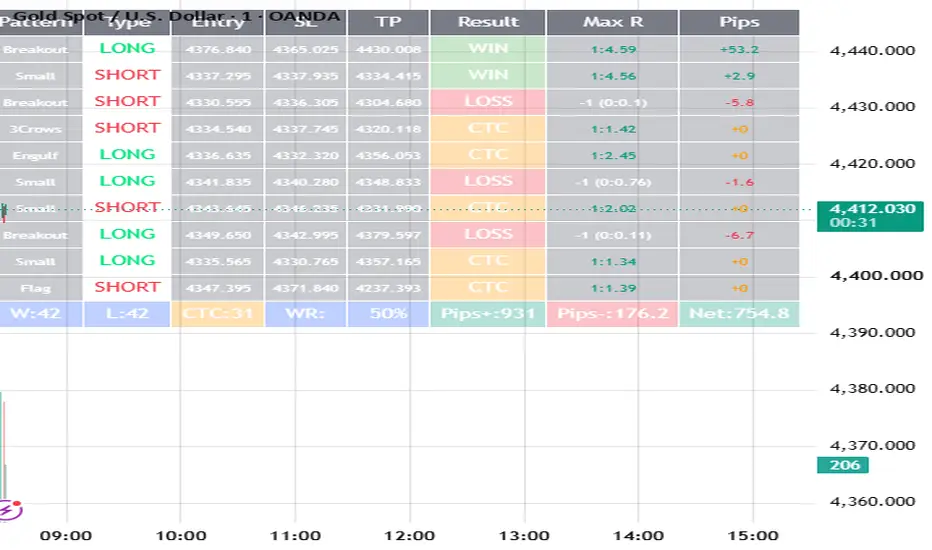
A multi-pattern reversal/breakout scanner with automatic risk:reward boxes, forward trade tracking, and a live win-rate table.
This tool scans price action for four distinct setups — small-candle rejections, engulfing reversals, compression breakouts, and pole-and-flag structures — and, when one fires, plots the entry, stop-loss, and take-profit as boxes projected forward on the chart. Every signal is tracked bar-by-bar against its SL/TP so you get an honest, non-repainting record of how each pattern actually performed, summarized in an on-chart results table (win / loss / close-to-cost / win rate).
No repainting: every signal and every trade outcome is calculated only on confirmed (closed) bars.
How it works
The indicator looks for four independent pattern types. Any of them can trigger a long or short signal; you can enable/disable each one separately.
1. Small Candle Pattern

A small-bodied rejection candle at a fresh swing low/high, followed by a small-bodied confirmation candle in the same direction.
Small Body Max (x ATR) – caps how big candle 1 and candle 2's bodies can be, relative to ATR, to still count as "small."
Min Wick / Body Ratio (Candle 1) – how long candle 1's rejection wick must be relative to its own body.
Both candles must occur at a fresh low (longs) or high (shorts) versus the Pivot Lookback Bars.
2. Engulfing Pattern

A classic bullish/bearish engulfing candle occurring at a fresh swing low/high, with three optional confirmation filters:
Require Engulf Size Ratio – candle 2's body must be at least N× candle 1's body.
Require Volume Spike – candle 2's volume must exceed its average by a set multiple.
Require Strong Close – candle 2 must close within the top/bottom X% of its own high-low range (rules out engulfing candles with long opposing wicks/indecisive closes).
3. Compression Breakout Pattern

Catches violent expansion candles breaking out of a tight multi-bar base — the move the other two patterns miss because there's no small candle or engulfing shape involved, just a coil followed by a release.
Base Lookback (bars) – how many bars immediately before the signal candle are checked for a tight base.
Max Base Range (x ATR) – how tight that base's high-low range must be.
Min Breakout Candle Body (x ATR) – how large the signal candle's body must be to count as a genuine expansion rather than noise.
4. Flag Pattern

Pole + flag structures: a sharp impulse candle, a tight consolidation right after it, then a decisive breakout of that consolidation.
Min Pole Candle Body (x ATR) – how large the impulse candle must be.
Pole Search Window (bars before flag) – instead of requiring the pole to sit on one exact bar, the indicator scans this many bars before the flag and uses whichever one has the biggest body. This makes detection far more reliable on real charts, where the impulse candle rarely lands on a perfectly fixed offset.
Flag Consolidation Bars – how many tight bars make up the flag.
Max Flag Range (x ATR) – how tight the consolidation must be.
Min Breakout Candle Body (x ATR) – how decisive the breakout candle must be.
Only Signal Reversal vs Pole – when ON, only fires when the breakout direction is opposite the pole (spike up → tight pullback → breaks down, or vice versa — an exhaustion/blow-off structure). When OFF (default), it also catches same-direction continuation flags.
Show Flag Consolidation Zones (debug) – draws every detected pole+flag setup on the chart, even ones that never break out, so you can visually see why a flag you spotted by eye didn't fire (range too wide, breakout candle too small, etc).
Chop / Range Filter
Reversal and breakout patterns are far less reliable inside dead, sideways chop. This section filters signals by market condition:
Require Trending Market (ADX) – blocks signals unless ADX is above your threshold.
Min ADX to Allow Signal – the ADX floor (20–25 is the common baseline for "trending").
Override: Allow if ADX Rising – ADX is a lagging indicator, so a brand-new trend's first few bars often still show low ADX. If ADX has been climbing over the lookback window, the signal is allowed through anyway.
Override: Allow on Volatility Breakout – if the signal candle's own range is a large expansion versus ATR, that's independent evidence of a trend starting, so the signal is allowed even if the ADX checks fail.
Enable Signal Cooldown – enforces a minimum number of bars between signals, preventing clustered, overlapping signals during choppy stretches.
Require Range Expansion (ATR vs ATR-MA) – optional extra filter that blocks signals when current volatility (ATR) is below its own moving average, i.e., the market is quiet/contracting.
Trade Settings
Reward : Risk Ratio – sets the take-profit distance as a multiple of the stop-loss distance for every signal.
Box Forward Extension (bars) – how far forward the entry/SL/TP boxes are drawn.
Enable CTC (Close-To-Cost) Outcome – if price runs in your favor far enough (see below) before hitting stop-loss, the trade is logged as CTC instead of a full loss, reflecting a realistic breakeven-plus stop management approach rather than assuming you'd sit through a full round-trip back to your original stop.
CTC Threshold (min R reached before SL) – the minimum favorable excursion, in R multiples, required before a stop-out counts as CTC instead of a loss.
Table Settings
Show Trade Results Table – toggles the on-chart performance table.
Max Trades Shown – how many recent trades are listed.
Table Position – corner placement.
The table logs every signal with its pattern type, direction, entry/SL/TP, result (WIN/LOSS/CTC), and the maximum R multiple reached — plus running totals and a win rate that excludes CTC trades from both the win and loss counts (since they're neither).
Suggested starting settings
These are reasonable defaults to start from — always forward-test and adjust for your instrument, timeframe, and volatility profile before trading live:
Setting Suggested value Why
ATR Length 14 Standard volatility baseline
Pivot Lookback Bars 5–8 Confirms a genuine fresh swing point without being too strict
Small Body Max (x ATR) 0.4–0.6 Keep tight so "small" candles stay meaningfully small
Engulf Size Ratio 1.3–1.5x Filters out marginal engulfing candles
Require Volume Spike On, 1.2x+ Volume confirmation reduces false engulfs significantly
Compression Base Range 1.0–1.5x ATR Tighter = higher quality but fewer signals
Flag Pole Body 1.3–1.8x ATR Should clearly stand out from surrounding candles
Flag Range 1.0–1.3x ATR A true flag should be visibly tight vs. the pole
ADX Threshold 20–25 20 is looser/more signals, 25 is stricter/higher quality
Reward:Risk 2:1 to 3:1 Balances win rate against payout; lower R:R needs a higher win rate to be profitable
Signal Cooldown 8–15 bars Prevents signal clustering in choppy conditions
On lower timeframes (1m–5m) and noisy instruments (gold, indices), lean toward tighter compression/flag ranges and a higher ADX floor to cut down on false breakouts. On higher timeframes (1H+), the default settings tend to hold up well as-is.
Notes
This indicator does not repaint: signals and their outcomes are only finalized on confirmed, closed bars.
The trade results table reflects this indicator's rule-based SL/TP simulation, not a full backtest with fees, slippage, or position sizing — treat it as a pattern-quality gauge, not a P&L guarantee.
This is a tool for identifying and evaluating patterns, not financial advice. Always manage your own risk.
This tool scans price action for four distinct setups — small-candle rejections, engulfing reversals, compression breakouts, and pole-and-flag structures — and, when one fires, plots the entry, stop-loss, and take-profit as boxes projected forward on the chart. Every signal is tracked bar-by-bar against its SL/TP so you get an honest, non-repainting record of how each pattern actually performed, summarized in an on-chart results table (win / loss / close-to-cost / win rate).
No repainting: every signal and every trade outcome is calculated only on confirmed (closed) bars.
How it works
The indicator looks for four independent pattern types. Any of them can trigger a long or short signal; you can enable/disable each one separately.
1. Small Candle Pattern
A small-bodied rejection candle at a fresh swing low/high, followed by a small-bodied confirmation candle in the same direction.
Small Body Max (x ATR) – caps how big candle 1 and candle 2's bodies can be, relative to ATR, to still count as "small."
Min Wick / Body Ratio (Candle 1) – how long candle 1's rejection wick must be relative to its own body.
Both candles must occur at a fresh low (longs) or high (shorts) versus the Pivot Lookback Bars.
2. Engulfing Pattern
A classic bullish/bearish engulfing candle occurring at a fresh swing low/high, with three optional confirmation filters:
Require Engulf Size Ratio – candle 2's body must be at least N× candle 1's body.
Require Volume Spike – candle 2's volume must exceed its average by a set multiple.
Require Strong Close – candle 2 must close within the top/bottom X% of its own high-low range (rules out engulfing candles with long opposing wicks/indecisive closes).
3. Compression Breakout Pattern
Catches violent expansion candles breaking out of a tight multi-bar base — the move the other two patterns miss because there's no small candle or engulfing shape involved, just a coil followed by a release.
Base Lookback (bars) – how many bars immediately before the signal candle are checked for a tight base.
Max Base Range (x ATR) – how tight that base's high-low range must be.
Min Breakout Candle Body (x ATR) – how large the signal candle's body must be to count as a genuine expansion rather than noise.
4. Flag Pattern
Pole + flag structures: a sharp impulse candle, a tight consolidation right after it, then a decisive breakout of that consolidation.
Min Pole Candle Body (x ATR) – how large the impulse candle must be.
Pole Search Window (bars before flag) – instead of requiring the pole to sit on one exact bar, the indicator scans this many bars before the flag and uses whichever one has the biggest body. This makes detection far more reliable on real charts, where the impulse candle rarely lands on a perfectly fixed offset.
Flag Consolidation Bars – how many tight bars make up the flag.
Max Flag Range (x ATR) – how tight the consolidation must be.
Min Breakout Candle Body (x ATR) – how decisive the breakout candle must be.
Only Signal Reversal vs Pole – when ON, only fires when the breakout direction is opposite the pole (spike up → tight pullback → breaks down, or vice versa — an exhaustion/blow-off structure). When OFF (default), it also catches same-direction continuation flags.
Show Flag Consolidation Zones (debug) – draws every detected pole+flag setup on the chart, even ones that never break out, so you can visually see why a flag you spotted by eye didn't fire (range too wide, breakout candle too small, etc).
Chop / Range Filter
Reversal and breakout patterns are far less reliable inside dead, sideways chop. This section filters signals by market condition:
Require Trending Market (ADX) – blocks signals unless ADX is above your threshold.
Min ADX to Allow Signal – the ADX floor (20–25 is the common baseline for "trending").
Override: Allow if ADX Rising – ADX is a lagging indicator, so a brand-new trend's first few bars often still show low ADX. If ADX has been climbing over the lookback window, the signal is allowed through anyway.
Override: Allow on Volatility Breakout – if the signal candle's own range is a large expansion versus ATR, that's independent evidence of a trend starting, so the signal is allowed even if the ADX checks fail.
Enable Signal Cooldown – enforces a minimum number of bars between signals, preventing clustered, overlapping signals during choppy stretches.
Require Range Expansion (ATR vs ATR-MA) – optional extra filter that blocks signals when current volatility (ATR) is below its own moving average, i.e., the market is quiet/contracting.
Trade Settings
Reward : Risk Ratio – sets the take-profit distance as a multiple of the stop-loss distance for every signal.
Box Forward Extension (bars) – how far forward the entry/SL/TP boxes are drawn.
Enable CTC (Close-To-Cost) Outcome – if price runs in your favor far enough (see below) before hitting stop-loss, the trade is logged as CTC instead of a full loss, reflecting a realistic breakeven-plus stop management approach rather than assuming you'd sit through a full round-trip back to your original stop.
CTC Threshold (min R reached before SL) – the minimum favorable excursion, in R multiples, required before a stop-out counts as CTC instead of a loss.
Table Settings
Show Trade Results Table – toggles the on-chart performance table.
Max Trades Shown – how many recent trades are listed.
Table Position – corner placement.
The table logs every signal with its pattern type, direction, entry/SL/TP, result (WIN/LOSS/CTC), and the maximum R multiple reached — plus running totals and a win rate that excludes CTC trades from both the win and loss counts (since they're neither).
Suggested starting settings
These are reasonable defaults to start from — always forward-test and adjust for your instrument, timeframe, and volatility profile before trading live:
Setting Suggested value Why
ATR Length 14 Standard volatility baseline
Pivot Lookback Bars 5–8 Confirms a genuine fresh swing point without being too strict
Small Body Max (x ATR) 0.4–0.6 Keep tight so "small" candles stay meaningfully small
Engulf Size Ratio 1.3–1.5x Filters out marginal engulfing candles
Require Volume Spike On, 1.2x+ Volume confirmation reduces false engulfs significantly
Compression Base Range 1.0–1.5x ATR Tighter = higher quality but fewer signals
Flag Pole Body 1.3–1.8x ATR Should clearly stand out from surrounding candles
Flag Range 1.0–1.3x ATR A true flag should be visibly tight vs. the pole
ADX Threshold 20–25 20 is looser/more signals, 25 is stricter/higher quality
Reward:Risk 2:1 to 3:1 Balances win rate against payout; lower R:R needs a higher win rate to be profitable
Signal Cooldown 8–15 bars Prevents signal clustering in choppy conditions
On lower timeframes (1m–5m) and noisy instruments (gold, indices), lean toward tighter compression/flag ranges and a higher ADX floor to cut down on false breakouts. On higher timeframes (1H+), the default settings tend to hold up well as-is.
Notes
This indicator does not repaint: signals and their outcomes are only finalized on confirmed, closed bars.
The trade results table reflects this indicator's rule-based SL/TP simulation, not a full backtest with fees, slippage, or position sizing — treat it as a pattern-quality gauge, not a P&L guarantee.
This is a tool for identifying and evaluating patterns, not financial advice. Always manage your own risk.
Notas de Lançamento
Added default best settings for good results.Notas de Lançamento
Updated settings for 'Compression Breakout Pattern'Notas de Lançamento
Updated new Pattern and pips lost and gained 
Aviso legal
As informações e publicações não se destinam a ser, e não constituem, conselhos ou recomendações financeiras, de investimento, comerciais ou de outro tipo fornecidos ou endossados pela TradingView. Leia mais nos Termos de Uso.
Aviso legal
As informações e publicações não se destinam a ser, e não constituem, conselhos ou recomendações financeiras, de investimento, comerciais ou de outro tipo fornecidos ou endossados pela TradingView. Leia mais nos Termos de Uso.