
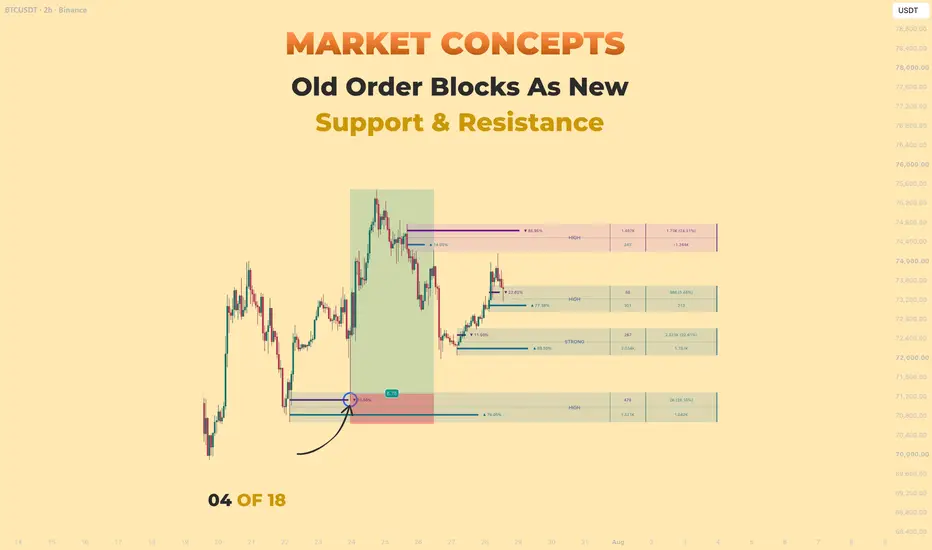
Lesson 4 - Turning Old Order Blocks Into New Support & Resistance
Difficulty: Intermediate
Some of the strongest levels on a chart aren't drawn as support or resistance at all — they started life as order blocks. Learning to see this shift changes how you read the entire chart.

🔵 THE HIDDEN LIFECYCLE OF A ZONE
Most traders think of order blocks as trade setups: price returns to a zone, you take the entry, done. But many zones have a much longer life than that.
Once a zone has been tested — even once — it starts behaving differently. It stops being a fresh entry area and starts acting like a reference level on the chart. Sometimes it holds. Sometimes it breaks. Sometimes it flips roles entirely — a zone that was supporting price starts rejecting it, or the other way around.
That transition — from fresh order block, to tested level, to acting as ongoing support or resistance — is one of the most useful patterns to recognize. It gives you levels that other traders don't see, because they were never drawn as support or resistance in the first place.
🔵 HOW AN ORDER BLOCK BECOMES A LEVEL
A fresh order block reflects the last place one side took control. When price returns and reacts strongly, that reaction confirms the zone was real — buyers or sellers stepped in exactly where they were expected to.
But something else happens in that moment: the zone is now visible to everyone watching that chart. Every trader who noticed the reaction now treats that price area as important. And that shared attention is exactly what turns a private zone into a public level.
The zone still marks the same price range as before. But now it's carrying two things at once: its original meaning (where one side lost control) and its new meaning (a level the market is actively watching).

🔵 THE SUPPORT-TO-RESISTANCE FLIP
The most powerful version of this pattern is when a zone flips its role.
A bullish order block was providing support — price kept bouncing off it. Then price finally breaks below and closes through. That zone doesn't just disappear — it inverts. What was floor becomes ceiling. When price later rallies back up to that same area, it often gets rejected there, because the traders who were long from that zone are now underwater and looking to exit at breakeven.
The reverse works too: a bearish order block acting as resistance, that eventually gets broken above, can flip into support on the next pullback.
This flip isn't guaranteed — nothing in trading is — but it's one of the more reliable patterns because the mechanics behind it are logical. Underwater positions, misplaced stops, and the memory of previous reactions all cluster at the same price area.

The first frame shows the zone doing its original job as support — holding price up.

The second frame shows what happens next — the support breaks, price returns to test it from below, and instead of pushing through, it gets rejected. The floor has officially become the ceiling.
🔵 HOW TO SPOT A ZONE THAT'S ALREADY FLIPPED
A few visual clues that a zone has transitioned from active order block to structural level:
- Price has already tested the zone multiple times and each test produced a reaction
- The zone was broken cleanly (with a decisive close through, not just a wick)
- Price is now trading on the opposite side of the zone from where it started
- On a return, price stalls or reverses at that same area — without needing any fresh setup
When all four line up, you're looking at a level that carries the weight of an order block plus the confirmation of repeated testing. That combination is what makes these levels reliable.
🔵 USING FLIPPED ZONES IN YOUR TRADING
Flipped zones aren't just observations — they're some of the cleanest trade setups on the chart, because the level has already proven itself twice: once as its original role, and once as its flipped role.
Here's what a flipped zone setup can look like in practice: a zone that was previously acting as support gets broken. Price later rallies back up to test it from below, and instead of pushing through, a clear rejection candle forms right at the level. That rejection is the signal — the flip is confirmed, and a short can be taken from that exact spot, with a stop just above the zone.

A few practical ways to work with flipped zones:
- Use them as high-quality entry setups when a clean rejection candle forms at the flipped level
- Use them as targets. If you're long from a fresh setup below, a flipped zone above can be a natural place to take partial profit
- Use them as invalidation. If price cleanly closes back through a flipped zone in the opposite direction, that often signals the flip has failed and the original bias is back in play
- Combine them with fresh order blocks nearby. A fresh zone that lines up with an older flipped zone from the same area carries more weight than either would alone
🔵 COMMON MISTAKES TO AVOID
- Assuming every broken zone will flip — most won't, and forcing the pattern where it isn't there leads to bad trades
- Ignoring the timeframe — a flip on a 5-minute chart carries much less weight than the same flip on a 4-hour chart
- Treating a flipped zone as a guaranteed level — it's a probabilistic edge, not a rule
- Getting stubborn when a flipped zone fails — if price closes decisively back through, the flip is done
🐳 PRO TIPS
- Zones that were originally rated High or Strong tend to produce cleaner flips than Weak zones, because they had more real conviction behind them to begin with
- A flipped zone that also lines up with a prior swing high or low, or a psychological level like a round number, is worth extra attention
- The strongest flips often happen when the break was accompanied by a clear structural shift on higher timeframes — the flip isn't just a local pattern, it's part of a bigger move
- Waiting for a rejection candle at the flipped level, rather than entering blind, filters out flips that were never real to begin with
Have you spotted a zone that flipped roles recently and produced a clean trade? Drop your example below 🐳
Market Concepts — All Lessons
Lesson 01 — What Order Blocks Are
Lesson 02 — Zone Strength Isn't About Size
Lesson 03 — Entering Trades With Order Blocks
Best Regards, BigBeluga 🐳
Difficulty: Intermediate
Some of the strongest levels on a chart aren't drawn as support or resistance at all — they started life as order blocks. Learning to see this shift changes how you read the entire chart.
🔵 THE HIDDEN LIFECYCLE OF A ZONE
Most traders think of order blocks as trade setups: price returns to a zone, you take the entry, done. But many zones have a much longer life than that.
Once a zone has been tested — even once — it starts behaving differently. It stops being a fresh entry area and starts acting like a reference level on the chart. Sometimes it holds. Sometimes it breaks. Sometimes it flips roles entirely — a zone that was supporting price starts rejecting it, or the other way around.
That transition — from fresh order block, to tested level, to acting as ongoing support or resistance — is one of the most useful patterns to recognize. It gives you levels that other traders don't see, because they were never drawn as support or resistance in the first place.
🔵 HOW AN ORDER BLOCK BECOMES A LEVEL
A fresh order block reflects the last place one side took control. When price returns and reacts strongly, that reaction confirms the zone was real — buyers or sellers stepped in exactly where they were expected to.
But something else happens in that moment: the zone is now visible to everyone watching that chart. Every trader who noticed the reaction now treats that price area as important. And that shared attention is exactly what turns a private zone into a public level.
The zone still marks the same price range as before. But now it's carrying two things at once: its original meaning (where one side lost control) and its new meaning (a level the market is actively watching).
🔵 THE SUPPORT-TO-RESISTANCE FLIP
The most powerful version of this pattern is when a zone flips its role.
A bullish order block was providing support — price kept bouncing off it. Then price finally breaks below and closes through. That zone doesn't just disappear — it inverts. What was floor becomes ceiling. When price later rallies back up to that same area, it often gets rejected there, because the traders who were long from that zone are now underwater and looking to exit at breakeven.
The reverse works too: a bearish order block acting as resistance, that eventually gets broken above, can flip into support on the next pullback.
This flip isn't guaranteed — nothing in trading is — but it's one of the more reliable patterns because the mechanics behind it are logical. Underwater positions, misplaced stops, and the memory of previous reactions all cluster at the same price area.
The first frame shows the zone doing its original job as support — holding price up.
The second frame shows what happens next — the support breaks, price returns to test it from below, and instead of pushing through, it gets rejected. The floor has officially become the ceiling.
🔵 HOW TO SPOT A ZONE THAT'S ALREADY FLIPPED
A few visual clues that a zone has transitioned from active order block to structural level:
- Price has already tested the zone multiple times and each test produced a reaction
- The zone was broken cleanly (with a decisive close through, not just a wick)
- Price is now trading on the opposite side of the zone from where it started
- On a return, price stalls or reverses at that same area — without needing any fresh setup
When all four line up, you're looking at a level that carries the weight of an order block plus the confirmation of repeated testing. That combination is what makes these levels reliable.
🔵 USING FLIPPED ZONES IN YOUR TRADING
Flipped zones aren't just observations — they're some of the cleanest trade setups on the chart, because the level has already proven itself twice: once as its original role, and once as its flipped role.
Here's what a flipped zone setup can look like in practice: a zone that was previously acting as support gets broken. Price later rallies back up to test it from below, and instead of pushing through, a clear rejection candle forms right at the level. That rejection is the signal — the flip is confirmed, and a short can be taken from that exact spot, with a stop just above the zone.
A few practical ways to work with flipped zones:
- Use them as high-quality entry setups when a clean rejection candle forms at the flipped level
- Use them as targets. If you're long from a fresh setup below, a flipped zone above can be a natural place to take partial profit
- Use them as invalidation. If price cleanly closes back through a flipped zone in the opposite direction, that often signals the flip has failed and the original bias is back in play
- Combine them with fresh order blocks nearby. A fresh zone that lines up with an older flipped zone from the same area carries more weight than either would alone
🔵 COMMON MISTAKES TO AVOID
- Assuming every broken zone will flip — most won't, and forcing the pattern where it isn't there leads to bad trades
- Ignoring the timeframe — a flip on a 5-minute chart carries much less weight than the same flip on a 4-hour chart
- Treating a flipped zone as a guaranteed level — it's a probabilistic edge, not a rule
- Getting stubborn when a flipped zone fails — if price closes decisively back through, the flip is done
🐳 PRO TIPS
- Zones that were originally rated High or Strong tend to produce cleaner flips than Weak zones, because they had more real conviction behind them to begin with
- A flipped zone that also lines up with a prior swing high or low, or a psychological level like a round number, is worth extra attention
- The strongest flips often happen when the break was accompanied by a clear structural shift on higher timeframes — the flip isn't just a local pattern, it's part of a bigger move
- Waiting for a rejection candle at the flipped level, rather than entering blind, filters out flips that were never real to begin with
Have you spotted a zone that flipped roles recently and produced a clean trade? Drop your example below 🐳
Market Concepts — All Lessons
Lesson 01 — What Order Blocks Are
Lesson 02 — Zone Strength Isn't About Size
Lesson 03 — Entering Trades With Order Blocks
Best Regards, BigBeluga 🐳

🔵Gain access to our powerful tools : bigbeluga.com/tv
🔵Join our free discord for updates : discord.com/invite/FuW63RKgdc
All scripts & content provided by BigBeluga are for informational & educational purposes only.
🔵Join our free discord for updates : discord.com/invite/FuW63RKgdc
All scripts & content provided by BigBeluga are for informational & educational purposes only.
相关出版物
免责声明
这些信息和出版物并非旨在提供,也不构成TradingView提供或认可的任何形式的财务、投资、交易或其他类型的建议或推荐。请阅读使用条款了解更多信息。
🔵Gain access to our powerful tools : bigbeluga.com/tv
🔵Join our free discord for updates : discord.com/invite/FuW63RKgdc
All scripts & content provided by BigBeluga are for informational & educational purposes only.
🔵Join our free discord for updates : discord.com/invite/FuW63RKgdc
All scripts & content provided by BigBeluga are for informational & educational purposes only.
相关出版物
免责声明
这些信息和出版物并非旨在提供,也不构成TradingView提供或认可的任何形式的财务、投资、交易或其他类型的建议或推荐。请阅读使用条款了解更多信息。