
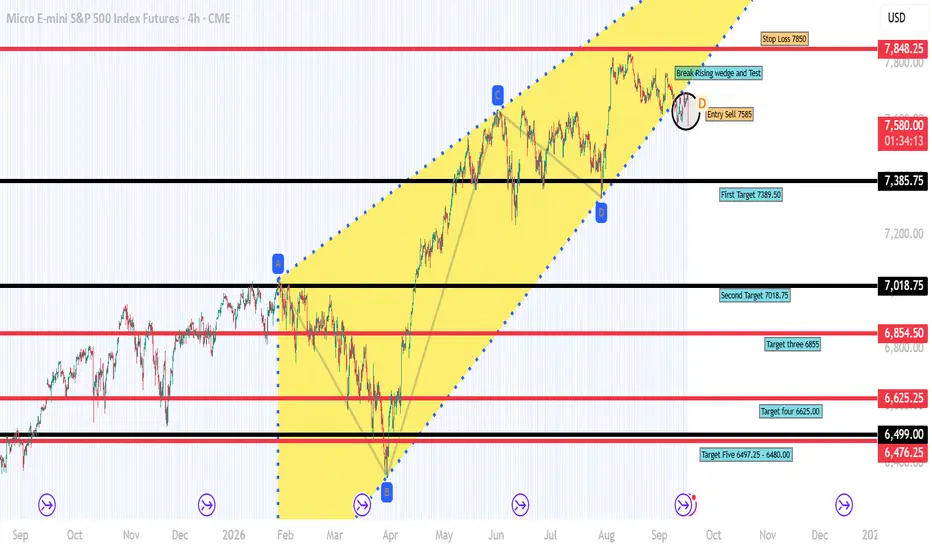
Market Structure & Overview:
The 4-hour chart displays a clear breakdown from a Rising Wedge / Ascending Channel structure, complemented by an ABCD harmonic structure. Price has completed a retest of the broken ascending trendline, confirming bearish pressure and offering a high-probability short opportunity.
Key Technical Factors:
Pattern Breakdown: Break & retest of the lower boundary of the Rising Wedge.
Harmonic Structure: Completion of point D near the top boundary, validating bearish control.
Confirmation: Price Action shows rejection at the retest area around 7,585.
Trade Parameters:
Action: Sell / Short
Entry: 7,585.00 (Break & Retest zone)
Stop Loss: 7,850.00 (Above recent swing high / resistance level)
Price Targets:
First Target (TP1): 7,389.50 (Key horizontal support)
Second Target (TP2): 7,018.75 (Major structural zone)
Third Target (TP3): 6,855.00 (Intermediate support level)
Fourth Target (TP4): 6,625.00 (Demand zone)
Fifth Target (TP5): 6,497.25 – 6,480.00 (Point B demand base / macro target)
Risk Management: Always manage position sizing according to your risk parameters. Protect capital by moving Stop Loss to breakeven once Target 1 is reached.
The 4-hour chart displays a clear breakdown from a Rising Wedge / Ascending Channel structure, complemented by an ABCD harmonic structure. Price has completed a retest of the broken ascending trendline, confirming bearish pressure and offering a high-probability short opportunity.
Key Technical Factors:
Pattern Breakdown: Break & retest of the lower boundary of the Rising Wedge.
Harmonic Structure: Completion of point D near the top boundary, validating bearish control.
Confirmation: Price Action shows rejection at the retest area around 7,585.
Trade Parameters:
Action: Sell / Short
Entry: 7,585.00 (Break & Retest zone)
Stop Loss: 7,850.00 (Above recent swing high / resistance level)
Price Targets:
First Target (TP1): 7,389.50 (Key horizontal support)
Second Target (TP2): 7,018.75 (Major structural zone)
Third Target (TP3): 6,855.00 (Intermediate support level)
Fourth Target (TP4): 6,625.00 (Demand zone)
Fifth Target (TP5): 6,497.25 – 6,480.00 (Point B demand base / macro target)
Risk Management: Always manage position sizing according to your risk parameters. Protect capital by moving Stop Loss to breakeven once Target 1 is reached.

免责声明
这些信息和出版物并非旨在提供,也不构成TradingView提供或认可的任何形式的财务、投资、交易或其他类型的建议或推荐。请阅读使用条款了解更多信息。
免责声明
这些信息和出版物并非旨在提供,也不构成TradingView提供或认可的任何形式的财务、投资、交易或其他类型的建议或推荐。请阅读使用条款了解更多信息。