OPEN-SOURCE SCRIPT
已更新 Zone-to-Zone Execution Engine + Pulse
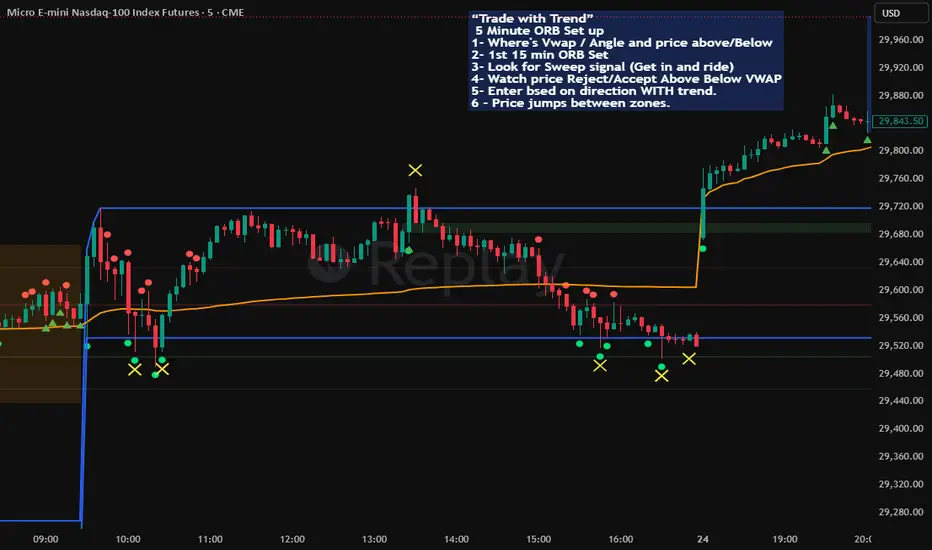
It marks areas where price previously moved away strongly, and assumes price may react there again.
These are:
Demand zones (where buying previously started)
Supply zones (where selling previously started)
Think of them as:
“places where something unfinished happened”
🟦 Step 1 — Identify zones
When you see a blue box:
That is a reaction zone
Price left that area with strength before
You don’t predict anything yet.
You just mark:
“this is a decision area”
🧭 Step 2 — Wait for price to return
You do NOTHING until price comes back to a zone.
There are only 3 situations:
1. Price approaches zone
→ prepare
2. Price enters zone
→ watch reaction closely
3. Price leaves zone
→ decision happens here
⚡ Step 3 — Watch reaction (this is the entire strategy)
When price touches the zone, you look for ONE thing:
Does it reject or break?
🔵 Bullish zone (demand)
Good reaction:
price dips into zone
wick below / push into it
then closes back up
👉 Meaning:
buyers defended the area
Expectation:
move up toward next supply zone
Bad reaction:
price falls through and keeps going
👉 Meaning:
zone failed
Ignore it after break
🔴 Bearish zone (supply)
Good reaction:
price pushes into zone
wicks above
closes back down
👉 Meaning:
sellers defended the area
Expectation:
move down toward next demand zone
Bad reaction:
price breaks through and holds above
👉 Zone is dead
📊 Step 4 — The only real rule: zone-to-zone movement
You are not trading bounces.
You are trading movement between zones:
Demand → Supply
Supply → Demand
That’s it.
🧠 Simple mental model
Think of price like this:
It builds pressure at zones
It releases toward the next zone
It repeats
So your job is NOT prediction.
It’s:
“Which zone is price leaving, and which zone is it likely heading to next?”
⚠️ What NOT to do
Avoid:
trading every touch
entering before reaction
assuming every zone will hold
forcing reversals in strong trends
🔥 Beginner rule (most important)
Only act after:
price touches a zone AND shows rejection
Not before.
🧭 One-line summary
Zone-to-zone trading is:
“Wait for price to hit a zone, confirm rejection, then ride it toward the next opposite zone.”
These are:
Demand zones (where buying previously started)
Supply zones (where selling previously started)
Think of them as:
“places where something unfinished happened”
🟦 Step 1 — Identify zones
When you see a blue box:
That is a reaction zone
Price left that area with strength before
You don’t predict anything yet.
You just mark:
“this is a decision area”
🧭 Step 2 — Wait for price to return
You do NOTHING until price comes back to a zone.
There are only 3 situations:
1. Price approaches zone
→ prepare
2. Price enters zone
→ watch reaction closely
3. Price leaves zone
→ decision happens here
⚡ Step 3 — Watch reaction (this is the entire strategy)
When price touches the zone, you look for ONE thing:
Does it reject or break?
🔵 Bullish zone (demand)
Good reaction:
price dips into zone
wick below / push into it
then closes back up
👉 Meaning:
buyers defended the area
Expectation:
move up toward next supply zone
Bad reaction:
price falls through and keeps going
👉 Meaning:
zone failed
Ignore it after break
🔴 Bearish zone (supply)
Good reaction:
price pushes into zone
wicks above
closes back down
👉 Meaning:
sellers defended the area
Expectation:
move down toward next demand zone
Bad reaction:
price breaks through and holds above
👉 Zone is dead
📊 Step 4 — The only real rule: zone-to-zone movement
You are not trading bounces.
You are trading movement between zones:
Demand → Supply
Supply → Demand
That’s it.
🧠 Simple mental model
Think of price like this:
It builds pressure at zones
It releases toward the next zone
It repeats
So your job is NOT prediction.
It’s:
“Which zone is price leaving, and which zone is it likely heading to next?”
⚠️ What NOT to do
Avoid:
trading every touch
entering before reaction
assuming every zone will hold
forcing reversals in strong trends
🔥 Beginner rule (most important)
Only act after:
price touches a zone AND shows rejection
Not before.
🧭 One-line summary
Zone-to-zone trading is:
“Wait for price to hit a zone, confirm rejection, then ride it toward the next opposite zone.”
版本注释
Update to change colors of zones for personal touch as well as some AI updating to give more accurate zones. adjust settings to your style. (if you not sure, paste source code to chat GPT and explain your style. 开源脚本
秉承TradingView的精神,该脚本的作者将其开源,以便交易者可以查看和验证其功能。向作者致敬!您可以免费使用该脚本,但请记住,重新发布代码须遵守我们的网站规则。

免责声明
这些信息和出版物并非旨在提供,也不构成TradingView提供或认可的任何形式的财务、投资、交易或其他类型的建议或推荐。请阅读使用条款了解更多信息。
免责声明
这些信息和出版物并非旨在提供,也不构成TradingView提供或认可的任何形式的财务、投资、交易或其他类型的建议或推荐。请阅读使用条款了解更多信息。