OPEN-SOURCE SCRIPT
EMA + RSI Trade Decision Table
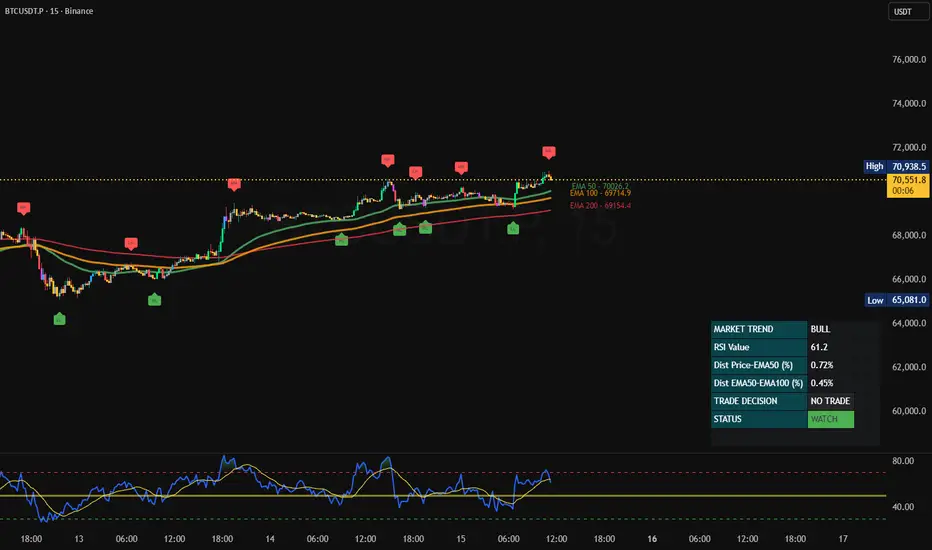
EMA + RSI Trade Decision Table
Indicator Explanation
This indicator is a rule-based trade decision system designed for 1-hour charts, focusing on clean trend pullbacks using EMA structure, RSI context, and confirmation filters.
It does not auto-trade. Instead, it evaluates market conditions and tells you when a trade is statistically justified.
1. Market Structure & Trend Detection
The indicator uses three EMAs:
EMA 50
EMA 100
EMA 200
Trend Regime
Bullish regime: EMA50 > EMA100
Bearish regime: EMA50 < EMA100
Optional confirmation: price above/below EMA200
The detected regime defines:
Whether longs or shorts are allowed
Which RSI zone is valid
This prevents trading against the dominant trend.
2. Dynamic RSI Zones (Context Filter)
RSI is not used as a simple overbought/oversold signal.
Instead, it adapts to the trend regime:
Bull market: higher RSI range allowed
Bear market: lower RSI range allowed
Additionally, a clean directional filter is applied:
Longs require RSI ≥ minimum long value
Shorts require RSI ≤ maximum short value
This avoids:
Longs in weak momentum
Shorts during strong bullish pressure
3. EMA Pullback & Rejection Logic
A trade is only considered if price performs a controlled pullback:
Price must touch EMA50 or EMA100 within a small tolerance
A rejection candle is required:
Long: candle closes bullish above EMA50
Short: candle closes bearish below EMA50
This ensures entries occur:
Close to structure
With confirmation, not anticipation
4. Distance & Risk Filters (Trade Quality)
To avoid late or low-quality entries, several blockers are used:
Price Distance Filter
If price is too far from EMA50, the trade is blocked
Prevents chasing extended moves
EMA Distance Filter
If EMA50 and EMA100 are too close, the market is considered choppy
Prevents trading in sideways conditions
Cooldown After EMA Cross
After EMA50/EMA100 cross, trades are blocked for a set number of candles
Avoids whipsaws during regime transitions
5. Confidence Score (0–100)
Each potential trade (long and short separately) receives a confidence score based on:
RSI position
Pullback & rejection quality
Trend alignment
EMA200 context
Distance and cooldown penalties
Scores are normalized between 0 and 100 and graded:
A (high quality)
B (acceptable)
C (low quality)
6. Trade Decision Logic
A trade becomes ENTRY-READY only if:
All required conditions are met
The confidence score exceeds the user-defined minimum
Possible outcomes:
LONG = YES
SHORT = YES
NO TRADE
The indicator never forces trades — it filters aggressively.
7. Status System (Decision Support)
The table displays a high-level status:
NO SETUP – no valid structure
PREPARE – conditions building
WATCH – high quality, waiting for confirmation
EXECUTE (LONG / SHORT) – entry conditions fulfilled
Status changes can trigger alerts (on candle close).
8. Table Modes
Compact
Quick overview: trend, RSI, distances, decision, status
Compact + Checks
Overview plus detailed condition checks (only when relevant)
Full Mode
Clean header showing:
Trend
Status
Trade decision
Followed by full long and short condition breakdown
Designed for decision clarity, not clutter.
9. Intended Use
This indicator is built for:
1H trend-pullback trading
Discretionary execution
High-quality setups with controlled frequency
It prioritizes:
Structure
Momentum
Risk control
Patience
Summary
Trade less, trade better. Ergün Özmen
Indicator Explanation
This indicator is a rule-based trade decision system designed for 1-hour charts, focusing on clean trend pullbacks using EMA structure, RSI context, and confirmation filters.
It does not auto-trade. Instead, it evaluates market conditions and tells you when a trade is statistically justified.
1. Market Structure & Trend Detection
The indicator uses three EMAs:
EMA 50
EMA 100
EMA 200
Trend Regime
Bullish regime: EMA50 > EMA100
Bearish regime: EMA50 < EMA100
Optional confirmation: price above/below EMA200
The detected regime defines:
Whether longs or shorts are allowed
Which RSI zone is valid
This prevents trading against the dominant trend.
2. Dynamic RSI Zones (Context Filter)
RSI is not used as a simple overbought/oversold signal.
Instead, it adapts to the trend regime:
Bull market: higher RSI range allowed
Bear market: lower RSI range allowed
Additionally, a clean directional filter is applied:
Longs require RSI ≥ minimum long value
Shorts require RSI ≤ maximum short value
This avoids:
Longs in weak momentum
Shorts during strong bullish pressure
3. EMA Pullback & Rejection Logic
A trade is only considered if price performs a controlled pullback:
Price must touch EMA50 or EMA100 within a small tolerance
A rejection candle is required:
Long: candle closes bullish above EMA50
Short: candle closes bearish below EMA50
This ensures entries occur:
Close to structure
With confirmation, not anticipation
4. Distance & Risk Filters (Trade Quality)
To avoid late or low-quality entries, several blockers are used:
Price Distance Filter
If price is too far from EMA50, the trade is blocked
Prevents chasing extended moves
EMA Distance Filter
If EMA50 and EMA100 are too close, the market is considered choppy
Prevents trading in sideways conditions
Cooldown After EMA Cross
After EMA50/EMA100 cross, trades are blocked for a set number of candles
Avoids whipsaws during regime transitions
5. Confidence Score (0–100)
Each potential trade (long and short separately) receives a confidence score based on:
RSI position
Pullback & rejection quality
Trend alignment
EMA200 context
Distance and cooldown penalties
Scores are normalized between 0 and 100 and graded:
A (high quality)
B (acceptable)
C (low quality)
6. Trade Decision Logic
A trade becomes ENTRY-READY only if:
All required conditions are met
The confidence score exceeds the user-defined minimum
Possible outcomes:
LONG = YES
SHORT = YES
NO TRADE
The indicator never forces trades — it filters aggressively.
7. Status System (Decision Support)
The table displays a high-level status:
NO SETUP – no valid structure
PREPARE – conditions building
WATCH – high quality, waiting for confirmation
EXECUTE (LONG / SHORT) – entry conditions fulfilled
Status changes can trigger alerts (on candle close).
8. Table Modes
Compact
Quick overview: trend, RSI, distances, decision, status
Compact + Checks
Overview plus detailed condition checks (only when relevant)
Full Mode
Clean header showing:
Trend
Status
Trade decision
Followed by full long and short condition breakdown
Designed for decision clarity, not clutter.
9. Intended Use
This indicator is built for:
1H trend-pullback trading
Discretionary execution
High-quality setups with controlled frequency
It prioritizes:
Structure
Momentum
Risk control
Patience
Summary
Trade less, trade better. Ergün Özmen
开源脚本
秉承TradingView的精神,该脚本的作者将其开源,以便交易者可以查看和验证其功能。向作者致敬!您可以免费使用该脚本,但请记住,重新发布代码须遵守我们的网站规则。

免责声明
这些信息和出版物并非旨在提供,也不构成TradingView提供或认可的任何形式的财务、投资、交易或其他类型的建议或推荐。请阅读使用条款了解更多信息。
免责声明
这些信息和出版物并非旨在提供,也不构成TradingView提供或认可的任何形式的财务、投资、交易或其他类型的建议或推荐。请阅读使用条款了解更多信息。