

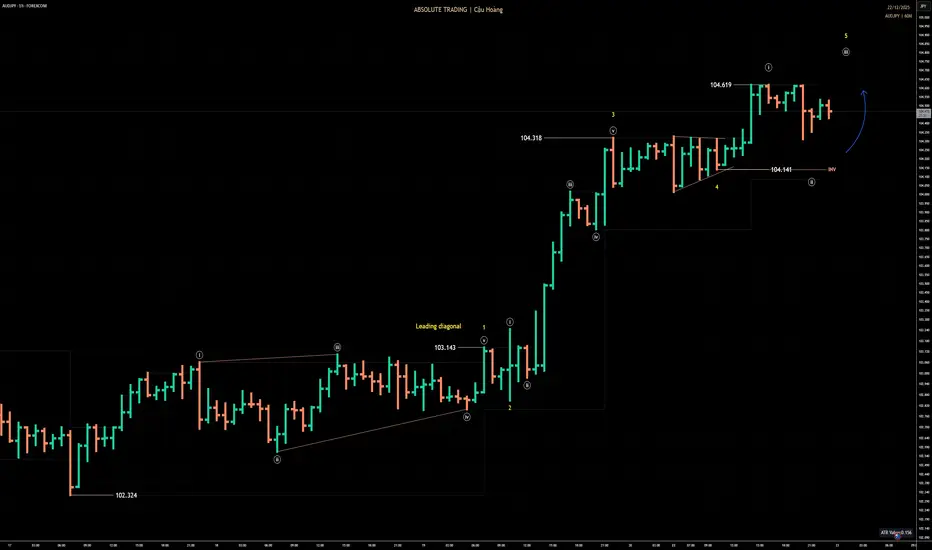
### 🔎 AUD/JPY — H1 | 22-12-2025 — Wave (ii) white correction, preparing for continuation of wave (iii) white within wave 5 yellow
• On the H1 timeframe, AUDJPY is trading within a **bullish Elliott Wave structure**, unfolding as an **impulsive sequence (i)–(ii)–(iii)–(iv)–(v) in white**.
• The initial **wave 1 in yellow** formed as a **leading diagonal**, setting the stage for a strong advance in **wave 3 in yellow** with clear bullish momentum.
• After completing **wave 3 in yellow** around the **104.318** area, the market entered a corrective phase in **wave 4 in yellow**, characterized by a shallow correction, indicating weakening selling pressure.
• As long as price holds firmly above the **104.141** level, the bullish structure remains intact, and **wave 5 in yellow** is expected to continue unfolding in the upcoming sessions.
### 📌 Preferred scenario (Bullish):
• Wait for **wave (ii) white** to complete and look for confirmation signals on lower timeframes to **buy in alignment with wave (iii) white of wave 5 yellow**, prioritizing trades that align with both structure and momentum.
### ⛔ Invalidation:
• A break below **104.141** invalidates the scenario and requires a full wave recount.
### 🧭 Trade tips:
*“Trade the structure — let the market confirm the wave.”*
• On the H1 timeframe, AUDJPY is trading within a **bullish Elliott Wave structure**, unfolding as an **impulsive sequence (i)–(ii)–(iii)–(iv)–(v) in white**.
• The initial **wave 1 in yellow** formed as a **leading diagonal**, setting the stage for a strong advance in **wave 3 in yellow** with clear bullish momentum.
• After completing **wave 3 in yellow** around the **104.318** area, the market entered a corrective phase in **wave 4 in yellow**, characterized by a shallow correction, indicating weakening selling pressure.
• As long as price holds firmly above the **104.141** level, the bullish structure remains intact, and **wave 5 in yellow** is expected to continue unfolding in the upcoming sessions.
### 📌 Preferred scenario (Bullish):
• Wait for **wave (ii) white** to complete and look for confirmation signals on lower timeframes to **buy in alignment with wave (iii) white of wave 5 yellow**, prioritizing trades that align with both structure and momentum.
### ⛔ Invalidation:
• A break below **104.141** invalidates the scenario and requires a full wave recount.
### 🧭 Trade tips:
*“Trade the structure — let the market confirm the wave.”*

Cậu Hoàng
t.me/cauhoang4554
t.me/cauhoang4554
Haftungsausschluss
Die Informationen und Veröffentlichungen sind nicht als Finanz-, Anlage-, Handels- oder andere Arten von Ratschlägen oder Empfehlungen gedacht, die von TradingView bereitgestellt oder gebilligt werden, und stellen diese nicht dar. Lesen Sie mehr in den Nutzungsbedingungen.
Cậu Hoàng
t.me/cauhoang4554
t.me/cauhoang4554
Haftungsausschluss
Die Informationen und Veröffentlichungen sind nicht als Finanz-, Anlage-, Handels- oder andere Arten von Ratschlägen oder Empfehlungen gedacht, die von TradingView bereitgestellt oder gebilligt werden, und stellen diese nicht dar. Lesen Sie mehr in den Nutzungsbedingungen.