

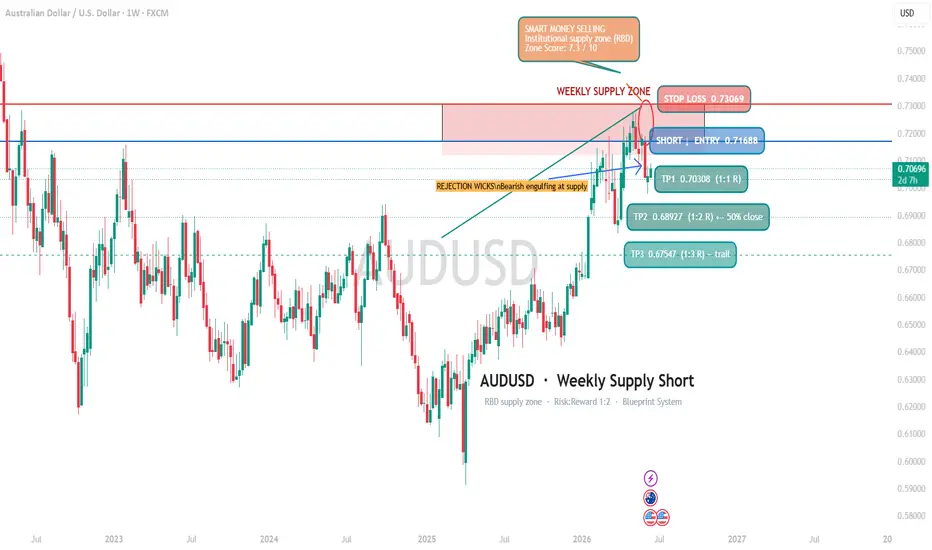
AUDUSD has staged a 1,270-pip recovery from its April 2026 lows at
0.5915 — and that 10-week rally has now delivered price directly into
the weekly supply zone that began the previous leg down. The level
between 0.7169 and 0.7307 is where institutions sold aggressively in
early 2025, producing a decisive drop. That zone has not been
re-tested since. The question now: are the same sellers still there?
---
MULTI-TIMEFRAME ANALYSIS
HTF (Weekly):
- Trend: Downtrend — lower highs and lower lows intact since the 2021 peak at 0.8007
- Location: Price at the top of the weekly range — expensive territory, consistent with a supply zone entry
LTF (Daily — zone details):
- Zone Type: RBD (Rally-Base-Drop) — supply zone
- Zone Range: 0.7169 (proximal) — 0.7307 (distal)
- Zone Quality Score: 7.3/10
- Departure: 10/10 — sharp, decisive leg out of the base
- Originality: 10/10 — never re-tested since formation
- Profit Margin: 10/10 — full target range clear of obstacles
- Arrival: 10/10 — clean impulse return to the zone
- Base Duration: 4/10
---
FUNDAMENTAL BIAS — 5-FACTOR ANALYSIS
- Valuation: Neutral — no opposing signal, gate passes for short
- COT Index: Neutral — no extreme positioning in AUD futures
- Seasonality: Neutral — June offers no directional edge for this pair
- Location: Bearish — price at expensive extreme of the weekly range
- Trend: Bearish — downtrend confirmed, lower highs and lower lows
Consensus: Location [+] + Trend [+] + Valuation [—] + COT [—] + Seasonality [—] = 2/5
Trade context: Standard with-trend — selling a counter-trend rally back into an established downtrend
Risk level: 0.5% (forex tier)
---

TRADE PLAN
Direction Short
Entry 0.7169 (zone proximal — confirmation entry)
Stop Loss 0.7307 (above zone distal — 138 pips)
Breakeven Move stop to entry at half-distance to Target 1
Target 1 0.7031 (1R — 138 pips) — stop to breakeven
Target 2 0.6893 (2R — 276 pips) — close 50% here
Target 3 0.6755 (3R — 414 pips) — trail remainder
R:R 1:2 to T2 / 1:3 to T3
Timeframe Weekly structure / Daily confirmation
Risk 0.5% max
---
INVALIDATION
The bearish thesis fails on a weekly close above 0.7307 — that breaks through the zone distal and signals the supply has been fully absorbed. A hawkish RBA pivot or significant USD weakness would also reverse the rate differential and flip this pair structurally bullish.
---
WHAT THIS SETUP TEACHES
A supply zone loses its edge each time it is re-tested, because every visit lets trapped sellers partially exit at breakeven — reducing the available sell orders. A zone that has never been re-visited since its formation still carries the full original order size. That is why first-test zones carry the highest probability in Blueprint methodology.
---
YOUR TURN
Are you watching AUDUSD from the short side — or do you think the recovery still has further to go? Drop your levels in the comments.
---
Educational analysis based on supply/demand methodology. Not financial advice. Always use proper risk management.
0.5915 — and that 10-week rally has now delivered price directly into
the weekly supply zone that began the previous leg down. The level
between 0.7169 and 0.7307 is where institutions sold aggressively in
early 2025, producing a decisive drop. That zone has not been
re-tested since. The question now: are the same sellers still there?
---
MULTI-TIMEFRAME ANALYSIS
HTF (Weekly):
- Trend: Downtrend — lower highs and lower lows intact since the 2021 peak at 0.8007
- Location: Price at the top of the weekly range — expensive territory, consistent with a supply zone entry
LTF (Daily — zone details):
- Zone Type: RBD (Rally-Base-Drop) — supply zone
- Zone Range: 0.7169 (proximal) — 0.7307 (distal)
- Zone Quality Score: 7.3/10
- Departure: 10/10 — sharp, decisive leg out of the base
- Originality: 10/10 — never re-tested since formation
- Profit Margin: 10/10 — full target range clear of obstacles
- Arrival: 10/10 — clean impulse return to the zone
- Base Duration: 4/10
---
FUNDAMENTAL BIAS — 5-FACTOR ANALYSIS
- Valuation: Neutral — no opposing signal, gate passes for short
- COT Index: Neutral — no extreme positioning in AUD futures
- Seasonality: Neutral — June offers no directional edge for this pair
- Location: Bearish — price at expensive extreme of the weekly range
- Trend: Bearish — downtrend confirmed, lower highs and lower lows
Consensus: Location [+] + Trend [+] + Valuation [—] + COT [—] + Seasonality [—] = 2/5
Trade context: Standard with-trend — selling a counter-trend rally back into an established downtrend
Risk level: 0.5% (forex tier)
---
TRADE PLAN
Direction Short
Entry 0.7169 (zone proximal — confirmation entry)
Stop Loss 0.7307 (above zone distal — 138 pips)
Breakeven Move stop to entry at half-distance to Target 1
Target 1 0.7031 (1R — 138 pips) — stop to breakeven
Target 2 0.6893 (2R — 276 pips) — close 50% here
Target 3 0.6755 (3R — 414 pips) — trail remainder
R:R 1:2 to T2 / 1:3 to T3
Timeframe Weekly structure / Daily confirmation
Risk 0.5% max
---
INVALIDATION
The bearish thesis fails on a weekly close above 0.7307 — that breaks through the zone distal and signals the supply has been fully absorbed. A hawkish RBA pivot or significant USD weakness would also reverse the rate differential and flip this pair structurally bullish.
---
WHAT THIS SETUP TEACHES
A supply zone loses its edge each time it is re-tested, because every visit lets trapped sellers partially exit at breakeven — reducing the available sell orders. A zone that has never been re-visited since its formation still carries the full original order size. That is why first-test zones carry the highest probability in Blueprint methodology.
---
YOUR TURN
Are you watching AUDUSD from the short side — or do you think the recovery still has further to go? Drop your levels in the comments.
---
Educational analysis based on supply/demand methodology. Not financial advice. Always use proper risk management.

Automate TradingView alerts to brokers no coding needed. Trade futures, forex, or crypto, copy trades across unlimited accounts, & control risk with ease.
For Tradovate: bit.ly/4a1KBrY
For all other supported brokers: bit.ly/4qEbU2G
For Tradovate: bit.ly/4a1KBrY
For all other supported brokers: bit.ly/4qEbU2G
Haftungsausschluss
Die Informationen und Veröffentlichungen sind nicht als Finanz-, Anlage-, Handels- oder andere Arten von Ratschlägen oder Empfehlungen gedacht, die von TradingView bereitgestellt oder gebilligt werden, und stellen diese nicht dar. Lesen Sie mehr in den Nutzungsbedingungen.
Automate TradingView alerts to brokers no coding needed. Trade futures, forex, or crypto, copy trades across unlimited accounts, & control risk with ease.
For Tradovate: bit.ly/4a1KBrY
For all other supported brokers: bit.ly/4qEbU2G
For Tradovate: bit.ly/4a1KBrY
For all other supported brokers: bit.ly/4qEbU2G
Haftungsausschluss
Die Informationen und Veröffentlichungen sind nicht als Finanz-, Anlage-, Handels- oder andere Arten von Ratschlägen oder Empfehlungen gedacht, die von TradingView bereitgestellt oder gebilligt werden, und stellen diese nicht dar. Lesen Sie mehr in den Nutzungsbedingungen.