
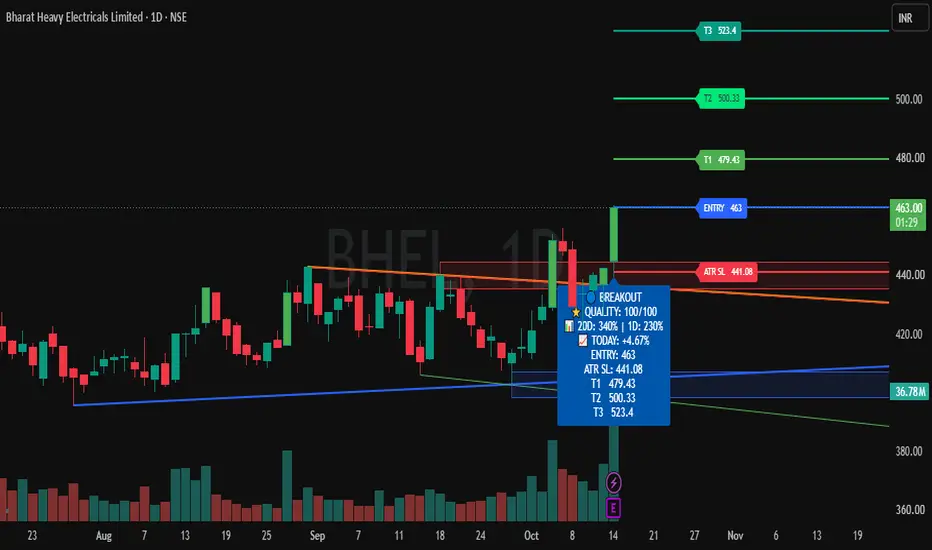
BHEL — BTST & SWING BREAKOUT SETUP
Entry, Stop Loss & Targets Are Clearly Defined — Helping You Plan Your Trade With Confidence.
📊 Stock Strength: 100/100
(Note: Higher score indicates stronger stock conditions, not guaranteed returns.)
A bullish breakout has appeared on the 1D timeframe with positive price action and strong volume expansion.
🔄 Trade Type: BTST & Swing Trade
────────────────────
🎯 TRADE LEVELS
ENTRY: ₹463
🛑 STOP LOSS
ATR SL: ₹441
🎯 TARGETS
T1: ₹479
T2: ₹500
T3: ₹523
────────────────────
📈 VOLUME
20D Volume: 335%
1D Volume: 227%
────────────────────
⏱ Timeframe: 1 Day
📌 Trade Entry: Take the trade only after 3:15 PM.
The position can be held for the next trading session or extended into a swing trade if the trend remains strong.
The setup is based on breakout structure, price action, volume strength and trend analysis.
────────────────────
📈 Risk Management
Stop Loss is compulsory. Consider position sizing according to your risk and avoid risking more than you can afford to lose.
────────────────────
⚠️ Disclaimer:
This is a technical analysis setup for educational purposes only and not a buy/sell recommendation. Please do your own research and manage risk before taking any trade.
Entry, Stop Loss & Targets Are Clearly Defined — Helping You Plan Your Trade With Confidence.
📊 Stock Strength: 100/100
(Note: Higher score indicates stronger stock conditions, not guaranteed returns.)
A bullish breakout has appeared on the 1D timeframe with positive price action and strong volume expansion.
🔄 Trade Type: BTST & Swing Trade
────────────────────
🎯 TRADE LEVELS
ENTRY: ₹463
🛑 STOP LOSS
ATR SL: ₹441
🎯 TARGETS
T1: ₹479
T2: ₹500
T3: ₹523
────────────────────
📈 VOLUME
20D Volume: 335%
1D Volume: 227%
────────────────────
⏱ Timeframe: 1 Day
📌 Trade Entry: Take the trade only after 3:15 PM.
The position can be held for the next trading session or extended into a swing trade if the trend remains strong.
The setup is based on breakout structure, price action, volume strength and trend analysis.
────────────────────
📈 Risk Management
Stop Loss is compulsory. Consider position sizing according to your risk and avoid risking more than you can afford to lose.
────────────────────
⚠️ Disclaimer:
This is a technical analysis setup for educational purposes only and not a buy/sell recommendation. Please do your own research and manage risk before taking any trade.

Haftungsausschluss
Die Informationen und Veröffentlichungen sind nicht als Finanz-, Anlage-, Handels- oder andere Arten von Ratschlägen oder Empfehlungen gedacht, die von TradingView bereitgestellt oder gebilligt werden, und stellen diese nicht dar. Lesen Sie mehr in den Nutzungsbedingungen.
Haftungsausschluss
Die Informationen und Veröffentlichungen sind nicht als Finanz-, Anlage-, Handels- oder andere Arten von Ratschlägen oder Empfehlungen gedacht, die von TradingView bereitgestellt oder gebilligt werden, und stellen diese nicht dar. Lesen Sie mehr in den Nutzungsbedingungen.