
Date: 27 October 2026
Timeframe: 15-Minute Chart
Previous Close: 22,719.20
━━━━━━━━━━━━━━━━━━
1. MARKET STRUCTURE
━━━━━━━━━━━━━━━━━━
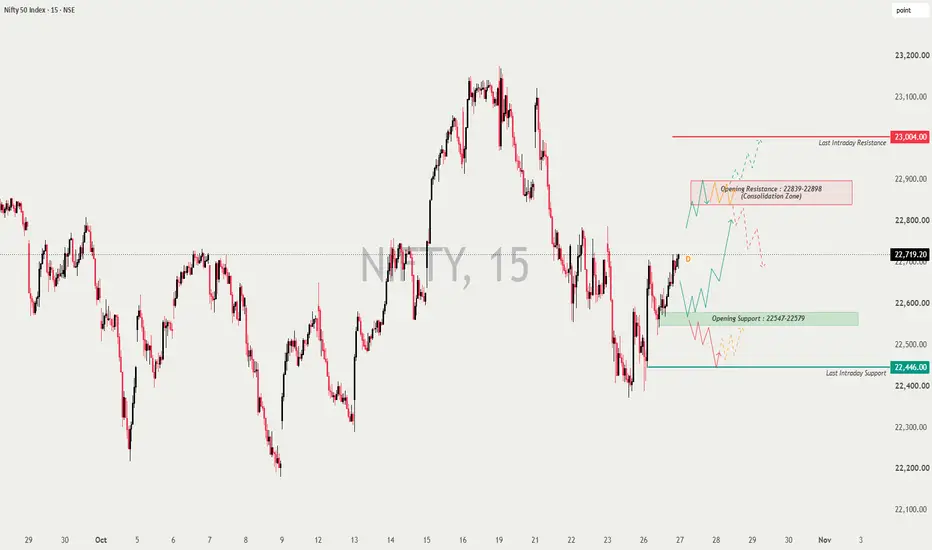
NIFTY has recovered from the recent swing low near 22,400–22,450 and is approaching the 22,839–22,898 resistance zone. The recovery is positive, but buyers need to confirm strength above resistance.
KEY LEVELS
🔴 Major Resistance: 23,004
🔴 Opening Resistance Zone: 22,839–22,898
⚫ Previous Close: 22,719
🟢 Opening Support Zone: 22,547–22,579
🟢 Last Intraday Support: 22,446
Market Psychology: Buyers are attempting a recovery, while sellers may defend the overhead supply zone. A confirmed breakout may trigger short covering; rejection could invite profit booking and fresh selling.
━━━━━━━━━━━━━━━━━━
2. OPENING SCENARIOS
━━━━━━━━━━━━━━━━━━
🟢 A. GAP-UP OPENING — 100+ POINTS
Reference: Opening above approximately 22,819.
• Bullish Continuation: Sustaining above 22,839–22,898, followed by a successful retest, may open the way toward 23,004.
• Rejection/Reversal: A sharp rejection from resistance followed by weakness toward support may trigger profit booking.
• Avoid: Chasing a large opening candle or buying directly into resistance.
• Confirmation: Wait for a 15-minute close and follow-through.
🟡 B. FLAT / NEAR-FLAT OPENING
• No-Trade Zone: 22,579–22,839 until a clear directional move develops.
• Bullish Setup: Breakout above 22,839–22,898 and a successful retest.
• Bearish Setup: Rejection from resistance followed by a confirmed breakdown below 22,547–22,579.
• Avoid: Trading the middle of the range without a clear trigger.
🔴 C. GAP-DOWN OPENING — 100+ POINTS
Reference: Opening below approximately 22,619.
• Bearish Continuation: Sustained trading below 22,547–22,579 may lead to a test of 22,446.
• Reversal / Short Covering: Reclaiming the support zone and holding a retest may support recovery toward 22,719.
• Failed Breakdown: If sellers cannot sustain the move below support, avoid chasing shorts.
• Avoid: Buying simply because the market has fallen sharply.
━━━━━━━━━━━━━━━━━━
3. LEVEL-BY-LEVEL ACTION PLAN
━━━━━━━━━━━━━━━━━━
🔴 22,839–22,898 — RESISTANCE ZONE
• Watch for rejection or a sustained breakout.
• Breakout + successful retest may offer a bullish setup toward 23,004.
• Rejection may lead to a pullback toward 22,719.
• Avoid fresh longs without confirmation.
🟢 22,547–22,579 — SUPPORT ZONE
• Holding the zone may attract buyers.
• Confirmed breakdown + failed retest may favour sellers targeting 22,446.
• A quick reclaim may indicate a failed breakdown.
• Avoid selling directly into support without confirmation.
🟢 22,446 — LAST INTRADAY SUPPORT
• A decisive break and sustained trading below it would weaken the recovery.
• Rejection of lower prices followed by a reclaim may trigger short covering.
• No lower target is marked on the chart; wait for fresh price-action confirmation.
🔴 23,004 — LAST INTRADAY RESISTANCE
• Breakout + successful retest may indicate further upside potential.
• Rejection may lead to profit booking.
• Do not assume a breakout before confirmation.
━━━━━━━━━━━━━━━━━━
4. FIRST 15–30 MINUTES
━━━━━━━━━━━━━━━━━━
1. Avoid impulsive entries immediately after the opening.
2. Mark the first 15-minute candle's high and low.
3. Observe price action around 22,839–22,898 and 22,547–22,579.
4. Prefer a 15-minute close with follow-through or a successful retest.
5. If price remains choppy between key levels, wait for a clearer setup.
━━━━━━━━━━━━━━━━━━
5. RISK MANAGEMENT
━━━━━━━━━━━━━━━━━━
• Define the stop-loss before entry using the setup's invalidation level.
• Keep position size aligned with your risk limit.
• Avoid revenge trading, FOMO entries and repeated trades inside a range.
• Reduce exposure near major support and resistance.
• Do not chase extended candles.
• If confirmation is missing:
NO TRADE — WAIT FOR CONFIRMATION.
━━━━━━━━━━━━━━━━━━
6. FINAL DECISION MAP
━━━━━━━━━━━━━━━━━━
🟢 BULLISH PATH
Sustained breakout above 22,839–22,898 → successful retest → potential test of 23,004.
🔴 BEARISH PATH
Rejection from resistance → breakdown below 22,547–22,579 → potential test of 22,446.
🟠 NO-TRADE / CHOP ZONE
Price remains between 22,579 and 22,839 without a confirmed directional setup.
DECISION FLOW:
Opening → Wait 15–30 minutes → Observe key zone → Confirm breakout/rejection → Execute with defined risk → Trail or exit.
Remember: Wait → Confirm → Execute → Manage → Exit.
Capital preservation is more important than participating in every move.
━━━━━━━━━━━━━━━━━━
DISCLAIMER
━━━━━━━━━━━━━━━━━━
I am not a SEBI-registered analyst. This content is for educational and informational purposes only and should not be considered investment advice or a recommendation to buy or sell any security. Trading involves substantial risk. Please conduct your own research and consult a SEBI-registered professional before making any investment or trading decision.
Timeframe: 15-Minute Chart
Previous Close: 22,719.20
━━━━━━━━━━━━━━━━━━
1. MARKET STRUCTURE
━━━━━━━━━━━━━━━━━━
NIFTY has recovered from the recent swing low near 22,400–22,450 and is approaching the 22,839–22,898 resistance zone. The recovery is positive, but buyers need to confirm strength above resistance.
KEY LEVELS
🔴 Major Resistance: 23,004
🔴 Opening Resistance Zone: 22,839–22,898
⚫ Previous Close: 22,719
🟢 Opening Support Zone: 22,547–22,579
🟢 Last Intraday Support: 22,446
Market Psychology: Buyers are attempting a recovery, while sellers may defend the overhead supply zone. A confirmed breakout may trigger short covering; rejection could invite profit booking and fresh selling.
━━━━━━━━━━━━━━━━━━
2. OPENING SCENARIOS
━━━━━━━━━━━━━━━━━━
🟢 A. GAP-UP OPENING — 100+ POINTS
Reference: Opening above approximately 22,819.
• Bullish Continuation: Sustaining above 22,839–22,898, followed by a successful retest, may open the way toward 23,004.
• Rejection/Reversal: A sharp rejection from resistance followed by weakness toward support may trigger profit booking.
• Avoid: Chasing a large opening candle or buying directly into resistance.
• Confirmation: Wait for a 15-minute close and follow-through.
🟡 B. FLAT / NEAR-FLAT OPENING
• No-Trade Zone: 22,579–22,839 until a clear directional move develops.
• Bullish Setup: Breakout above 22,839–22,898 and a successful retest.
• Bearish Setup: Rejection from resistance followed by a confirmed breakdown below 22,547–22,579.
• Avoid: Trading the middle of the range without a clear trigger.
🔴 C. GAP-DOWN OPENING — 100+ POINTS
Reference: Opening below approximately 22,619.
• Bearish Continuation: Sustained trading below 22,547–22,579 may lead to a test of 22,446.
• Reversal / Short Covering: Reclaiming the support zone and holding a retest may support recovery toward 22,719.
• Failed Breakdown: If sellers cannot sustain the move below support, avoid chasing shorts.
• Avoid: Buying simply because the market has fallen sharply.
━━━━━━━━━━━━━━━━━━
3. LEVEL-BY-LEVEL ACTION PLAN
━━━━━━━━━━━━━━━━━━
🔴 22,839–22,898 — RESISTANCE ZONE
• Watch for rejection or a sustained breakout.
• Breakout + successful retest may offer a bullish setup toward 23,004.
• Rejection may lead to a pullback toward 22,719.
• Avoid fresh longs without confirmation.
🟢 22,547–22,579 — SUPPORT ZONE
• Holding the zone may attract buyers.
• Confirmed breakdown + failed retest may favour sellers targeting 22,446.
• A quick reclaim may indicate a failed breakdown.
• Avoid selling directly into support without confirmation.
🟢 22,446 — LAST INTRADAY SUPPORT
• A decisive break and sustained trading below it would weaken the recovery.
• Rejection of lower prices followed by a reclaim may trigger short covering.
• No lower target is marked on the chart; wait for fresh price-action confirmation.
🔴 23,004 — LAST INTRADAY RESISTANCE
• Breakout + successful retest may indicate further upside potential.
• Rejection may lead to profit booking.
• Do not assume a breakout before confirmation.
━━━━━━━━━━━━━━━━━━
4. FIRST 15–30 MINUTES
━━━━━━━━━━━━━━━━━━
1. Avoid impulsive entries immediately after the opening.
2. Mark the first 15-minute candle's high and low.
3. Observe price action around 22,839–22,898 and 22,547–22,579.
4. Prefer a 15-minute close with follow-through or a successful retest.
5. If price remains choppy between key levels, wait for a clearer setup.
━━━━━━━━━━━━━━━━━━
5. RISK MANAGEMENT
━━━━━━━━━━━━━━━━━━
• Define the stop-loss before entry using the setup's invalidation level.
• Keep position size aligned with your risk limit.
• Avoid revenge trading, FOMO entries and repeated trades inside a range.
• Reduce exposure near major support and resistance.
• Do not chase extended candles.
• If confirmation is missing:
NO TRADE — WAIT FOR CONFIRMATION.
━━━━━━━━━━━━━━━━━━
6. FINAL DECISION MAP
━━━━━━━━━━━━━━━━━━
🟢 BULLISH PATH
Sustained breakout above 22,839–22,898 → successful retest → potential test of 23,004.
🔴 BEARISH PATH
Rejection from resistance → breakdown below 22,547–22,579 → potential test of 22,446.
🟠 NO-TRADE / CHOP ZONE
Price remains between 22,579 and 22,839 without a confirmed directional setup.
DECISION FLOW:
Opening → Wait 15–30 minutes → Observe key zone → Confirm breakout/rejection → Execute with defined risk → Trail or exit.
Remember: Wait → Confirm → Execute → Manage → Exit.
Capital preservation is more important than participating in every move.
━━━━━━━━━━━━━━━━━━
DISCLAIMER
━━━━━━━━━━━━━━━━━━
I am not a SEBI-registered analyst. This content is for educational and informational purposes only and should not be considered investment advice or a recommendation to buy or sell any security. Trading involves substantial risk. Please conduct your own research and consult a SEBI-registered professional before making any investment or trading decision.

Haftungsausschluss
Die Informationen und Veröffentlichungen sind nicht als Finanz-, Anlage-, Handels- oder andere Arten von Ratschlägen oder Empfehlungen gedacht, die von TradingView bereitgestellt oder gebilligt werden, und stellen diese nicht dar. Lesen Sie mehr in den Nutzungsbedingungen.
Haftungsausschluss
Die Informationen und Veröffentlichungen sind nicht als Finanz-, Anlage-, Handels- oder andere Arten von Ratschlägen oder Empfehlungen gedacht, die von TradingView bereitgestellt oder gebilligt werden, und stellen diese nicht dar. Lesen Sie mehr in den Nutzungsbedingungen.