Squeeze Breakout & Retest Targets [PhenLabs]
🎯 Overview
Squeeze Breakout & Retest Targets [PhenLabs] is an analytical overlay and trade-planning indicator built on Pine Script v6. It finds volatility squeezes (Bollinger Bands contracting inside the Keltner Channel), frames the compressed range on the chart, waits for a decisive breakout close in the direction of the 200 EMA trend, and then waits for price to come back and hold the broken edge before drawing a closed-bar trade plan (ENTRY, SL, TP1, TP2, TP3).
🧠 How It Works — Non-Repainting State Machine
Every signal and trade plan is governed by a deterministic closed-bar state machine (SQUEEZE → BREAKOUT → RETEST → TRADE):
⚙️ Under the Hood — Mathematical Formulation
1. Squeeze Detection
Pine Script®
2. Breakout Effort Filter
Volume symbols use relative volume. Symbols without volume automatically switch to range expansion, so the filter works on every asset and plan:
Pine Script®
3. Learned TAKE / SKIP Odds
Each breakout is placed in one of 6 buckets (3 squeeze-duration bands × 2 breakout-expansion bands). When a setup resolves, the bucket records whether TP1 was reached before the stop; fakeouts count as failures and expired retests are excluded. Odds use a Laplace-smoothed rate so thin buckets stay near 50%:
Pine Script®
The gate is off by default because it did not improve results in testing. When it is on, skipped setups are still tracked in the background so the odds keep learning, but they are left out of the dashboard win rate and Net R.
4. Trend Filter
Pine Script®
5. Presets
Auto (by timeframe) picks Scalp on 5m and below, Intraday up to 1H, and Swing above 1H.
📊 Visual Walkthrough & Telemetry Dashboard
🛠️ Input Guide
Group 1 — Setup
Group 2 — Filters
Group 3 — Display
🚀 Built-In Alerts
All alerts and signals are evaluated on confirmed bars only. Signal, squeeze, state, odds, and fakeout values are exposed to the Data Window and Pine Screener.
Squeeze Breakout & Retest Targets [PhenLabs] is an analytical overlay and trade-planning indicator built on Pine Script v6. It finds volatility squeezes (Bollinger Bands contracting inside the Keltner Channel), frames the compressed range on the chart, waits for a decisive breakout close in the direction of the 200 EMA trend, and then waits for price to come back and hold the broken edge before drawing a closed-bar trade plan (ENTRY, SL, TP1, TP2, TP3).
- Breakouts that fail fast: Many squeeze tools fire on the first candle outside the range, right where fakeouts happen. This script requires a confirmed retest of the box edge, and any close back past the box midline is marked FAKEOUT and counted in the stats.
- Counter-trend breakouts: A 200 EMA trend filter only allows breakouts on the side of the trend, and its current bias (ABOVE EMA 200 · longs or BELOW EMA 200 · shorts) is shown in the dashboard without cluttering the chart.
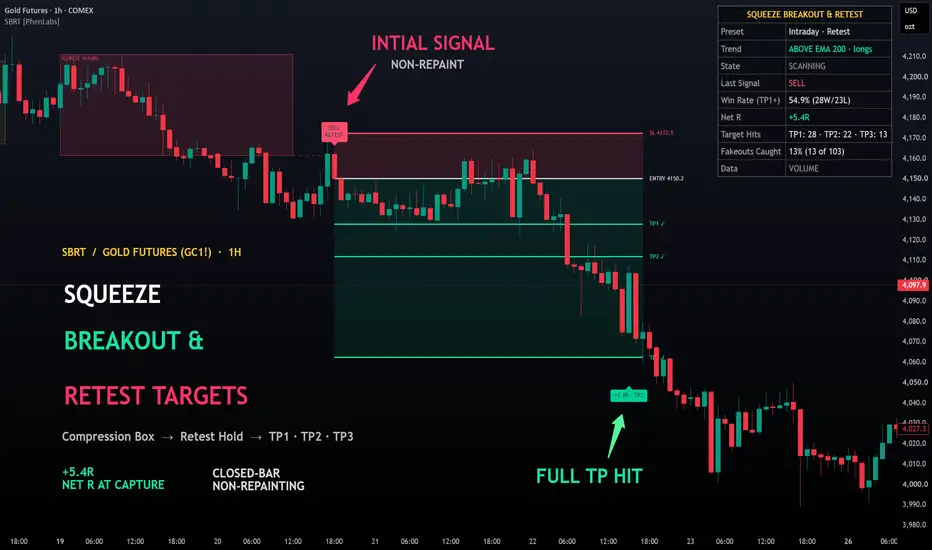
- Clear plan after the signal: Every BUY or SELL draws a unified red risk backdrop, a green reward backdrop, crisp horizontal lines for ENTRY, SL, and TP1–TP3, and right-edge price/R labels. Exits scale out 50% / 30% / 20%. Each target line thickens and ticks ✓ as it is hit, and a +R / −R result pill prints when the trade closes.
🧠 How It Works — Non-Repainting State Machine
Every signal and trade plan is governed by a deterministic closed-bar state machine (SQUEEZE → BREAKOUT → RETEST → TRADE):
- Stage 1 (SQUEEZE):
While the bands sit inside the channel, the script tracks the closed-bar high and low of the compression. Once the squeeze lasts at least the preset minimum (6 / 8 / 10 bars) while no trade is active, it draws a gold squeeze box (#F5C542) and stays ARMED for a short window after the squeeze releases. Old squeeze boxes are capped to the 6 most recent so the chart stays clean. - Stage 2 (BREAKOUT):
A candle must close beyond the box edge by a preset ATR distance, with a body of at least 50% of its range and (optionally) above-average participation. With the Trend Filter on, an upside breakout must close above the trend EMA and a downside breakout below it. The box recolors to teal or red and labels SQUEEZE N BARS. - Stage 3 (RETEST):
A dashed horizontal line extends from the broken box edge across the retest window. The script waits up to the preset retest window for price to revisit the edge (±0.25 ATR):
• Hold: a retest candle that closes back in the breakout direction fires BUY or SELL.
• Fail: a close back past the box midline marks FAKEOUT.
• Expire: no retest inside the window quietly resets the setup. - Stage 4 — Full Trade Plan & Lifecycle:
By default the stop sits 1.5 ATR from entry. Two other options are available: Retest Extreme (tight) (just beyond the retest wick) or Box Midline (wide). TP1 is 1R. TP2 is the larger of the box height projected from the broken edge or 1.5R, and TP3 is the larger of twice the box height or 2.5R. Scale-out is 50% at TP1, 30% at TP2, and 20% at TP3 while the stop stays at its initial level. Stops are checked before targets on every bar, so a bar that touches both counts as a loss. Historical trade plans are capped by Past Plans Shown (default 4).
⚙️ Under the Hood — Mathematical Formulation
1. Squeeze Detection
2. Breakout Effort Filter
Volume symbols use relative volume. Symbols without volume automatically switch to range expansion, so the filter works on every asset and plan:
3. Learned TAKE / SKIP Odds
Each breakout is placed in one of 6 buckets (3 squeeze-duration bands × 2 breakout-expansion bands). When a setup resolves, the bucket records whether TP1 was reached before the stop; fakeouts count as failures and expired retests are excluded. Odds use a Laplace-smoothed rate so thin buckets stay near 50%:
The gate is off by default because it did not improve results in testing. When it is on, skipped setups are still tracked in the background so the odds keep learning, but they are left out of the dashboard win rate and Net R.
4. Trend Filter
5. Presets
Auto (by timeframe) picks Scalp on 5m and below, Intraday up to 1H, and Swing above 1H.
- Scalp (1m–5m): 6-bar minimum squeeze, 0.10 ATR breakout distance, 8-bar retest window.
- Intraday (15m–1H): 8-bar minimum squeeze, 0.15 ATR breakout distance, 10-bar retest window.
- Swing (4H+): 10-bar minimum squeeze, 0.20 ATR breakout distance, 12-bar retest window, slightly tighter channel.
📊 Visual Walkthrough & Telemetry Dashboard
- Squeeze Box: Drawn once a squeeze reaches the preset minimum bar count. When price breaks out with the trend, the box turns teal or red (SQUEEZE N BARS) and extends a dashed retest line from the broken edge. A failed breakout fades to neutral grey (FAKEOUT).
- Signal Callout: A compact BUY or SELL pill on the confirmed retest bar showing the entry mode (RETEST or BREAKOUT).
- Trade Plan (PlanDraw UDT): A single red risk backdrop and green reward backdrop with horizontal ENTRY, SL, and TP1–TP3 lines plus right-edge labels. Each target line thickens and ticks TP1 ✓, TP2 ✓, TP3 ✓ as it is reached, and a +R · TP3, STOP, or TRAIL badge prints when the plan closes.
- Dashboard: Shows the active Preset, Trend state (ABOVE/BELOW EMA 200), State (squeeze bar count, retest countdown, or live trade), Last Signal, Win Rate (TP1+), Net R, Target Hits (TP1 / TP2 / TP3 counts), Fakeouts Caught, and Data mode (VOLUME or RANGE PROXY).
🛠️ Input Guide
Group 1 — Setup
- Preset: Auto (by timeframe), Scalp, Intraday, or Swing (Auto).
- Entry Mode: Retest (confirmed) or Aggressive (breakout close) (Retest).
- Stop Placement: ATR (1.5×), Retest Extreme (tight), or Box Midline (wide) (ATR).
Group 2 — Filters
- Trend Filter (EMA): Only take breakouts on the trend side of the EMA (true, 200).
- Volume / Range Expansion Filter: Requires breakout effort of at least 1.2x average (true).
- TAKE / SKIP Odds Gate: Marks setups below 50% learned odds as SKIP (false).
Group 3 — Display
- Squeeze Boxes, Trade Plan, Fakeout Markers: Individual display toggles (true).
- Past Plans Shown: Number of recent trade plans kept on the chart (4).
- Dashboard / Table Size: Show or hide the table and scale it (Small).
- Bull / Bear / Squeeze Colors: #00E5A8, #FF4D6D, and #F5C542 by default.
🚀 Built-In Alerts
- Squeeze Started
- Bullish Breakout / Bearish Breakout
- BUY Signal / SELL Signal
- Fakeout
- TP1 Hit / Stop Hit
All alerts and signals are evaluated on confirmed bars only. Signal, squeeze, state, odds, and fakeout values are exposed to the Data Window and Pine Screener.
⚠️ Risk Disclaimer
This indicator is an analytical decision-support tool designed for educational and informational purposes only. Historical win rates, learned odds, and cumulative R-multiples are computed from closed-bar state-machine simulations on the active chart history and do not predict or guarantee future performance. Always validate setups within your own risk management framework.

TradingView Charting w/ Crypto Systems: phenlabs.com
Join our growing community: discord.gg/phen
All content provided by PhenLabs is for informational & educational purposes only. Past performance does not guarantee future results.
Join our growing community: discord.gg/phen
All content provided by PhenLabs is for informational & educational purposes only. Past performance does not guarantee future results.
Haftungsausschluss
Die Informationen und Veröffentlichungen sind nicht als Finanz-, Anlage-, Handels- oder andere Arten von Ratschlägen oder Empfehlungen gedacht, die von TradingView bereitgestellt oder gebilligt werden, und stellen diese nicht dar. Lesen Sie mehr in den Nutzungsbedingungen.
TradingView Charting w/ Crypto Systems: phenlabs.com
Join our growing community: discord.gg/phen
All content provided by PhenLabs is for informational & educational purposes only. Past performance does not guarantee future results.
Join our growing community: discord.gg/phen
All content provided by PhenLabs is for informational & educational purposes only. Past performance does not guarantee future results.
Haftungsausschluss
Die Informationen und Veröffentlichungen sind nicht als Finanz-, Anlage-, Handels- oder andere Arten von Ratschlägen oder Empfehlungen gedacht, die von TradingView bereitgestellt oder gebilligt werden, und stellen diese nicht dar. Lesen Sie mehr in den Nutzungsbedingungen.