
1. Market Context
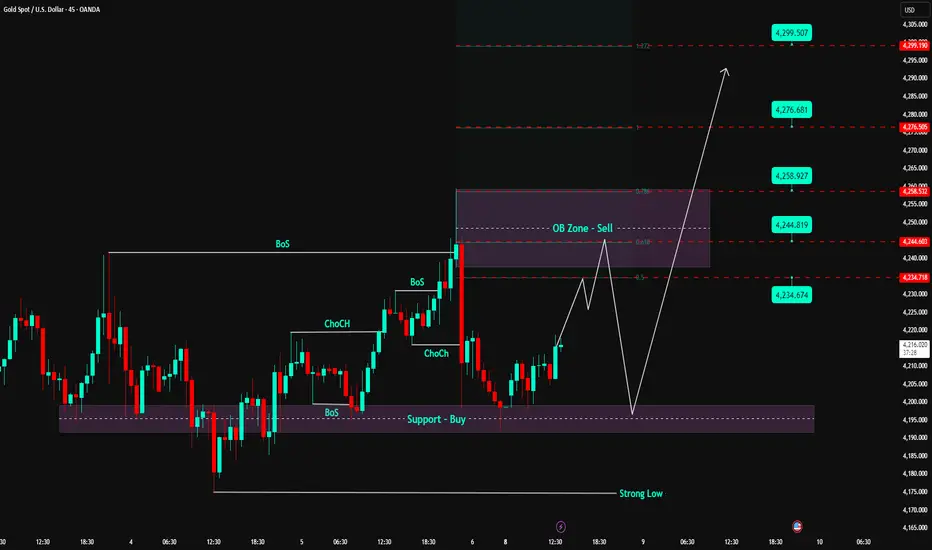
Gold is moving within a corrective structure after the previous strong rally. The current price action revolves around two main zones:
Buy Support Zone 4,197–4,200: where the price continuously reacts, with multiple BoS – ChoCH increases → indicating that buying pressure still maintains the base.
OB Zone – Sell 4.24x: confluence of Fibonacci 0.5 – 0.618 – 0.786, a zone likely to see a decline reaction before forming a larger trend.
The current structure leans towards a recovery to the OB Sell zone, after which the market may continue to adjust deeper to create liquidity before rising again.
2. Important Technical Zones
🔹 Support – Buy Zone: 4,197 – 4,200
This is a strong price base, where BoS + ChoCH continuously form.
Only when breaking below this zone → the short-term uptrend structure weakens.
🔹 OB Zone – Sell: 4,238 – 4,245
Confluence of Fibonacci retracement (0.5–0.618–0.786).
A favorable zone for the market to create a decline reaction, triggering a liquidity sweep to lower lows.
🔹 Strong Low: 4.17x
This is an important low – if the price sweeps here but does not break → expect a strong rebound to higher targets.
3. Trading Scenarios According to Structure
🔸 Scenario 1: Price recovers to OB Sell 4.24x → look for short-term SELL signals
Wait for the price to hit the OB Sell zone and appear:
Strong rejection candle
ChoCH decreases on M15 frame
Volume increases at the peak
Then expect a decline back to the Support Buy zone 4,197–4,205.
Trading idea:
Sell zone 4,238–4,245
Target: 4.20x
If breaking 4.20x deeply → extend to Strong Low 4.17x
🔸 Scenario 2 (high priority): Buy at Support to catch the rise to 4.25x – 4.27x – 4.29x
After completing the decline according to scenario 1, the price may rebound from the strong demand zone.
BUY conditions:
Price sweeps down to 4,197–4,205 or deeper to 4.17x.
Reversal pattern appears + ChoCH increases.
Recreate HL (higher low) structure.
Targets:
TP1: 4,234
TP2: 4,244
TP3: 4,258
Extended TP: 4,276 – 4,299 (Fibo 1.272 – 1.618)
4. Risk Management Notes
Do not chase Buy when the price is in the OB Sell zone – easy to get swept.
Do not Sell deeply when not reaching OB 4.24x zone – price has not entered a nice premium zone.
Always clearly define invalidation levels:
BUY invalid when price closes H1 below 4.17x.
SELL invalid when price breaks strongly above 4,245 and holds.
Gold is moving within a corrective structure after the previous strong rally. The current price action revolves around two main zones:
Buy Support Zone 4,197–4,200: where the price continuously reacts, with multiple BoS – ChoCH increases → indicating that buying pressure still maintains the base.
OB Zone – Sell 4.24x: confluence of Fibonacci 0.5 – 0.618 – 0.786, a zone likely to see a decline reaction before forming a larger trend.
The current structure leans towards a recovery to the OB Sell zone, after which the market may continue to adjust deeper to create liquidity before rising again.
2. Important Technical Zones
🔹 Support – Buy Zone: 4,197 – 4,200
This is a strong price base, where BoS + ChoCH continuously form.
Only when breaking below this zone → the short-term uptrend structure weakens.
🔹 OB Zone – Sell: 4,238 – 4,245
Confluence of Fibonacci retracement (0.5–0.618–0.786).
A favorable zone for the market to create a decline reaction, triggering a liquidity sweep to lower lows.
🔹 Strong Low: 4.17x
This is an important low – if the price sweeps here but does not break → expect a strong rebound to higher targets.
3. Trading Scenarios According to Structure
🔸 Scenario 1: Price recovers to OB Sell 4.24x → look for short-term SELL signals
Wait for the price to hit the OB Sell zone and appear:
Strong rejection candle
ChoCH decreases on M15 frame
Volume increases at the peak
Then expect a decline back to the Support Buy zone 4,197–4,205.
Trading idea:
Sell zone 4,238–4,245
Target: 4.20x
If breaking 4.20x deeply → extend to Strong Low 4.17x
🔸 Scenario 2 (high priority): Buy at Support to catch the rise to 4.25x – 4.27x – 4.29x
After completing the decline according to scenario 1, the price may rebound from the strong demand zone.
BUY conditions:
Price sweeps down to 4,197–4,205 or deeper to 4.17x.
Reversal pattern appears + ChoCH increases.
Recreate HL (higher low) structure.
Targets:
TP1: 4,234
TP2: 4,244
TP3: 4,258
Extended TP: 4,276 – 4,299 (Fibo 1.272 – 1.618)
4. Risk Management Notes
Do not chase Buy when the price is in the OB Sell zone – easy to get swept.
Do not Sell deeply when not reaching OB 4.24x zone – price has not entered a nice premium zone.
Always clearly define invalidation levels:
BUY invalid when price closes H1 below 4.17x.
SELL invalid when price breaks strongly above 4,245 and holds.

Exención de responsabilidad
La información y las publicaciones no constituyen, ni deben considerarse como, asesoramiento o recomendaciones financieras, de inversión, de trading u otro tipo, proporcionadas o respaldadas por TradingView. Obtenga más información en Condiciones de uso.
Exención de responsabilidad
La información y las publicaciones no constituyen, ni deben considerarse como, asesoramiento o recomendaciones financieras, de inversión, de trading u otro tipo, proporcionadas o respaldadas por TradingView. Obtenga más información en Condiciones de uso.