ICT Structure Engine [WillyAlgoTrader]
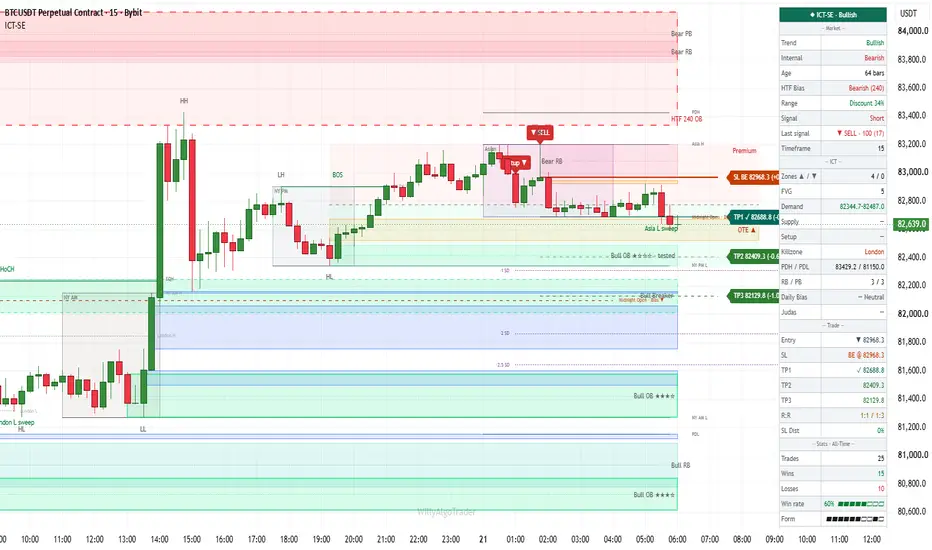
🧠 ICT Structure Engine is an overlay indicator that implements the Inner Circle Trader (ICT) methodology as one connected engine rather than a set of separate drawings. It maps external and internal market structure (BOS / CHoCH), every major PD array — Order Blocks, Breaker Blocks, Fair Value Gaps, Rejection Blocks, Propulsion Blocks, Premium / Discount and OTE — the full liquidity map (equal highs / lows, swing pools, PDH / PDL, PWH / PWL, session highs / lows), the time layer (Asian, London, NY AM and NY PM killzones, Silver Bullet windows, Midnight Open), the daily narrative (Daily Bias, Judas Swing) and standard deviation projections — and then uses all of them to run the ICT 2022 entry model as a fully managed virtual trade.
The core insight: in ICT every concept answers a different question. Liquidity says where price is drawn, time says when a move is likely, the market structure shift says that the move has started, and the PD array says where to enter. A chart that shows these pieces separately still leaves the trader to connect them by hand. This engine connects them in code: a setup exists only when a liquidity sweep is followed by a displacement-backed CHoCH inside a killzone, in line with the daily bias, and an entry exists only when price returns to the PD array created by that move — in discount for longs, in premium for shorts.
Coverage at a glance: 21 ICT concepts in one script — BOS, CHoCH, HH / LH / HL / LL, Order Block, Breaker Block, Fair Value Gap, Rejection Block, Propulsion Block, Equal Highs / Lows, liquidity sweep, PDH / PDL, PWH / PWL, session highs / lows, killzones, Silver Bullet, Midnight Open, Daily Bias, Judas Swing, Premium / Discount, OTE, standard deviation projections — plus HTF structure and HTF order blocks. Every layer has its own toggle, so the same script can be a complete ICT map or a single clean tool.
🧩 WHY THESE COMPONENTS WORK TOGETHER
A standalone order block indicator draws dozens of zones and cannot tell which one matters. A standalone FVG indicator marks every gap, including gaps in the middle of noise. A liquidity indicator shows sweeps but not what happens after them, and a killzone indicator shows time without price. None of them alone describes the ICT model, which is a sequence, not a list.
This indicator implements that sequence:
Liquidity map → Sweep → CHoCH with displacement (FVG) → PD array of the impulse → Retest in Discount / Premium or OTE → Structure-aware stop → Targets at the next opposing liquidity → Break-even and statistics
Liquidity levels (pools, previous day / week, sessions) define where stops rest. A sweep of one of them is the first condition of a setup. A change of character in the opposite direction within the sweep window confirms the shift, but only if the leg left a fair value gap — displacement. The FVG or Order Block created by that leg becomes the single armed zone. Time (killzones or Silver Bullet) and the daily bias filter when a setup may arm. The dealing range decides whether the retest is in discount or premium. On entry, the stop is anchored to the signal wick, the zone or the swept extreme, and TP2 / TP3 can be placed at the next untaken opposing liquidity or at standard deviation projections of the setup leg — closing the loop back to the liquidity map the setup started from.
Without the liquidity layer, a CHoCH is just a break. Without displacement, a sweep-and-break can be a slow drift. Without the PD array, there is no defined entry. Without premium / discount, entries are taken at any price. Without time and bias filters, the model runs at hours and in directions ICT itself avoids. Together they turn twenty separate drawings into one testable trade idea.
🔍 WHAT MAKES IT ORIGINAL
1️⃣ Dual market structure engine — external and internal BOS / CHoCH.
Two independent structure trackers run on confirmed pivots: External (swing length 10) and Internal (swing length 3). A break of the last unbroken swing in the trend direction is a BOS; a break against the current trend is a CHoCH (market structure shift).
— Break confirmation: Close (default) = close beyond the swing; Wick = high / low beyond the swing.
— If one bar breaks both the swing high and the swing low, both are consumed and the direction is decided by the close.
— HH / LH / HL / LL labels classify each new external swing against the previous one.
— The Internal tracker feeds setups (a CHoCH can be internal or external) and can draw its own dashed breaks.
Why this matters: ICT entries usually come from the internal shift inside an external move. Tracking both levels separately avoids mixing minor and major structure.
2️⃣ Order Blocks anchored to the impulse extreme, with score and Breaker conversion.
On every BOS / CHoCH (External by default) the engine scans back from the broken swing (up to 300 bars) to the extreme of the move that caused the break:
— Extreme bar = lowest low (bullish) / highest high (bearish) between the swing and the break.
— Source candle = the first opposite-colored candle at the extreme or up to 2 bars older. No opposite candle → no Order Block.
— Proximal edge = body (default) or wick of the source candle; distal edge = the extreme.
— Zones thinner than 0.1 × ATR use the full candle; zones taller than 1.5 × ATR(50) are capped.
— A zone overlapping an existing untested zone of the same side by more than 50% is not duplicated.
— If price already returned into the zone before the break was confirmed (including the break bar itself), the OB is created as "tested".
Zone score (0–4 ★, shown as 0–100):
— +1 FVG inside the impulse (displacement)
— +1 liquidity sweep within 2 bars of the extreme
— +1 HTF trend in the same direction
— +1 zone midpoint in the discount half (bullish) / premium half (bearish) of the dealing range
Score = 25 × sum.
Invalidation: Close beyond distal (default), Wick beyond distal or Close beyond 50%. When a close invalidates the zone, it converts into a Breaker Block of the opposite direction (dashed, re-scored); a breaker is removed on a close back through it.
3️⃣ Fair Value Gaps with volatility-consistent threshold and live fill.
Three-candle imbalance:
— Bullish: low[0] > high[2] and close[1] > high[2]
— Bearish: high[0] < low[2] and close[1] < low[2]
— Minimum size: gap ≥ 0.2 × ATR(50) of the bar where the gap formed (the same rule is used when scanning history, so a gap shown on the chart is the same gap the setup engine sees).
FVGs shrink as price fills them and are removed when filled (Touch / 50% / Full, default Full). Up to 5 active gaps per side.
4️⃣ Rejection Blocks and Propulsion Blocks.
— Rejection Block: on a confirmed external swing, if the wick is at least 50% of the candle range, the zone from the body edge to the wick extreme is drawn (bearish at highs, bullish at lows). Skipped where an Order Block of the same side already covers it. Touches before confirmation mark it as tested.
— Propulsion Block: when an Order Block is touched for the first time by an opposite-colored candle, that candle becomes a candidate. If a later close within 3 bars breaks the candle's far side in the OB direction, the candle range becomes a Propulsion Block. Breakers do not produce Propulsion Blocks.
Both are informational PD arrays with their own limits (3 per side) and alerts; they do not trigger entries on their own.
5️⃣ Complete liquidity map with sweep detection.
— Swing pools: pivots with length 5. Two swings within 0.1 × ATR merge into EQH / EQL (×N for three or more touches). Single swings are tracked silently by default and can be drawn.
— Key levels: PDH / PDL, PWH / PWL (rolled by the D / W period of the symbol) and Asian, London, NY AM, NY PM highs / lows created when each session ends.
— Sweep = wick beyond the level and close back inside. A level traded through on close is marked as taken without a sweep.
The swept level's name ("PDL", "London H", "EQH") is carried through the setup, the entry label, the alert and the webhook.
6️⃣ Time layer — killzones, Silver Bullet and Midnight Open.
Default New York time (timezone configurable):
— Asian 20:00–00:00, London 02:00–05:00, NY AM 07:00–10:00, NY PM 13:30–16:00 — drawn as live range boxes
— Silver Bullet windows 03:00–04:00, 10:00–11:00, 14:00–15:00 (optional background highlight)
— Midnight Open = open of the bar that starts exactly at 00:00:00
Setup Time Filter: Off / Killzones (default) / Silver Bullet. The time layer runs on intraday charts up to 1H; above that it switches off automatically.
7️⃣ Daily Bias and Judas Swing.
Daily Bias (draw on liquidity) from the previous day's close against the prior day's range:
— close > prior high → bullish, draw on PDH
— close < prior low → bearish, draw on PDL
— both prior extremes taken, close inside → neutral (outside day)
— only prior high taken, close inside → bearish; only prior low taken → bullish
— otherwise neutral (inside day)
Setup filter: Off (default) / With bias only / Not against bias.
Judas Swing (window 00:00–05:00): with a bullish bias, price trades below the Midnight Open, the extreme is tracked, and the Judas is confirmed when a bar closes back above the Midnight Open — optionally only if the extreme also swept the current Asian range (default on). Mirrored for a bearish bias. The label is placed at the false-move extreme.
8️⃣ Sweep → CHoCH setup state machine with displacement gate.
A setup arms when all of the following are true on a confirmed bar:
— a sell-side sweep (for longs) or buy-side sweep (for shorts) happened within the last 20 bars and has not been used by another setup
— an external or internal CHoCH in the opposite direction prints now
— the time filter and the daily bias filter allow it
— the leg from the sweep to the CHoCH contains a fair value gap (Require Displacement, default on)
Entry PD array: FVG first (default) = the newest untouched FVG of the setup direction formed since the sweep, otherwise the OB created on the CHoCH bar. Alternatives: OB first, FVG only, OB only.
Only one setup is active. It is cancelled by an opposite CHoCH, a broken zone, a newer setup, or after 30 bars without a retest. Each sweep can arm only one setup.
9️⃣ Entry location — Premium / Discount or OTE.
The first candle that trades into the armed zone (for an FVG: and closes on the correct side of it) is the entry candidate. It becomes a signal only if:
— Discount / Premium (default): close below the 50% of the dealing range for longs, above it for shorts. The dealing range is the HTF swing range when HTF is on, otherwise the current external swing range.
— OTE (≥ 62%): close at or beyond the 61.8% retracement of the setup leg and inside the leg.
If the filter has no valid range yet, the attempt is skipped and reported — it never passes silently.
🔟 Trade engine — structure-aware stop, liquidity targets, tick-exact levels.
Stop-loss (ATR(14) of the risk engine):
— Wick-Anchored (default): min(signal low − 0.25 × ATR, entry − 0.5 × ATR) for longs
— Zone-Anchored: beyond the zone's distal edge with the same buffer and minimum
— Sweep-Anchored: beyond the swept extreme of the setup leg
— ATR: entry − ATR × SL multiplier
Targets, risk = |entry − SL|:
— R-Multiples (default): TP = entry ± risk × multiplier
— Liquidity: TP1 in R; TP2 / TP3 = the next untaken opposing pool or key level beyond the previous target
— Std Deviations: TP2 / TP3 = the next SD projections of the setup leg
R-multiples are the fallback when no level is found.
Presets (SL × ATR / TP1 / TP2 / TP3 in R): Conservative 2.5 / 1 / 2 / 4, Balanced 1.5 / 1 / 2 / 3 (default), Aggressive 1.0 / 1.5 / 2.5 / 4, Scalping 0.8 / 0.8 / 1.5 / 2, Custom.
All levels are rounded to the instrument tick — the stop away from entry, targets toward it. If TP1 lands within one tick of entry or neighbouring targets collapse after rounding, the trade is not opened and the reason is reported.
1️⃣1️⃣ Trade management — break-even, TP priority, atomic reversal.
— After TP1 the stop moves to break-even (offset 0 by default, capped at half the way to TP1, rounded toward entry). If the TP1 bar already closed beyond the break-even level, the trade is closed at that close instead of placing a stop on the wrong side of price.
— A stop is never hit on the bar it was moved; when TP1 or TP3 and the stop are touched on the same bar, the target is counted first (optimistic intrabar model).
— An opposite signal reverses the position only after the new trade plan is validated; if the new plan is invalid, the open position stays.
— Statistics: a trade is a win once TP1 is reached. Win rate for 24H / 30D / All-Time, plus the last 10 results.
1️⃣2️⃣ Standard deviation projections and HTF context.
— SD projections of the setup leg (sweep extreme → CHoCH): level = leg high + k × leg range for longs, leg low − k × leg range for shorts. Default "1, 2, 2.5", up to 8 levels, k ≤ 10.
— HTF engine (default 4H, swing length 5) runs on closed HTF bars: HTF trend, HTF Order Blocks and the HTF dealing range used by the score and the Discount / Premium filter.
⚙️ HOW IT WORKS — CALCULATION FLOW
Step 1 — Calendar levels: on a new day / week, PDH / PDL and PWH / PWL are set; finished killzone sessions publish their highs and lows.
Step 2 — Liquidity: pools and key levels are checked for sweeps; new pivots are added and merged into EQH / EQL.
Step 3 — Time and narrative: Midnight Open is set at 00:00:00, the daily bias is read, the Judas Swing state machine advances.
Step 4 — Structure: external and internal BOS / CHoCH are evaluated; the dealing range is updated.
Step 5 — PD arrays: Order Blocks are mitigated, converted to Breakers or created; Propulsion and Rejection Blocks are updated; FVGs shrink, fill or are created.
Step 6 — Setup: the armed setup is checked for expiry, opposite CHoCH and entry; a new Sweep → CHoCH with displacement arms the next zone and draws SD projections.
Step 7 — Trade engine: TP / SL hits and break-even are processed on the open trade; a valid signal opens or reverses a trade with tick-rounded levels.
Step 8 — Output: dashboard, lines and alerts are produced in a fixed order: management → closures → reversal → entries → info.
📖 HOW TO USE
🎯 Quick start:
1. Add the indicator to a 1M–15M chart. Keep the defaults: HTF 4H, Time Filter "Killzones", Entry "FVG first", Filter "Discount / Premium".
2. Read the daily bias and the Midnight Open on the dashboard; prefer setups in the bias direction.
3. Wait for a "Setup ▲ / ▼" label — a sweep and a displacement CHoCH have just happened, and the armed zone is outlined.
4. A BUY / SELL label appears on the first retest of that zone in discount / premium, with SL and TP1–TP3 drawn.
5. Create one alert with "Any alert() function call" to receive every event.
👁️ Reading the chart:
— 🟢 / 🔴 BOS and CHoCH lines with labels; HH / LH / HL / LL at swings
— Solid boxes = Order Blocks with ★ score; dotted border = tested; dashed = Breaker
— Blue / orange boxes = Fair Value Gaps (shrink as they fill)
— "RB" / "PB" boxes = Rejection and Propulsion Blocks
— Dotted lines = single swings (when enabled); solid lines with EQH / EQL = equal highs / lows; "Sweep" labels at swept levels
— Grey lines = PDH / PDL, PWH / PWL, session highs / lows (dotted once taken)
— Colored session boxes = killzones; dashed amber line = Midnight Open; "Judas ▲ / ▼" label at the false-move extreme
— Premium (red) / Discount (green) shading with equilibrium line; amber OTE band in trend direction
— Purple dotted "-1 SD", "-2 SD" lines = standard deviation projections of the setup leg
— Dashed wide boxes "HTF 240 OB" = higher-timeframe Order Blocks
— Entry, SL and TP1–TP3 lines with labels; "✓" marks reached targets; orange "SL BE" after break-even
📊 Dashboard fields:
— Market: Trend, Internal trend, Age of trend, HTF Bias, Range position (Premium / Discount %), Signal (position), Last signal with score, Timeframe
— ICT: Active zones ▲ / ▼, FVG count, nearest Demand and Supply, armed Setup with bars left, current Killzone, PDH / PDL, RB / PB count, Daily Bias, Judas state
— Trade: Entry, SL (BE when moved), TP1–TP3 with liquidity tags, actual R:R to TP1 / TP3, SL distance %
— Stats: Trades, Wins, Losses, Win rate with gauge, Form (last 10)
🔧 Tuning guide:
— Too few setups: set Time Filter to Off, turn Require Displacement off, or raise the Sweep → CHoCH window.
— Too many zones: raise Min Score to Show, lower Max Active Zones, enable Require FVG in Impulse.
— Swing trading (1H–4H): HTF Daily, External Swing Length 12–20; killzones switch off above 1H.
— Stops too tight: use Sweep-Anchored or Zone-Anchored SL, or the Conservative preset.
— Chart too busy: switch off the layers you do not trade — every module has its own toggle.
⚙️ KEY SETTINGS REFERENCE
🧭 Market Structure:
— External Swing Length (default 10): pivot length of major structure
— Internal Swing Length (default 3): pivot length of minor structure, must be smaller than External
— Break Confirmation (default Close): Close or Wick beyond the swing
— Show External / Internal BOS / CHoCH (default on / off), Show HH / LH / HL / LL (default on)
🕐 Higher Timeframe:
— Use Higher Timeframe (default on), Higher Timeframe (default 240), HTF Swing Length (default 5), Show HTF Order Blocks (default on)
🧱 Order Blocks:
— Build From (default External), Proximal Edge (default Body), Max Zone Height (default 1.5 × ATR)
— Require FVG in Impulse (default off), Min Score to Show (default 0)
— Invalidation (default Close), Convert to Breaker (default on), Max Active Zones per Side (default 4), Keep Mitigated Zones (default off), Show 50% Line (default on)
⚡ Fair Value Gaps:
— Min Size (default 0.2 × ATR), Filled When (default Full), Shrink as Filled (default on), Max Active FVGs per Side (default 5)
💧 Liquidity:
— Pool Swing Length (default 5), Equal Tolerance (default 0.1 × ATR), Single Swings: Draw & Alert (default off), Max Active Pools per Side (default 6)
🧩 Rejection & Propulsion Blocks:
— Show Rejection Blocks (default on), Min Wick Share (default 0.5), Max per Side (default 3)
— Show Propulsion Blocks (default on), Confirm Within (default 3 bars), Max per Side (default 3)
🗝️ Key Levels:
— Previous Day High / Low, Previous Week High / Low, Session Highs / Lows, Midnight Open (all default on)
📅 Daily Bias & Judas Swing:
— Daily Bias (default on), Setup Filter (default Off)
— Judas Swing (default on), Window (default 00:00–05:00), Require Asian Range Sweep (default on)
📐 Standard Deviations:
— Show SD Projections (default on), Levels (default "1, 2, 2.5")
🕒 Killzones:
— Show Killzones (default on); Asian 20:00–00:00, London 02:00–05:00, NY AM 07:00–10:00, NY PM 13:30–16:00, each with its own toggle
— Timezone (default America/New_York), Setup Time Filter (default Killzones), Highlight Silver Bullet (default off)
🎯 Setup (Sweep → CHoCH):
— Enable Setups (default on), Sweep → CHoCH Window (default 20 bars), Wait for Retest (default 30 bars)
— Require Displacement (default on), Entry PD Array (default FVG first), Entry Location Filter (default Discount / Premium)
⚖️ Premium / Discount:
— Show Premium / Discount (default on), Show OTE (62–79%) (default on)
🛡️ Risk Management:
— Risk Preset (default Balanced), SL Mode (default Wick-Anchored), TP Mode (default R-Multiples)
— ATR Length (SL) (default 14); Custom multipliers SL 1.5, TP1 1.0, TP2 2.0, TP3 3.0 (TP1 < TP2 < TP3 enforced)
— Break-Even After TP1 (default on), BE Offset (default 0 × ATR)
— SL / TP lines, labels, % distance and line styles
🎨 Visual / Dashboard / Colors / Advanced:
— Theme Auto / Dark / Light; label and text sizes; zone, sweep, setup and signal label toggles; zone transparency (default 85); watermark
— Dashboard position, font size, four section toggles, Win Rate Period (default All-Time)
— Bull / Bear, FVG, OTE, RB and killzone colors
— Zone ATR Length (default 50), History Size (default 150 archived objects)
🔔 ALERTS
Create one alert with "Any alert() function call". All alerts fire once per bar close, in this order:
— 🛡️ BREAK-EVEN — new stop price
— 🎯 TP1 HIT / 🎯🎯 TP2 HIT — target price
— 🏆 TP3 HIT — entry and TP3
— 🛑 SL HIT / 🛡️ BE STOP-OUT — entry and stop price
— 🛡️ BE EXIT @ CLOSE — the TP1 bar closed beyond the break-even level
— 🔄 REVERSAL — new direction, closed as win / loss
— 🟢 LONG / 🔴 SHORT — price, swept level, setup type, score, SL, TP1–TP3 with liquidity tags, R:R, killzone, bar-close time
— ℹ️ INFO — BOS / CHoCH, sweeps (incl. PDH / PDL and sessions), OB touches, new FVGs, RB / PB, Judas Swing, daily bias, setups armed / rejected / skipped / cancelled, signals not executed with the reason
Every event has a webhook JSON variant (Webhook JSON Format), with null for missing prices.
⚠️ IMPORTANT NOTES
— 🚫 No repainting of confirmed events. BUY / SELL signals, setups, structure breaks, zones, sweeps and SL / TP hits are processed only on bar close (barstate.isconfirmed) and alerts use once-per-bar-close. HTF, previous-day and previous-week values come from closed bars. Pivots are confirmed with equal left / right lookback, so swing labels, Order Block origins and the Judas extreme are drawn back on the bar they describe after confirmation — delayed confirmation, not lookahead. The dashboard, Premium / Discount / OTE shading, HTF boxes and the extension of trade lines follow the live price inside the current bar.
— 📐 Trades are virtual: stops and targets are evaluated on closed OHLC bars, gaps are reported at the level price, and intrabar TP / SL conflicts are resolved in favor of the target. Statistics measure how often TP1 is reached, are recalculated from the loaded history on every reload, and are not a backtest. Past performance does not guarantee future results.
— ⚖️ ICT rules are implemented as explicit, documented heuristics: structure uses confirmed pivots, the score is a sum of four conditions (not a probability), and "standard deviations" are multiples of the setup leg as used in ICT, not statistical sigma. Killzones work on intraday charts up to 1H; Midnight Open needs a bar that opens exactly at 00:00:00 in the selected timezone. Use standard candles (not Heikin Ashi or Renko).
— 🛠️ This is an ICT structure, liquidity and trade-planning tool, not an automated trading bot. It maps the PD arrays, liquidity and time, arms setups and manages a virtual position — trade decisions remain yours.
— 🌐 Works on stocks, forex, crypto, futures and indices. Killzones default to New York time; previous-day levels follow the symbol's session day.
The core insight: in ICT every concept answers a different question. Liquidity says where price is drawn, time says when a move is likely, the market structure shift says that the move has started, and the PD array says where to enter. A chart that shows these pieces separately still leaves the trader to connect them by hand. This engine connects them in code: a setup exists only when a liquidity sweep is followed by a displacement-backed CHoCH inside a killzone, in line with the daily bias, and an entry exists only when price returns to the PD array created by that move — in discount for longs, in premium for shorts.
Coverage at a glance: 21 ICT concepts in one script — BOS, CHoCH, HH / LH / HL / LL, Order Block, Breaker Block, Fair Value Gap, Rejection Block, Propulsion Block, Equal Highs / Lows, liquidity sweep, PDH / PDL, PWH / PWL, session highs / lows, killzones, Silver Bullet, Midnight Open, Daily Bias, Judas Swing, Premium / Discount, OTE, standard deviation projections — plus HTF structure and HTF order blocks. Every layer has its own toggle, so the same script can be a complete ICT map or a single clean tool.
🧩 WHY THESE COMPONENTS WORK TOGETHER
A standalone order block indicator draws dozens of zones and cannot tell which one matters. A standalone FVG indicator marks every gap, including gaps in the middle of noise. A liquidity indicator shows sweeps but not what happens after them, and a killzone indicator shows time without price. None of them alone describes the ICT model, which is a sequence, not a list.
This indicator implements that sequence:
Liquidity map → Sweep → CHoCH with displacement (FVG) → PD array of the impulse → Retest in Discount / Premium or OTE → Structure-aware stop → Targets at the next opposing liquidity → Break-even and statistics
Liquidity levels (pools, previous day / week, sessions) define where stops rest. A sweep of one of them is the first condition of a setup. A change of character in the opposite direction within the sweep window confirms the shift, but only if the leg left a fair value gap — displacement. The FVG or Order Block created by that leg becomes the single armed zone. Time (killzones or Silver Bullet) and the daily bias filter when a setup may arm. The dealing range decides whether the retest is in discount or premium. On entry, the stop is anchored to the signal wick, the zone or the swept extreme, and TP2 / TP3 can be placed at the next untaken opposing liquidity or at standard deviation projections of the setup leg — closing the loop back to the liquidity map the setup started from.
Without the liquidity layer, a CHoCH is just a break. Without displacement, a sweep-and-break can be a slow drift. Without the PD array, there is no defined entry. Without premium / discount, entries are taken at any price. Without time and bias filters, the model runs at hours and in directions ICT itself avoids. Together they turn twenty separate drawings into one testable trade idea.
🔍 WHAT MAKES IT ORIGINAL
1️⃣ Dual market structure engine — external and internal BOS / CHoCH.
Two independent structure trackers run on confirmed pivots: External (swing length 10) and Internal (swing length 3). A break of the last unbroken swing in the trend direction is a BOS; a break against the current trend is a CHoCH (market structure shift).
— Break confirmation: Close (default) = close beyond the swing; Wick = high / low beyond the swing.
— If one bar breaks both the swing high and the swing low, both are consumed and the direction is decided by the close.
— HH / LH / HL / LL labels classify each new external swing against the previous one.
— The Internal tracker feeds setups (a CHoCH can be internal or external) and can draw its own dashed breaks.
Why this matters: ICT entries usually come from the internal shift inside an external move. Tracking both levels separately avoids mixing minor and major structure.
2️⃣ Order Blocks anchored to the impulse extreme, with score and Breaker conversion.
On every BOS / CHoCH (External by default) the engine scans back from the broken swing (up to 300 bars) to the extreme of the move that caused the break:
— Extreme bar = lowest low (bullish) / highest high (bearish) between the swing and the break.
— Source candle = the first opposite-colored candle at the extreme or up to 2 bars older. No opposite candle → no Order Block.
— Proximal edge = body (default) or wick of the source candle; distal edge = the extreme.
— Zones thinner than 0.1 × ATR use the full candle; zones taller than 1.5 × ATR(50) are capped.
— A zone overlapping an existing untested zone of the same side by more than 50% is not duplicated.
— If price already returned into the zone before the break was confirmed (including the break bar itself), the OB is created as "tested".
Zone score (0–4 ★, shown as 0–100):
— +1 FVG inside the impulse (displacement)
— +1 liquidity sweep within 2 bars of the extreme
— +1 HTF trend in the same direction
— +1 zone midpoint in the discount half (bullish) / premium half (bearish) of the dealing range
Score = 25 × sum.
Invalidation: Close beyond distal (default), Wick beyond distal or Close beyond 50%. When a close invalidates the zone, it converts into a Breaker Block of the opposite direction (dashed, re-scored); a breaker is removed on a close back through it.
3️⃣ Fair Value Gaps with volatility-consistent threshold and live fill.
Three-candle imbalance:
— Bullish: low[0] > high[2] and close[1] > high[2]
— Bearish: high[0] < low[2] and close[1] < low[2]
— Minimum size: gap ≥ 0.2 × ATR(50) of the bar where the gap formed (the same rule is used when scanning history, so a gap shown on the chart is the same gap the setup engine sees).
FVGs shrink as price fills them and are removed when filled (Touch / 50% / Full, default Full). Up to 5 active gaps per side.
4️⃣ Rejection Blocks and Propulsion Blocks.
— Rejection Block: on a confirmed external swing, if the wick is at least 50% of the candle range, the zone from the body edge to the wick extreme is drawn (bearish at highs, bullish at lows). Skipped where an Order Block of the same side already covers it. Touches before confirmation mark it as tested.
— Propulsion Block: when an Order Block is touched for the first time by an opposite-colored candle, that candle becomes a candidate. If a later close within 3 bars breaks the candle's far side in the OB direction, the candle range becomes a Propulsion Block. Breakers do not produce Propulsion Blocks.
Both are informational PD arrays with their own limits (3 per side) and alerts; they do not trigger entries on their own.
5️⃣ Complete liquidity map with sweep detection.
— Swing pools: pivots with length 5. Two swings within 0.1 × ATR merge into EQH / EQL (×N for three or more touches). Single swings are tracked silently by default and can be drawn.
— Key levels: PDH / PDL, PWH / PWL (rolled by the D / W period of the symbol) and Asian, London, NY AM, NY PM highs / lows created when each session ends.
— Sweep = wick beyond the level and close back inside. A level traded through on close is marked as taken without a sweep.
The swept level's name ("PDL", "London H", "EQH") is carried through the setup, the entry label, the alert and the webhook.
6️⃣ Time layer — killzones, Silver Bullet and Midnight Open.
Default New York time (timezone configurable):
— Asian 20:00–00:00, London 02:00–05:00, NY AM 07:00–10:00, NY PM 13:30–16:00 — drawn as live range boxes
— Silver Bullet windows 03:00–04:00, 10:00–11:00, 14:00–15:00 (optional background highlight)
— Midnight Open = open of the bar that starts exactly at 00:00:00
Setup Time Filter: Off / Killzones (default) / Silver Bullet. The time layer runs on intraday charts up to 1H; above that it switches off automatically.
7️⃣ Daily Bias and Judas Swing.
Daily Bias (draw on liquidity) from the previous day's close against the prior day's range:
— close > prior high → bullish, draw on PDH
— close < prior low → bearish, draw on PDL
— both prior extremes taken, close inside → neutral (outside day)
— only prior high taken, close inside → bearish; only prior low taken → bullish
— otherwise neutral (inside day)
Setup filter: Off (default) / With bias only / Not against bias.
Judas Swing (window 00:00–05:00): with a bullish bias, price trades below the Midnight Open, the extreme is tracked, and the Judas is confirmed when a bar closes back above the Midnight Open — optionally only if the extreme also swept the current Asian range (default on). Mirrored for a bearish bias. The label is placed at the false-move extreme.
8️⃣ Sweep → CHoCH setup state machine with displacement gate.
A setup arms when all of the following are true on a confirmed bar:
— a sell-side sweep (for longs) or buy-side sweep (for shorts) happened within the last 20 bars and has not been used by another setup
— an external or internal CHoCH in the opposite direction prints now
— the time filter and the daily bias filter allow it
— the leg from the sweep to the CHoCH contains a fair value gap (Require Displacement, default on)
Entry PD array: FVG first (default) = the newest untouched FVG of the setup direction formed since the sweep, otherwise the OB created on the CHoCH bar. Alternatives: OB first, FVG only, OB only.
Only one setup is active. It is cancelled by an opposite CHoCH, a broken zone, a newer setup, or after 30 bars without a retest. Each sweep can arm only one setup.
9️⃣ Entry location — Premium / Discount or OTE.
The first candle that trades into the armed zone (for an FVG: and closes on the correct side of it) is the entry candidate. It becomes a signal only if:
— Discount / Premium (default): close below the 50% of the dealing range for longs, above it for shorts. The dealing range is the HTF swing range when HTF is on, otherwise the current external swing range.
— OTE (≥ 62%): close at or beyond the 61.8% retracement of the setup leg and inside the leg.
If the filter has no valid range yet, the attempt is skipped and reported — it never passes silently.
🔟 Trade engine — structure-aware stop, liquidity targets, tick-exact levels.
Stop-loss (ATR(14) of the risk engine):
— Wick-Anchored (default): min(signal low − 0.25 × ATR, entry − 0.5 × ATR) for longs
— Zone-Anchored: beyond the zone's distal edge with the same buffer and minimum
— Sweep-Anchored: beyond the swept extreme of the setup leg
— ATR: entry − ATR × SL multiplier
Targets, risk = |entry − SL|:
— R-Multiples (default): TP = entry ± risk × multiplier
— Liquidity: TP1 in R; TP2 / TP3 = the next untaken opposing pool or key level beyond the previous target
— Std Deviations: TP2 / TP3 = the next SD projections of the setup leg
R-multiples are the fallback when no level is found.
Presets (SL × ATR / TP1 / TP2 / TP3 in R): Conservative 2.5 / 1 / 2 / 4, Balanced 1.5 / 1 / 2 / 3 (default), Aggressive 1.0 / 1.5 / 2.5 / 4, Scalping 0.8 / 0.8 / 1.5 / 2, Custom.
All levels are rounded to the instrument tick — the stop away from entry, targets toward it. If TP1 lands within one tick of entry or neighbouring targets collapse after rounding, the trade is not opened and the reason is reported.
1️⃣1️⃣ Trade management — break-even, TP priority, atomic reversal.
— After TP1 the stop moves to break-even (offset 0 by default, capped at half the way to TP1, rounded toward entry). If the TP1 bar already closed beyond the break-even level, the trade is closed at that close instead of placing a stop on the wrong side of price.
— A stop is never hit on the bar it was moved; when TP1 or TP3 and the stop are touched on the same bar, the target is counted first (optimistic intrabar model).
— An opposite signal reverses the position only after the new trade plan is validated; if the new plan is invalid, the open position stays.
— Statistics: a trade is a win once TP1 is reached. Win rate for 24H / 30D / All-Time, plus the last 10 results.
1️⃣2️⃣ Standard deviation projections and HTF context.
— SD projections of the setup leg (sweep extreme → CHoCH): level = leg high + k × leg range for longs, leg low − k × leg range for shorts. Default "1, 2, 2.5", up to 8 levels, k ≤ 10.
— HTF engine (default 4H, swing length 5) runs on closed HTF bars: HTF trend, HTF Order Blocks and the HTF dealing range used by the score and the Discount / Premium filter.
⚙️ HOW IT WORKS — CALCULATION FLOW
Step 1 — Calendar levels: on a new day / week, PDH / PDL and PWH / PWL are set; finished killzone sessions publish their highs and lows.
Step 2 — Liquidity: pools and key levels are checked for sweeps; new pivots are added and merged into EQH / EQL.
Step 3 — Time and narrative: Midnight Open is set at 00:00:00, the daily bias is read, the Judas Swing state machine advances.
Step 4 — Structure: external and internal BOS / CHoCH are evaluated; the dealing range is updated.
Step 5 — PD arrays: Order Blocks are mitigated, converted to Breakers or created; Propulsion and Rejection Blocks are updated; FVGs shrink, fill or are created.
Step 6 — Setup: the armed setup is checked for expiry, opposite CHoCH and entry; a new Sweep → CHoCH with displacement arms the next zone and draws SD projections.
Step 7 — Trade engine: TP / SL hits and break-even are processed on the open trade; a valid signal opens or reverses a trade with tick-rounded levels.
Step 8 — Output: dashboard, lines and alerts are produced in a fixed order: management → closures → reversal → entries → info.
📖 HOW TO USE
🎯 Quick start:
1. Add the indicator to a 1M–15M chart. Keep the defaults: HTF 4H, Time Filter "Killzones", Entry "FVG first", Filter "Discount / Premium".
2. Read the daily bias and the Midnight Open on the dashboard; prefer setups in the bias direction.
3. Wait for a "Setup ▲ / ▼" label — a sweep and a displacement CHoCH have just happened, and the armed zone is outlined.
4. A BUY / SELL label appears on the first retest of that zone in discount / premium, with SL and TP1–TP3 drawn.
5. Create one alert with "Any alert() function call" to receive every event.
👁️ Reading the chart:
— 🟢 / 🔴 BOS and CHoCH lines with labels; HH / LH / HL / LL at swings
— Solid boxes = Order Blocks with ★ score; dotted border = tested; dashed = Breaker
— Blue / orange boxes = Fair Value Gaps (shrink as they fill)
— "RB" / "PB" boxes = Rejection and Propulsion Blocks
— Dotted lines = single swings (when enabled); solid lines with EQH / EQL = equal highs / lows; "Sweep" labels at swept levels
— Grey lines = PDH / PDL, PWH / PWL, session highs / lows (dotted once taken)
— Colored session boxes = killzones; dashed amber line = Midnight Open; "Judas ▲ / ▼" label at the false-move extreme
— Premium (red) / Discount (green) shading with equilibrium line; amber OTE band in trend direction
— Purple dotted "-1 SD", "-2 SD" lines = standard deviation projections of the setup leg
— Dashed wide boxes "HTF 240 OB" = higher-timeframe Order Blocks
— Entry, SL and TP1–TP3 lines with labels; "✓" marks reached targets; orange "SL BE" after break-even
📊 Dashboard fields:
— Market: Trend, Internal trend, Age of trend, HTF Bias, Range position (Premium / Discount %), Signal (position), Last signal with score, Timeframe
— ICT: Active zones ▲ / ▼, FVG count, nearest Demand and Supply, armed Setup with bars left, current Killzone, PDH / PDL, RB / PB count, Daily Bias, Judas state
— Trade: Entry, SL (BE when moved), TP1–TP3 with liquidity tags, actual R:R to TP1 / TP3, SL distance %
— Stats: Trades, Wins, Losses, Win rate with gauge, Form (last 10)
🔧 Tuning guide:
— Too few setups: set Time Filter to Off, turn Require Displacement off, or raise the Sweep → CHoCH window.
— Too many zones: raise Min Score to Show, lower Max Active Zones, enable Require FVG in Impulse.
— Swing trading (1H–4H): HTF Daily, External Swing Length 12–20; killzones switch off above 1H.
— Stops too tight: use Sweep-Anchored or Zone-Anchored SL, or the Conservative preset.
— Chart too busy: switch off the layers you do not trade — every module has its own toggle.
⚙️ KEY SETTINGS REFERENCE
🧭 Market Structure:
— External Swing Length (default 10): pivot length of major structure
— Internal Swing Length (default 3): pivot length of minor structure, must be smaller than External
— Break Confirmation (default Close): Close or Wick beyond the swing
— Show External / Internal BOS / CHoCH (default on / off), Show HH / LH / HL / LL (default on)
🕐 Higher Timeframe:
— Use Higher Timeframe (default on), Higher Timeframe (default 240), HTF Swing Length (default 5), Show HTF Order Blocks (default on)
🧱 Order Blocks:
— Build From (default External), Proximal Edge (default Body), Max Zone Height (default 1.5 × ATR)
— Require FVG in Impulse (default off), Min Score to Show (default 0)
— Invalidation (default Close), Convert to Breaker (default on), Max Active Zones per Side (default 4), Keep Mitigated Zones (default off), Show 50% Line (default on)
⚡ Fair Value Gaps:
— Min Size (default 0.2 × ATR), Filled When (default Full), Shrink as Filled (default on), Max Active FVGs per Side (default 5)
💧 Liquidity:
— Pool Swing Length (default 5), Equal Tolerance (default 0.1 × ATR), Single Swings: Draw & Alert (default off), Max Active Pools per Side (default 6)
🧩 Rejection & Propulsion Blocks:
— Show Rejection Blocks (default on), Min Wick Share (default 0.5), Max per Side (default 3)
— Show Propulsion Blocks (default on), Confirm Within (default 3 bars), Max per Side (default 3)
🗝️ Key Levels:
— Previous Day High / Low, Previous Week High / Low, Session Highs / Lows, Midnight Open (all default on)
📅 Daily Bias & Judas Swing:
— Daily Bias (default on), Setup Filter (default Off)
— Judas Swing (default on), Window (default 00:00–05:00), Require Asian Range Sweep (default on)
📐 Standard Deviations:
— Show SD Projections (default on), Levels (default "1, 2, 2.5")
🕒 Killzones:
— Show Killzones (default on); Asian 20:00–00:00, London 02:00–05:00, NY AM 07:00–10:00, NY PM 13:30–16:00, each with its own toggle
— Timezone (default America/New_York), Setup Time Filter (default Killzones), Highlight Silver Bullet (default off)
🎯 Setup (Sweep → CHoCH):
— Enable Setups (default on), Sweep → CHoCH Window (default 20 bars), Wait for Retest (default 30 bars)
— Require Displacement (default on), Entry PD Array (default FVG first), Entry Location Filter (default Discount / Premium)
⚖️ Premium / Discount:
— Show Premium / Discount (default on), Show OTE (62–79%) (default on)
🛡️ Risk Management:
— Risk Preset (default Balanced), SL Mode (default Wick-Anchored), TP Mode (default R-Multiples)
— ATR Length (SL) (default 14); Custom multipliers SL 1.5, TP1 1.0, TP2 2.0, TP3 3.0 (TP1 < TP2 < TP3 enforced)
— Break-Even After TP1 (default on), BE Offset (default 0 × ATR)
— SL / TP lines, labels, % distance and line styles
🎨 Visual / Dashboard / Colors / Advanced:
— Theme Auto / Dark / Light; label and text sizes; zone, sweep, setup and signal label toggles; zone transparency (default 85); watermark
— Dashboard position, font size, four section toggles, Win Rate Period (default All-Time)
— Bull / Bear, FVG, OTE, RB and killzone colors
— Zone ATR Length (default 50), History Size (default 150 archived objects)
🔔 ALERTS
Create one alert with "Any alert() function call". All alerts fire once per bar close, in this order:
— 🛡️ BREAK-EVEN — new stop price
— 🎯 TP1 HIT / 🎯🎯 TP2 HIT — target price
— 🏆 TP3 HIT — entry and TP3
— 🛑 SL HIT / 🛡️ BE STOP-OUT — entry and stop price
— 🛡️ BE EXIT @ CLOSE — the TP1 bar closed beyond the break-even level
— 🔄 REVERSAL — new direction, closed as win / loss
— 🟢 LONG / 🔴 SHORT — price, swept level, setup type, score, SL, TP1–TP3 with liquidity tags, R:R, killzone, bar-close time
— ℹ️ INFO — BOS / CHoCH, sweeps (incl. PDH / PDL and sessions), OB touches, new FVGs, RB / PB, Judas Swing, daily bias, setups armed / rejected / skipped / cancelled, signals not executed with the reason
Every event has a webhook JSON variant (Webhook JSON Format), with null for missing prices.
⚠️ IMPORTANT NOTES
— 🚫 No repainting of confirmed events. BUY / SELL signals, setups, structure breaks, zones, sweeps and SL / TP hits are processed only on bar close (barstate.isconfirmed) and alerts use once-per-bar-close. HTF, previous-day and previous-week values come from closed bars. Pivots are confirmed with equal left / right lookback, so swing labels, Order Block origins and the Judas extreme are drawn back on the bar they describe after confirmation — delayed confirmation, not lookahead. The dashboard, Premium / Discount / OTE shading, HTF boxes and the extension of trade lines follow the live price inside the current bar.
— 📐 Trades are virtual: stops and targets are evaluated on closed OHLC bars, gaps are reported at the level price, and intrabar TP / SL conflicts are resolved in favor of the target. Statistics measure how often TP1 is reached, are recalculated from the loaded history on every reload, and are not a backtest. Past performance does not guarantee future results.
— ⚖️ ICT rules are implemented as explicit, documented heuristics: structure uses confirmed pivots, the score is a sum of four conditions (not a probability), and "standard deviations" are multiples of the setup leg as used in ICT, not statistical sigma. Killzones work on intraday charts up to 1H; Midnight Open needs a bar that opens exactly at 00:00:00 in the selected timezone. Use standard candles (not Heikin Ashi or Renko).
— 🛠️ This is an ICT structure, liquidity and trade-planning tool, not an automated trading bot. It maps the PD arrays, liquidity and time, arms setups and manages a virtual position — trade decisions remain yours.
— 🌐 Works on stocks, forex, crypto, futures and indices. Killzones default to New York time; previous-day levels follow the symbol's session day.

10 years in trading. For all inquiries, contact me on my Telegram channel: t.me/WillyAlgoTrader or Instagram: @willytraderbtc
Exención de responsabilidad
La información y las publicaciones no constituyen, ni deben considerarse como, asesoramiento o recomendaciones financieras, de inversión, de trading u otro tipo, proporcionadas o respaldadas por TradingView. Obtenga más información en Condiciones de uso.
10 years in trading. For all inquiries, contact me on my Telegram channel: t.me/WillyAlgoTrader or Instagram: @willytraderbtc
Exención de responsabilidad
La información y las publicaciones no constituyen, ni deben considerarse como, asesoramiento o recomendaciones financieras, de inversión, de trading u otro tipo, proporcionadas o respaldadas por TradingView. Obtenga más información en Condiciones de uso.