
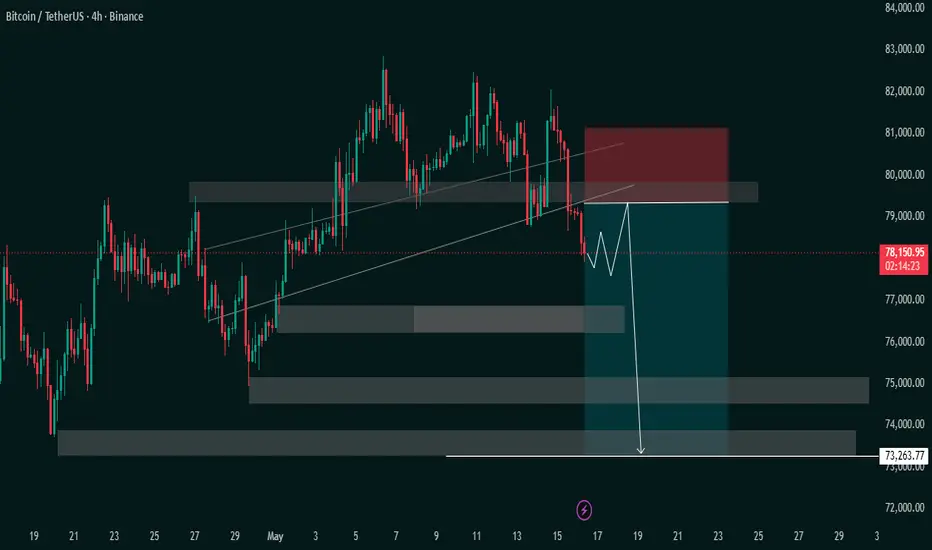
This 4H BTCUSDT chart is showing a bearish continuation structure after rejection from a key supply zone around 79.5k–80k.
Key Observations
Price respected the ascending trendline for several days but has now broken below momentum support.
The grey zones represent:
Supply / resistance near 79.5k–80.5k
Demand zones around:
76.3k
74.8k
73.2k (major liquidity target)
The white projected path suggests:
Small bounce/retest into resistance
Failure to reclaim 79k–80k
Strong selloff toward lower liquidity pools
Market Structure
The structure currently favors bears because:
Lower highs are forming after the rejection near 82k
Recent candles show aggressive downside displacement
Price lost short-term trend support
Retest area aligns with previous support turned resistance
Trade Idea Shown on Chart
The risk-reward box indicates:
Entry Zone: ~78k–79k
Stop Loss: Above 80.8k–81k
Target: ~73.2k
Approximate setup:
Risk: ~2%
Reward: ~6–7%
Roughly a 1:3 R:R setup
Important Levels
Resistance
79.5k
80.8k
82k
Support / Targets
76.3k
74.8k
73.2k
Key Observations
Price respected the ascending trendline for several days but has now broken below momentum support.
The grey zones represent:
Supply / resistance near 79.5k–80.5k
Demand zones around:
76.3k
74.8k
73.2k (major liquidity target)
The white projected path suggests:
Small bounce/retest into resistance
Failure to reclaim 79k–80k
Strong selloff toward lower liquidity pools
Market Structure
The structure currently favors bears because:
Lower highs are forming after the rejection near 82k
Recent candles show aggressive downside displacement
Price lost short-term trend support
Retest area aligns with previous support turned resistance
Trade Idea Shown on Chart
The risk-reward box indicates:
Entry Zone: ~78k–79k
Stop Loss: Above 80.8k–81k
Target: ~73.2k
Approximate setup:
Risk: ~2%
Reward: ~6–7%
Roughly a 1:3 R:R setup
Important Levels
Resistance
79.5k
80.8k
82k
Support / Targets
76.3k
74.8k
73.2k

Clause de non-responsabilité
Les informations et publications ne sont pas destinées à être, et ne constituent pas, des conseils ou recommandations financiers, d'investissement, de trading ou autres fournis ou approuvés par TradingView. Pour en savoir plus, consultez les Conditions d'utilisation.
Clause de non-responsabilité
Les informations et publications ne sont pas destinées à être, et ne constituent pas, des conseils ou recommandations financiers, d'investissement, de trading ou autres fournis ou approuvés par TradingView. Pour en savoir plus, consultez les Conditions d'utilisation.