

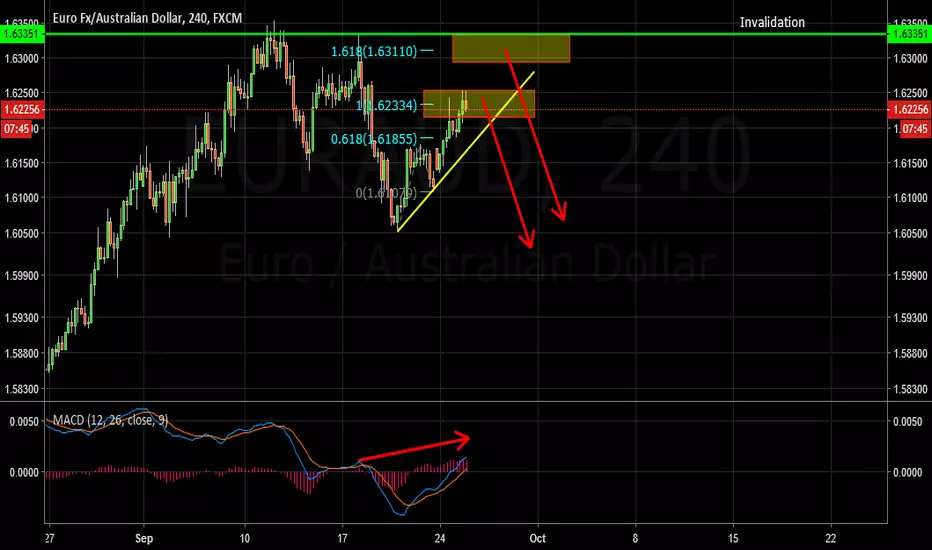
H4 - Two critical zones, price has reached the first critical zone, hidden bearish divergence.
if the price holds in this zone look for bearish evidences and then we may start looking for sells.
Alternatively if the price breaks above this zone, moves higher and reaches the second critical zone, we may then start looking for sells from the second critical zone with bearish evidences.
Invalidation: If the price breaks and holds above the invalidation level (marked in green), then this setup will be invalidated (false breaks can be neglected).
if the price holds in this zone look for bearish evidences and then we may start looking for sells.
Alternatively if the price breaks above this zone, moves higher and reaches the second critical zone, we may then start looking for sells from the second critical zone with bearish evidences.
Invalidation: If the price breaks and holds above the invalidation level (marked in green), then this setup will be invalidated (false breaks can be neglected).

Clause de non-responsabilité
Les informations et publications ne sont pas destinées à être, et ne constituent pas, des conseils ou recommandations financiers, d'investissement, de trading ou autres fournis ou approuvés par TradingView. Pour en savoir plus, consultez les Conditions d'utilisation.
Clause de non-responsabilité
Les informations et publications ne sont pas destinées à être, et ne constituent pas, des conseils ou recommandations financiers, d'investissement, de trading ou autres fournis ou approuvés par TradingView. Pour en savoir plus, consultez les Conditions d'utilisation.