
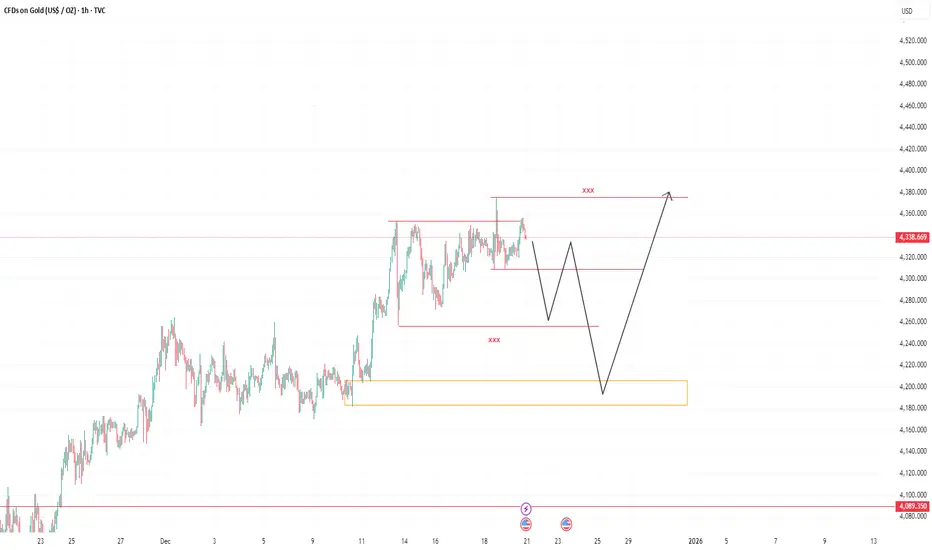
Gold is currently consolidating after a strong impulsive move to the upside. The price is trading inside a range, marked clearly by the red horizontal levels.
🔴 Key Resistance (Top Red Line)
This zone represents major resistance / liquidity where price has previously been rejected.
Multiple rejections here suggest sellers are active.
A clean breakout and hold above this level would signal bullish continuation.
🔴 Key Support (Middle Red Line)
Acts as range support and short-term decision zone.
Price is currently reacting around this area, showing indecision.
A breakdown below this level opens the door for deeper pullbacks.
🟧 Major Demand Zone (Orange Box)
This is a strong demand / accumulation area.
If price sweeps liquidity below the range, this zone is the high-probability buy area.
Expect strong reactions or reversal setups here.
🧠 Projected Price Path (Black Arrows)
The drawing suggests a liquidity grab scenario:
Price breaks below range support.
Sweeps sell-side liquidity.
Drops into the demand zone.
Strong bullish reaction from demand.
Expansion move back toward — and potentially above — resistance.
📌 Bias Summary
Short-term: Ranging / corrective.
Mid-term: Bullish, after liquidity sweep.
Best trades come from patience, not chasing breakouts.
💡 Let price come to your level. Trade the reaction, not the prediction.
🔴 Key Resistance (Top Red Line)
This zone represents major resistance / liquidity where price has previously been rejected.
Multiple rejections here suggest sellers are active.
A clean breakout and hold above this level would signal bullish continuation.
🔴 Key Support (Middle Red Line)
Acts as range support and short-term decision zone.
Price is currently reacting around this area, showing indecision.
A breakdown below this level opens the door for deeper pullbacks.
🟧 Major Demand Zone (Orange Box)
This is a strong demand / accumulation area.
If price sweeps liquidity below the range, this zone is the high-probability buy area.
Expect strong reactions or reversal setups here.
🧠 Projected Price Path (Black Arrows)
The drawing suggests a liquidity grab scenario:
Price breaks below range support.
Sweeps sell-side liquidity.
Drops into the demand zone.
Strong bullish reaction from demand.
Expansion move back toward — and potentially above — resistance.
📌 Bias Summary
Short-term: Ranging / corrective.
Mid-term: Bullish, after liquidity sweep.
Best trades come from patience, not chasing breakouts.
💡 Let price come to your level. Trade the reaction, not the prediction.
Transaction en cours
takes the liquidity above first. could it be the lower next? or we on a distribution.. pewwww..Trade fermée: cible de profit atteinte

Clause de non-responsabilité
Les informations et publications ne sont pas destinées à être, et ne constituent pas, des conseils ou recommandations financiers, d'investissement, de trading ou autres fournis ou approuvés par TradingView. Pour en savoir plus, consultez les Conditions d'utilisation.
Clause de non-responsabilité
Les informations et publications ne sont pas destinées à être, et ne constituent pas, des conseils ou recommandations financiers, d'investissement, de trading ou autres fournis ou approuvés par TradingView. Pour en savoir plus, consultez les Conditions d'utilisation.