
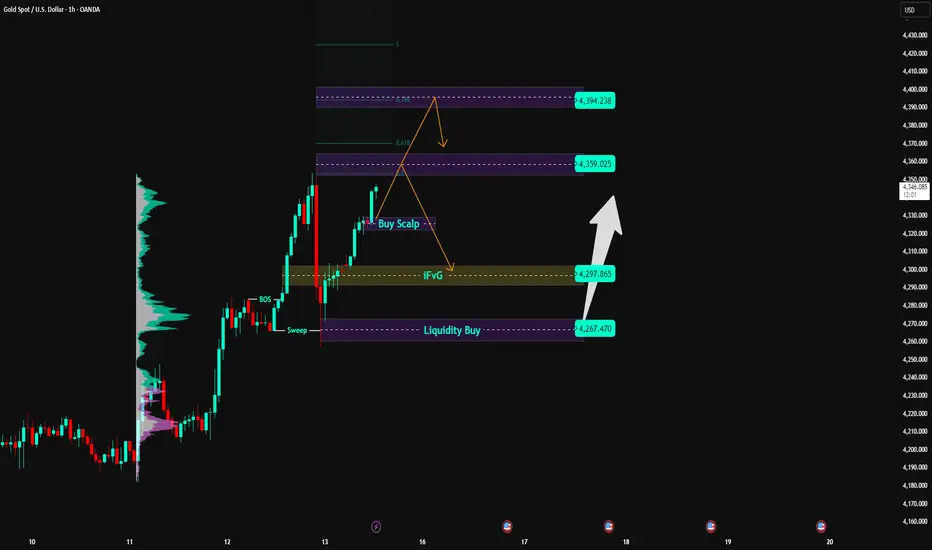
1. Market Context & Structure (H1)
• Gold has completed a liquidity sweep followed by a bullish BOS, confirming that the short-term uptrend remains intact.
• After the strong impulse, price is now entering a rebalancing / technical pullback phase rather than a reversal.
• The overall structure remains Higher High – Higher Low, favoring BUY strategies aligned with the dominant trend.
2. Key Technical Zones on the Chart
• Resistance / Supply Zone 1: 4,359 – 4,360
→ A previously strong reaction zone, where short-term corrections may occur.
• Resistance / Supply Zone 2: 4,394
→ Fibonacci 0.786 extension area, prone to profit-taking or upper liquidity sweeps.
• iFVG – Pullback Zone: 4,297 – 4,300
→ Inefficiency left during the bullish impulse, prioritized for the first BUY reaction.
• Liquidity Buy Zone: 4,267
→ Resting liquidity below, where a deeper sweep may occur before trend continuation.
3. Trading Scenarios – Captain Vincent Style
🔹 Primary Scenario – BUY at iFVG / Liquidity Buy (Preferred)
• Expect price to pull back from the 4,35x area toward 4,297 – 4,300 (iFVG) or deeper into 4,267 (Liquidity Buy).
• At the BUY zone, wait for confirmation signals:
– Strong rejection wicks
– Bullish engulfing
– Bullish ChoCH on M15–H1
• Preferred BUY Zones:
– BUY 1: 4,297 – 4,300
– BUY 2 (deeper): 4,267
• Targets:
– TP1: 4,359
– TP2: 4,394
– TP3 extension: continuation if 4,394 is broken.
• Invalidation:
– H1 close below 4,255 → short-term bullish structure weakens.
🔹 Secondary Scenario – Short-Term SELL Reaction at Supply
• If price rallies directly into 4,359 – 4,394 without a clear pullback, a short-term SELL reaction may appear.
• SELLs are scalp / counter-trend only, not the primary scenario.
• SELL target: pullback toward iFVG 4,297.
4. Risk & Management Notes
• Avoid FOMO BUY at high resistance zones.
• Prioritize BUY entries at discounted areas (FVG – Liquidity).
• Main bias remains BUY on pullbacks; SELLs are only technical reactions.
• Adjust position sizing carefully as the market is in an expansion phase.
• Gold has completed a liquidity sweep followed by a bullish BOS, confirming that the short-term uptrend remains intact.
• After the strong impulse, price is now entering a rebalancing / technical pullback phase rather than a reversal.
• The overall structure remains Higher High – Higher Low, favoring BUY strategies aligned with the dominant trend.
2. Key Technical Zones on the Chart
• Resistance / Supply Zone 1: 4,359 – 4,360
→ A previously strong reaction zone, where short-term corrections may occur.
• Resistance / Supply Zone 2: 4,394
→ Fibonacci 0.786 extension area, prone to profit-taking or upper liquidity sweeps.
• iFVG – Pullback Zone: 4,297 – 4,300
→ Inefficiency left during the bullish impulse, prioritized for the first BUY reaction.
• Liquidity Buy Zone: 4,267
→ Resting liquidity below, where a deeper sweep may occur before trend continuation.
3. Trading Scenarios – Captain Vincent Style
🔹 Primary Scenario – BUY at iFVG / Liquidity Buy (Preferred)
• Expect price to pull back from the 4,35x area toward 4,297 – 4,300 (iFVG) or deeper into 4,267 (Liquidity Buy).
• At the BUY zone, wait for confirmation signals:
– Strong rejection wicks
– Bullish engulfing
– Bullish ChoCH on M15–H1
• Preferred BUY Zones:
– BUY 1: 4,297 – 4,300
– BUY 2 (deeper): 4,267
• Targets:
– TP1: 4,359
– TP2: 4,394
– TP3 extension: continuation if 4,394 is broken.
• Invalidation:
– H1 close below 4,255 → short-term bullish structure weakens.
🔹 Secondary Scenario – Short-Term SELL Reaction at Supply
• If price rallies directly into 4,359 – 4,394 without a clear pullback, a short-term SELL reaction may appear.
• SELLs are scalp / counter-trend only, not the primary scenario.
• SELL target: pullback toward iFVG 4,297.
4. Risk & Management Notes
• Avoid FOMO BUY at high resistance zones.
• Prioritize BUY entries at discounted areas (FVG – Liquidity).
• Main bias remains BUY on pullbacks; SELLs are only technical reactions.
• Adjust position sizing carefully as the market is in an expansion phase.

Clause de non-responsabilité
Les informations et publications ne sont pas destinées à être, et ne constituent pas, des conseils ou recommandations financiers, d'investissement, de trading ou autres fournis ou approuvés par TradingView. Pour en savoir plus, consultez les Conditions d'utilisation.
Clause de non-responsabilité
Les informations et publications ne sont pas destinées à être, et ne constituent pas, des conseils ou recommandations financiers, d'investissement, de trading ou autres fournis ou approuvés par TradingView. Pour en savoir plus, consultez les Conditions d'utilisation.