OPEN-SOURCE SCRIPT
SMC Supply and Demand Zones [Dots3Red]
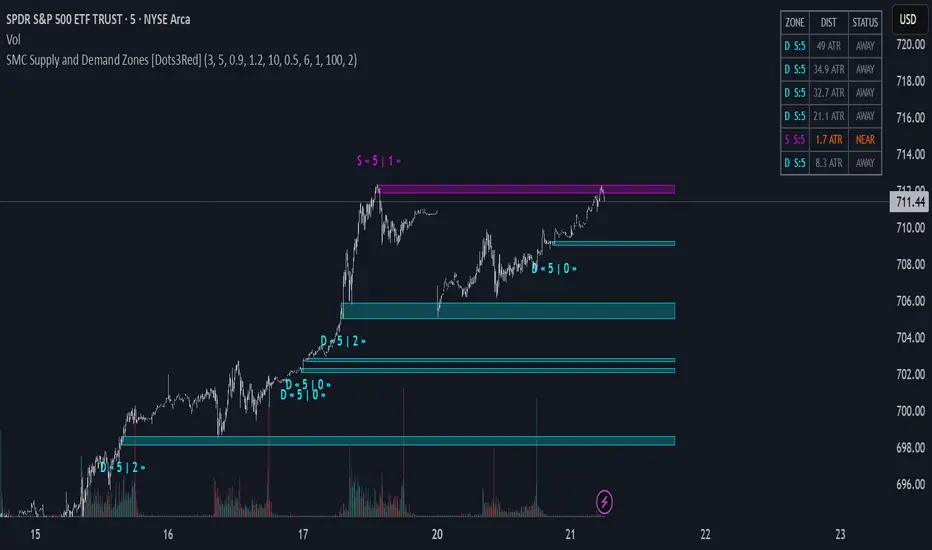
SMC Supply & Demand Zones [Dots3Red]
This script automatically detects and visualizes Smart Money Concept (SMC) Supply and Demand zones using a three-factor confirmation model: base consolidation, impulse breakout, and volume surge.
How zone detection works
The indicator looks for a tight consolidation base (price range below ATR threshold) followed by a strong impulsive candle breaking out of that base with above-average volume. The direction of the breakout determines the zone type — bullish breakout creates a Demand zone, bearish breakout creates a Supply zone. The base range itself becomes the zone, as that is where institutional activity occurred.
Zone scoring (max 5)
Each zone is scored at birth based on three factors:
Higher scoring zones render with stronger fill intensity.
Visual features
Proximity dashboard
A live table in the top-right corner shows all active zones ranked by distance from current price. Each zone displays its type, score, distance in ATR units, and status — INSIDE (gold), NEAR (orange), or AWAY (gray).
Zone invalidation
A zone is considered broken when price closes through it (configurable to wick-based) or when it has been touched too many times — both signals that the institutional order block has been absorbed.
Settings
All key parameters are tunable — base length, ATR multipliers, volume sensitivity, touch limits, score threshold, and proximity distance — making the indicator adaptable to any instrument and timeframe.

This script automatically detects and visualizes Smart Money Concept (SMC) Supply and Demand zones using a three-factor confirmation model: base consolidation, impulse breakout, and volume surge.
How zone detection works
The indicator looks for a tight consolidation base (price range below ATR threshold) followed by a strong impulsive candle breaking out of that base with above-average volume. The direction of the breakout determines the zone type — bullish breakout creates a Demand zone, bearish breakout creates a Supply zone. The base range itself becomes the zone, as that is where institutional activity occurred.
Zone scoring (max 5)
Each zone is scored at birth based on three factors:
- Base tightness — how compressed the consolidation was (1pt)
- Impulse strength — how strong the breakout candle body was relative to ATR (2pts)
- Volume confirmation — whether breakout volume exceeded the MA threshold (2pts)
Higher scoring zones render with stronger fill intensity.
Visual features
- Supply and Demand zones themselves
- Inactive zones (invalidated or max touches reached) can be shown or hidden via toggle
Proximity dashboard
A live table in the top-right corner shows all active zones ranked by distance from current price. Each zone displays its type, score, distance in ATR units, and status — INSIDE (gold), NEAR (orange), or AWAY (gray).
Zone invalidation
A zone is considered broken when price closes through it (configurable to wick-based) or when it has been touched too many times — both signals that the institutional order block has been absorbed.
Settings
All key parameters are tunable — base length, ATR multipliers, volume sensitivity, touch limits, score threshold, and proximity distance — making the indicator adaptable to any instrument and timeframe.
Script open-source
Dans l'esprit TradingView, le créateur de ce script l'a rendu open source afin que les traders puissent examiner et vérifier ses fonctionnalités. Bravo à l'auteur! Bien que vous puissiez l'utiliser gratuitement, n'oubliez pas que la republication du code est soumise à nos Règles.

Connect the dots to elevate your trading.
Clause de non-responsabilité
Les informations et publications ne sont pas destinées à être, et ne constituent pas, des conseils ou recommandations financiers, d'investissement, de trading ou autres fournis ou approuvés par TradingView. Pour en savoir plus, consultez les Conditions d'utilisation.
Script open-source
Dans l'esprit TradingView, le créateur de ce script l'a rendu open source afin que les traders puissent examiner et vérifier ses fonctionnalités. Bravo à l'auteur! Bien que vous puissiez l'utiliser gratuitement, n'oubliez pas que la republication du code est soumise à nos Règles.
Connect the dots to elevate your trading.
Clause de non-responsabilité
Les informations et publications ne sont pas destinées à être, et ne constituent pas, des conseils ou recommandations financiers, d'investissement, de trading ou autres fournis ou approuvés par TradingView. Pour en savoir plus, consultez les Conditions d'utilisation.