Heat Sweep | Volume Heatmap Liquidity Strategy
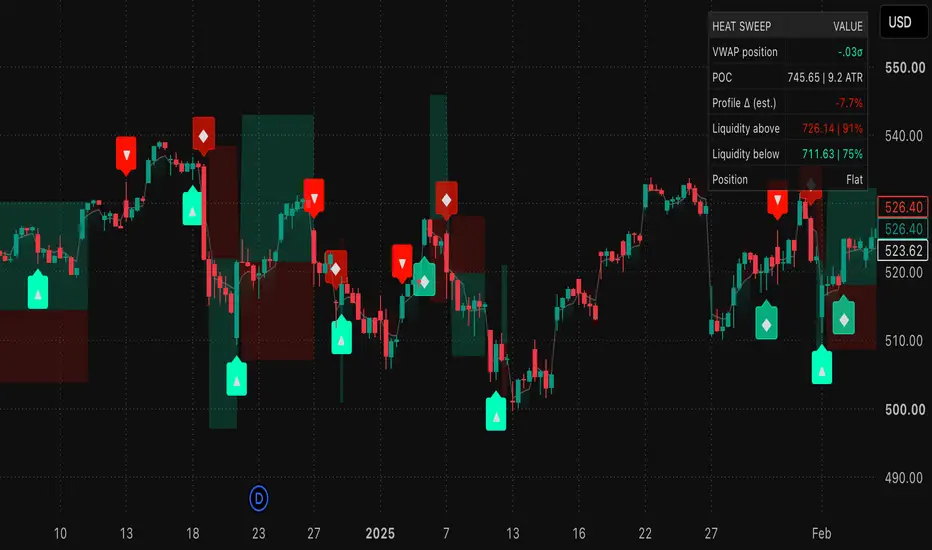
Heat Sweep draws a volume heatmap of where trading actually happened, then looks for liquidity sweeps at the price levels that carry the most volume. When price wicks through one of those levels on heavy volume and closes back inside, the strategy treats it as a stop hunt and trades the reversal with a fixed risk-to-reward.
Strategy explanation
Features
Tips
Warning
Strategy explanation
- Heatmap: the last N bars are binned by closing price. Each row’s volume is split into buy (close ≥ open) and sell (close < open) volume. The busiest row is the POC.
- Liquidity levels: the last two confirmed swing highs and lows are tracked as resting liquidity. Each level gets a heat score: the volume near its price as a share of the POC row.
- Setup 1, sweep: price wicks beyond a level and closes back inside. The level’s heat must pass the minimum, and the candle’s volume must exceed its 20-bar average. A sweep below a swing low is a long; a sweep above a swing high is a short.
- Setup 2, POC reclaim: the close crosses the POC with a same-direction candle and enough volume.
- Exits: the stop sits beyond the sweep wick (or the 3-bar swing for POC trades) plus an ATR buffer. The target is a fixed multiple of the risk. Position size is set so a stop-out costs a fixed percentage of equity, capped by a leverage limit.
- Used levels are consumed: a swept level is removed, so it can’t trigger twice.
Features
- Buy/sell split volume profile with per-row delta tags and a highlighted POC
- Anchored VWAP with two deviation bands and gradient fills (auto-anchor by timeframe)
- VWAP deviation candles, coloured by distance from VWAP
- Shaded liquidity zones with a volume-heat percentage
- Two entry setups (sweep, POC reclaim), each toggleable
- Risk-based position sizing with a leverage cap
- Entry, stop and target shading while a trade is open
- Status table with VWAP position, POC distance, profile delta, relative volume, nearest liquidity and position
- Alerts for long and short signals
Tips
- Raise Min level heat toward 0.5 for fewer, cleaner sweeps. Set it to 0 for the most trades.
- Turn off POC reclaim to trade pure liquidity sweeps only.
- Turn on VWAP location filter for stricter mean-reversion entries (longs below VWAP, shorts above).
- Increase Swing length on noisy lower timeframes and decrease it on higher ones.
- Hide the chart’s default candle body, border and wick colours so the VWAP deviation candles show cleanly.
- Test on liquid symbols with reliable volume, and compare results across several timeframes.
- Keep Risk per trade modest. It scales profit and drawdown equally.
Warning
- This is an educational tool, not financial advice. Past backtest results do not guarantee future performance.
- The heatmap is built from candle data, not an order book. Buy/sell delta is estimated from candle direction, not real bid/ask flow. Volume quality varies by data vendor and market.
- The profile, levels and table recalculate on the live bar, so the right-side graphics can change until the bar closes. Signals only fire on confirmed bars.
- Backtests assume fills at stop and limit prices. When both are touched inside one bar, the order of events is unknown. Slippage, spreads and commissions can move real results a lot. Review the defaults against your market.
- Risk-based sizing can produce large positions with tight stops. Check max drawdown in the Strategy Tester before using any risk setting live.
- It needs volume data and will not work on symbols without it.

Clause de non-responsabilité
Les informations et publications ne sont pas destinées à être, et ne constituent pas, des conseils ou recommandations financiers, d'investissement, de trading ou autres fournis ou approuvés par TradingView. Pour en savoir plus, consultez les Conditions d'utilisation.
Clause de non-responsabilité
Les informations et publications ne sont pas destinées à être, et ne constituent pas, des conseils ou recommandations financiers, d'investissement, de trading ou autres fournis ou approuvés par TradingView. Pour en savoir plus, consultez les Conditions d'utilisation.