Order Flow Control Regime [Jireh]
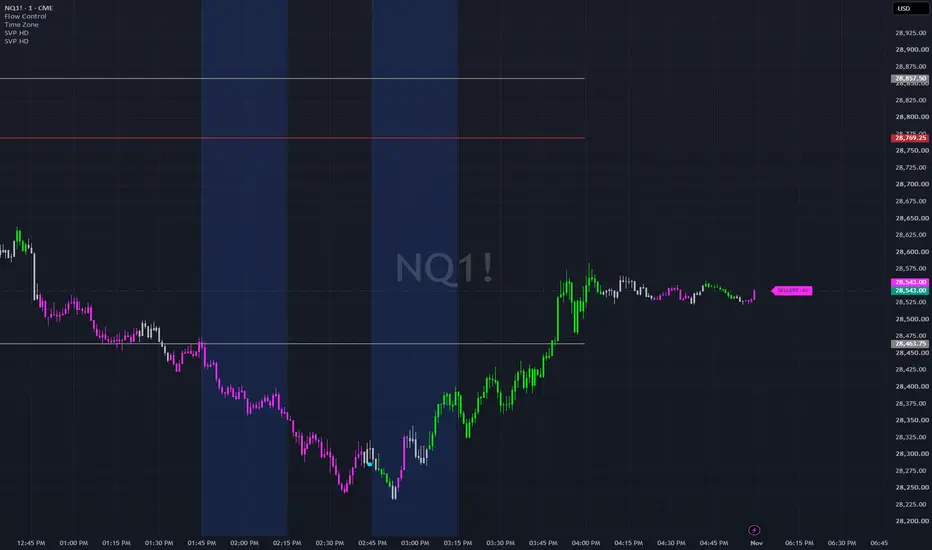
Order Flow Control Regime [Jireh]
OVERVIEW
Colors every candle by who is in control of the market, based on order flow instead of moving averages:
• Green – Buyers in control
• Magenta – Sellers in control
• Gray – Contested (no side has clear control)
It's filtered like a regime tool, so candles don't flip color on every bar. A side has to clearly take control before the color changes, and it keeps control until it clearly loses it.
HOW IT WORKS
The script combines three order-flow readings into one control score from -100 (sellers) to +100 (buyers):
1. Aggression – net delta (aggressive buying minus aggressive selling) as a share of total volume over the lookback. Shows which side is hitting the market harder.
2. Price response – is price actually moving where the aggression is pushing? Heavy aggressive buying while price goes nowhere cancels out, because that aggression is being absorbed. Control requires both pressure and results.
3. Absorption memory – a bar with unusually large buying that closes down and weak is treated as absorbed buying, which tilts control toward sellers (and vice versa). This influence fades gradually over the following bars instead of disappearing at once.
REGIME FILTER
• Hysteresis – a side must reach the "enter" score to take control, but keeps it until the score falls below the lower "exit" score. The gap between the two prevents color flicker in choppy conditions.
• Confirmation – any change must hold for a set number of bars before the color switches.
DATA
• Footprint (Premium/Ultimate) – uses TradingView's native bid/ask volume for real delta.
• Approximate – estimates delta from where each candle closes within its range. Works on any plan.
• Auto (default) – uses footprint when available, otherwise approximate.
The label tooltip shows which data source is active.
DISPLAY
• Full candle coloring (body, border and wick), bodies only, or off
• Optional right-edge label with control state and score. Hover for the full breakdown: delta ratio, price response, absorption bias.
• Optional absorption dots: orange above the bar for absorbed buying, cyan below for absorbed selling
• Full color customization
If full candles only appear when you hover over the indicator, open the indicator's menu and choose Visual order > Bring to front.
SETTINGS
• Data: delta source, footprint row size
• Control engine: lookback, delta ratio for full credit, ATR length, price-move scaling, smoothing
• Absorption memory: big-delta multiple, averaging length, memory decay, dots on/off
• Weights for aggression, price response and absorption
• Regime filter: enter score, exit score, confirmation bars
ALERTS
Buyers take control, sellers take control, contested, absorbed buying, absorbed selling (use "Once per bar close").
Default settings are tuned for NQ on the 1-minute chart.
This indicator is for educational and analytical purposes only and is not financial advice.
OVERVIEW
Colors every candle by who is in control of the market, based on order flow instead of moving averages:
• Green – Buyers in control
• Magenta – Sellers in control
• Gray – Contested (no side has clear control)
It's filtered like a regime tool, so candles don't flip color on every bar. A side has to clearly take control before the color changes, and it keeps control until it clearly loses it.
HOW IT WORKS
The script combines three order-flow readings into one control score from -100 (sellers) to +100 (buyers):
1. Aggression – net delta (aggressive buying minus aggressive selling) as a share of total volume over the lookback. Shows which side is hitting the market harder.
2. Price response – is price actually moving where the aggression is pushing? Heavy aggressive buying while price goes nowhere cancels out, because that aggression is being absorbed. Control requires both pressure and results.
3. Absorption memory – a bar with unusually large buying that closes down and weak is treated as absorbed buying, which tilts control toward sellers (and vice versa). This influence fades gradually over the following bars instead of disappearing at once.
REGIME FILTER
• Hysteresis – a side must reach the "enter" score to take control, but keeps it until the score falls below the lower "exit" score. The gap between the two prevents color flicker in choppy conditions.
• Confirmation – any change must hold for a set number of bars before the color switches.
DATA
• Footprint (Premium/Ultimate) – uses TradingView's native bid/ask volume for real delta.
• Approximate – estimates delta from where each candle closes within its range. Works on any plan.
• Auto (default) – uses footprint when available, otherwise approximate.
The label tooltip shows which data source is active.
DISPLAY
• Full candle coloring (body, border and wick), bodies only, or off
• Optional right-edge label with control state and score. Hover for the full breakdown: delta ratio, price response, absorption bias.
• Optional absorption dots: orange above the bar for absorbed buying, cyan below for absorbed selling
• Full color customization
If full candles only appear when you hover over the indicator, open the indicator's menu and choose Visual order > Bring to front.
SETTINGS
• Data: delta source, footprint row size
• Control engine: lookback, delta ratio for full credit, ATR length, price-move scaling, smoothing
• Absorption memory: big-delta multiple, averaging length, memory decay, dots on/off
• Weights for aggression, price response and absorption
• Regime filter: enter score, exit score, confirmation bars
ALERTS
Buyers take control, sellers take control, contested, absorbed buying, absorbed selling (use "Once per bar close").
Default settings are tuned for NQ on the 1-minute chart.
This indicator is for educational and analytical purposes only and is not financial advice.

Clause de non-responsabilité
Les informations et publications ne sont pas destinées à être, et ne constituent pas, des conseils ou recommandations financiers, d'investissement, de trading ou autres fournis ou approuvés par TradingView. Pour en savoir plus, consultez les Conditions d'utilisation.
Clause de non-responsabilité
Les informations et publications ne sont pas destinées à être, et ne constituent pas, des conseils ou recommandations financiers, d'investissement, de trading ou autres fournis ou approuvés par TradingView. Pour en savoir plus, consultez les Conditions d'utilisation.