
1. Price Level
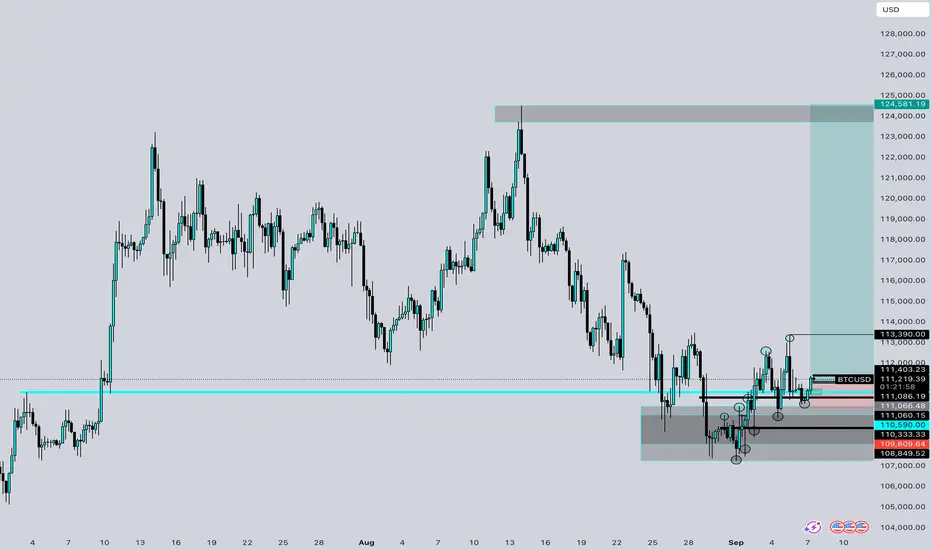
• BTCUSD is currently trading around 111,200.
• Recent move shows price bouncing from the 110,000 – 109,000 demand zone.
2. Support & Demand Zones
• Strong support zone marked around 108,800 – 110,000 (grey box).
Price has reacted multiple times here, showing accumulation and liquidity grabs.
• Intermediate support near 110,500 – 110,900.
3. Resistance & Target Zones
• First resistance / short-term target: 113,390.
• Major resistance / higher timeframe target: 124,500 – 125,000 (highlighted green box at the top).
4. Market Structure
• After a series of lower highs and lower lows, BTC found a base around 109k.
• Current structure shows a break of minor highs → potential start of a trend reversal.
• Price is consolidating above demand and building a higher low formation.
⸻
Buy Setup Analysis
• Entry Zone: Between 110,500 – 111,200 (current consolidation and demand retest).
• Stop Loss (SL): Below 108,800 (the low of demand zone and liquidity sweep).
• Take Profit (TP):
• TP1: 113,390 (first resistance).
• TP2: 118,000 (mid-structure target).
• TP3: 124,500 – 125,000 (major resistance zone).
• Risk-to-Reward (RR):
• If entered near 111,000 with SL at 108,800, and TP1 at 113,390 → ~1:1.
• If TP3 at 124,500 is achieved → ~5:1 RR.
• BTCUSD is currently trading around 111,200.
• Recent move shows price bouncing from the 110,000 – 109,000 demand zone.
2. Support & Demand Zones
• Strong support zone marked around 108,800 – 110,000 (grey box).
Price has reacted multiple times here, showing accumulation and liquidity grabs.
• Intermediate support near 110,500 – 110,900.
3. Resistance & Target Zones
• First resistance / short-term target: 113,390.
• Major resistance / higher timeframe target: 124,500 – 125,000 (highlighted green box at the top).
4. Market Structure
• After a series of lower highs and lower lows, BTC found a base around 109k.
• Current structure shows a break of minor highs → potential start of a trend reversal.
• Price is consolidating above demand and building a higher low formation.
⸻
Buy Setup Analysis
• Entry Zone: Between 110,500 – 111,200 (current consolidation and demand retest).
• Stop Loss (SL): Below 108,800 (the low of demand zone and liquidity sweep).
• Take Profit (TP):
• TP1: 113,390 (first resistance).
• TP2: 118,000 (mid-structure target).
• TP3: 124,500 – 125,000 (major resistance zone).
• Risk-to-Reward (RR):
• If entered near 111,000 with SL at 108,800, and TP1 at 113,390 → ~1:1.
• If TP3 at 124,500 is achieved → ~5:1 RR.

Pernyataan Penyangkalan
Informasi dan publikasi ini tidak dimaksudkan, dan bukan merupakan, saran atau rekomendasi keuangan, investasi, trading, atau jenis lainnya yang diberikan atau didukung oleh TradingView. Baca selengkapnya di Ketentuan Penggunaan.
Pernyataan Penyangkalan
Informasi dan publikasi ini tidak dimaksudkan, dan bukan merupakan, saran atau rekomendasi keuangan, investasi, trading, atau jenis lainnya yang diberikan atau didukung oleh TradingView. Baca selengkapnya di Ketentuan Penggunaan.