
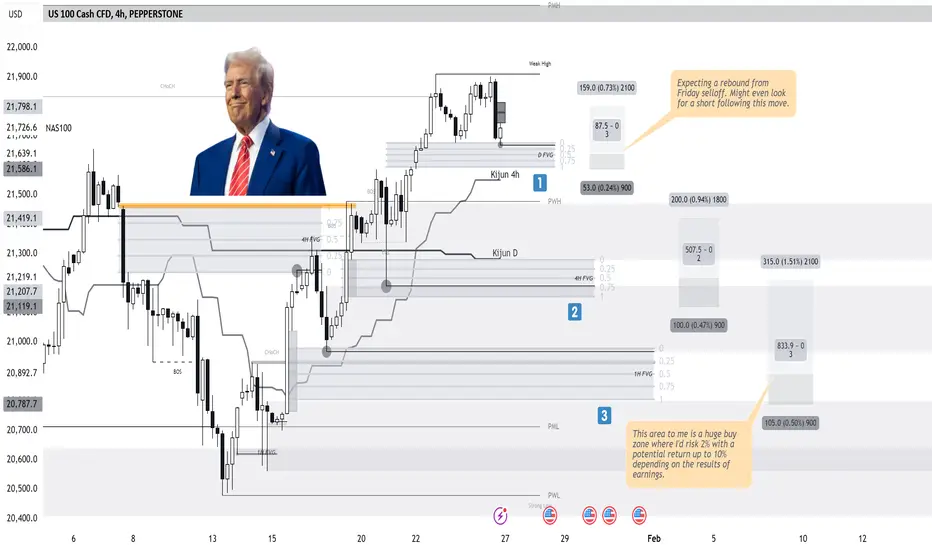
US100 analysis: Three "buy zones" identified for potential entries with distinct risk levels.
1. "Zone 1": Near the "4H Kijun" and prior weak high, aiming for short-term rebound with controlled risk.
2. "Zone 2": Aligns with deeper "4H FVG" support. This setup offers a higher conviction for a reversal targeting the mid-range.
3. "Zone 3": Major buy zone with strong confluence at the "PML" and "1H FVG". Willing to risk 2% for a potential return of up to 10%, depending on upcoming earnings.
Each zone represents escalating risk-reward setups, ensuring precise risk management across macro support structures. Consider macro headwinds and earnings season's volatility.
1. "Zone 1": Near the "4H Kijun" and prior weak high, aiming for short-term rebound with controlled risk.
2. "Zone 2": Aligns with deeper "4H FVG" support. This setup offers a higher conviction for a reversal targeting the mid-range.
3. "Zone 3": Major buy zone with strong confluence at the "PML" and "1H FVG". Willing to risk 2% for a potential return of up to 10%, depending on upcoming earnings.
Each zone represents escalating risk-reward setups, ensuring precise risk management across macro support structures. Consider macro headwinds and earnings season's volatility.
Trading ditutup: stop tercapai
Got killed lol
Pernyataan Penyangkalan
Informasi dan publikasi ini tidak dimaksudkan, dan bukan merupakan, saran atau rekomendasi keuangan, investasi, trading, atau jenis lainnya yang diberikan atau didukung oleh TradingView. Baca selengkapnya di Ketentuan Penggunaan.
Pernyataan Penyangkalan
Informasi dan publikasi ini tidak dimaksudkan, dan bukan merupakan, saran atau rekomendasi keuangan, investasi, trading, atau jenis lainnya yang diberikan atau didukung oleh TradingView. Baca selengkapnya di Ketentuan Penggunaan.