Snapback Scalper
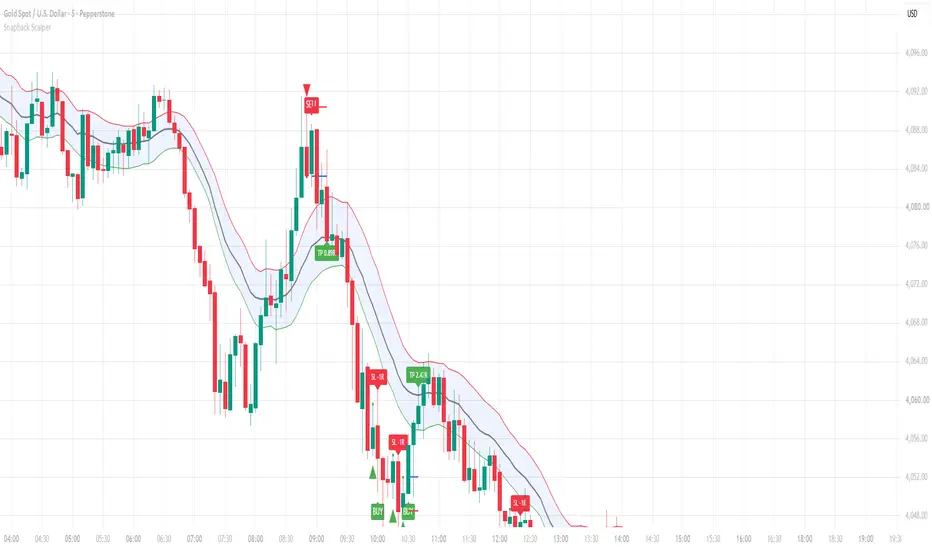
Snapback Scalper is a mean-reversion tool built on a 20-period EMA channel: an upper EMA of highs, a center EMA of closes, and a lower EMA of lows. When price stretches completely outside the channel and prints a reversal candle, it looks for a snap back to the center line.
HOW IT WORKS
• Overextension: a candle must sit fully outside the channel (for buys, its high is below the lower EMA; for sells, its low is above the upper EMA).
• Confirmation: that candle must form an inside bar or an engulfing bar with a color flip (red→green for buys, green→red for sells).
• Entry: a stop order just beyond the signal candle's high (buy) or low (sell). It is valid for the next candle only; if price doesn't reach it, the order is cancelled.
• Stop: just beyond the opposite end of the signal candle.
• Target: the first touch of the center EMA.
ON THE CHART
• Triangles mark setups, and dots mark the pending entry level.
• BUY/SELL labels mark triggered entries, with entry (blue) and stop (red) lines.
• TP/SL labels show each trade's result in R (1R = entry-to-stop distance).
• A stats table shows the number of trades, win rate, net R and average R for the loaded history.
SETTINGS
• EMA length (default 20)
• Turn inside bars and engulfing bars on or off
• Require the color flip
• Strict mode: both pattern candles must be fully outside the band
• Entry/stop offset in ticks
ALERTS
Buy setup, Sell setup, Long entry, Short entry, Target hit, Stop hit. Use "Once per bar close."
NOTES
If the stop and the target are both reached in the same candle, the trade is counted as a loss, so results are conservative. Because the target is the center line, winning trades can be smaller than the risk taken. Check net R, not just win rate. This is for educational purposes only and is not financial advice.
HOW IT WORKS
• Overextension: a candle must sit fully outside the channel (for buys, its high is below the lower EMA; for sells, its low is above the upper EMA).
• Confirmation: that candle must form an inside bar or an engulfing bar with a color flip (red→green for buys, green→red for sells).
• Entry: a stop order just beyond the signal candle's high (buy) or low (sell). It is valid for the next candle only; if price doesn't reach it, the order is cancelled.
• Stop: just beyond the opposite end of the signal candle.
• Target: the first touch of the center EMA.
ON THE CHART
• Triangles mark setups, and dots mark the pending entry level.
• BUY/SELL labels mark triggered entries, with entry (blue) and stop (red) lines.
• TP/SL labels show each trade's result in R (1R = entry-to-stop distance).
• A stats table shows the number of trades, win rate, net R and average R for the loaded history.
SETTINGS
• EMA length (default 20)
• Turn inside bars and engulfing bars on or off
• Require the color flip
• Strict mode: both pattern candles must be fully outside the band
• Entry/stop offset in ticks
ALERTS
Buy setup, Sell setup, Long entry, Short entry, Target hit, Stop hit. Use "Once per bar close."
NOTES
If the stop and the target are both reached in the same candle, the trade is counted as a loss, so results are conservative. Because the target is the center line, winning trades can be smaller than the risk taken. Check net R, not just win rate. This is for educational purposes only and is not financial advice.

1 Trade Away
Pernyataan Penyangkalan
Informasi dan publikasi ini tidak dimaksudkan, dan bukan merupakan, saran atau rekomendasi keuangan, investasi, trading, atau jenis lainnya yang diberikan atau didukung oleh TradingView. Baca selengkapnya di Ketentuan Penggunaan.
1 Trade Away
Pernyataan Penyangkalan
Informasi dan publikasi ini tidak dimaksudkan, dan bukan merupakan, saran atau rekomendasi keuangan, investasi, trading, atau jenis lainnya yang diberikan atau didukung oleh TradingView. Baca selengkapnya di Ketentuan Penggunaan.