[SkuldX] Order Blocks
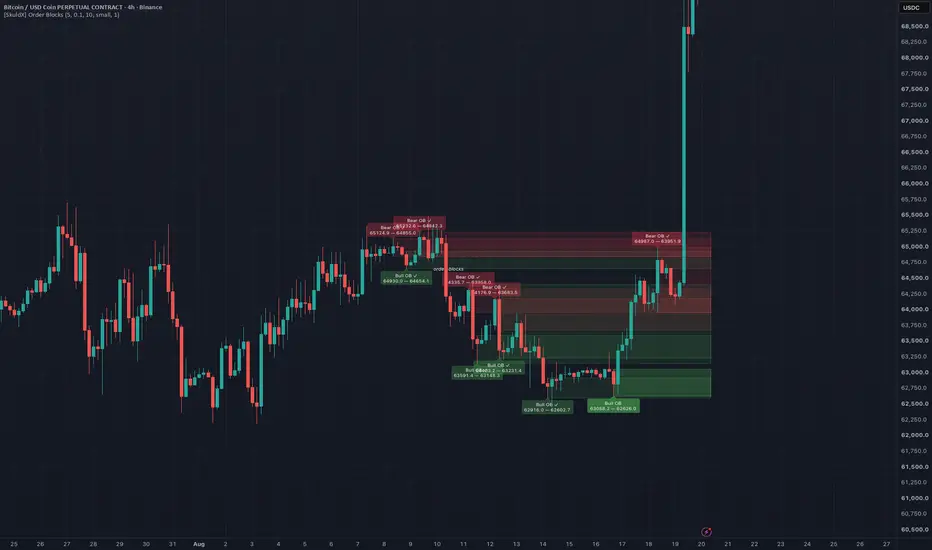
SkuldX Order Blocks — Institutional Entry Zone Detector
by SkuldX Trading Systems
What is it?
SkuldX Order Blocks automatically identifies the price zones where institutional participants placed their large orders before a significant directional move. These zones — known as Order Blocks in ICT methodology — act as magnets for price on retracements and represent the highest-probability entry points in the market. When price returns to an Order Block, institutions defend their positions, creating predictable reactions that retail traders can exploit.
The core concept
Every significant market move starts with institutional order flow. Before price can move strongly in one direction, large buy or sell orders must be placed. These orders leave a footprint — the last opposing candle before the impulse move. A bullish Order Block is the last bearish candle before a strong upward impulse that breaks a swing high. A bearish Order Block is the last bullish candle before a strong downward impulse that breaks a swing low.
The logic is straightforward: institutions placed their orders inside that candle zone. When price returns to that zone, those same institutions are likely to defend their positions — creating a high-probability reaction. The zone becomes a structural entry point rather than a random support or resistance level.
Bullish Order Block
A bullish OB forms when a confirmed swing low develops after a strong downward move. The indicator looks back from the pivot and identifies the last bearish candle (close below open) that preceded the bullish impulse. The entire candle range — from its low to its high — becomes the Order Block zone.
When price retraces back into this zone, it is returning to where institutional buying was concentrated. This is where longs have the highest structural justification.
Bearish Order Block
A bearish OB forms when a confirmed swing high develops after a strong upward move. The last bullish candle before the bearish impulse defines the zone. When price retraces into it, institutional sellers are defending their short positions.
Mitigation
An Order Block is considered mitigated when price re-enters the zone. Mitigation is the moment the OB is being tested — either institutions defend it and price rejects, or they have exited and the zone fails. The indicator marks mitigated OBs with a lighter color and adds a ✓ to the label so you can instantly distinguish fresh unmitigated zones from already-tested ones.
Mitigated OBs can be hidden entirely via the Show Mitigated OB toggle — keeping the chart clean by only showing untested zones.
What you see on the chart
Colored zone box — the Order Block price range from the candle's low to its high. Green for bullish, red for bearish. The box extends rightward until price mitigates the zone or the OB is displaced by a newer one.
50% midline — a dotted line at the exact midpoint of the OB zone. The 50% level is the most common precise entry within an OB — it offers the best risk-reward by entering in the middle of the zone with a stop beyond the far edge.
Label — shows the OB type (Bull OB / Bear OB) and the exact price range of the zone. Updates to show ✓ when mitigated.
Mitigation color change — when price enters the zone, the box transitions to a lighter transparent color. Fresh unmitigated zones remain at full opacity for immediate visual priority.
Settings reference
Swing Lookback — how many bars on each side define a confirmed pivot. Default 5. Lower values find more frequent OBs. Higher values require more significant structural pivots and produce fewer but stronger zones.
Min Impulse Size % — the minimum size of the impulse candle as a percentage of price. Filters out weak moves that produce low-quality OBs. Default 0.1%. Increase to 0.3–0.5% on volatile instruments to require more decisive institutional moves.
Max OB to Show — limits visible OBs to the N most recent. Oldest OBs are automatically removed when the limit is reached. Default 5. Increase to see more historical zones.
Show Bullish / Bearish OB — independent toggles for each direction
Bullish / Bearish OB Color — color of the active unmitigated zone
Mitigated Color — color of the zone after price has entered it
Show Mitigated OB — keep mitigated zones visible or remove them automatically
Show 50% Midline — toggle the dotted midpoint line within each OB
Show Labels — toggle the price range labels
Label Size — tiny, small, or normal
Line Width — border thickness of the OB box
Data Window
Hovering over any bar shows the nearest active unmitigated Bullish OB above price and the nearest active unmitigated Bearish OB below price — giving the two closest institutional reference zones at a glance. Also shows the total count of currently active OBs.
How to use it in practice
Entry at the OB — when price retraces into an unmitigated OB, wait for a confirmation candle before entering. A bullish rejection candle (hammer, engulfing, or pin bar) inside the bullish OB zone is a high-probability long entry. Stop goes below the OB low. Target is the next structural high or bearish OB above.
50% entry — for better risk-reward, enter at the 50% midline rather than waiting for price to reach the bottom of the zone. This gives more room before the stop and a larger move to target.
Fresh vs mitigated — always prioritize fresh unmitigated OBs. A zone that has already been entered once has partially absorbed institutional orders and is less reliable on subsequent tests. When Show Mitigated OB is enabled, the visual distinction between fresh and tested zones is immediate.
OB + structure alignment — the most reliable setups occur when an OB aligns with the current market structure. A bullish OB that forms after a bullish CHoCH is significantly stronger than one that forms in a bearish trend — structure and OB direction agree. Use SkuldX Market Structure alongside this indicator to confirm alignment.
Multiple timeframe approach — identify OBs on a higher timeframe (1h or 4h) for the macro zones, then switch to 15m or 5m for precise entry timing when price reaches those zones. A 4h bullish OB that price approaches on the 15m chart is the ideal setup for a precise entry with a tight stop.
Part of the SkuldX Suite
SkuldX Order Blocks integrates with the full suite to create high-confluence setups:
by SkuldX Trading Systems
What is it?
SkuldX Order Blocks automatically identifies the price zones where institutional participants placed their large orders before a significant directional move. These zones — known as Order Blocks in ICT methodology — act as magnets for price on retracements and represent the highest-probability entry points in the market. When price returns to an Order Block, institutions defend their positions, creating predictable reactions that retail traders can exploit.
The core concept
Every significant market move starts with institutional order flow. Before price can move strongly in one direction, large buy or sell orders must be placed. These orders leave a footprint — the last opposing candle before the impulse move. A bullish Order Block is the last bearish candle before a strong upward impulse that breaks a swing high. A bearish Order Block is the last bullish candle before a strong downward impulse that breaks a swing low.
The logic is straightforward: institutions placed their orders inside that candle zone. When price returns to that zone, those same institutions are likely to defend their positions — creating a high-probability reaction. The zone becomes a structural entry point rather than a random support or resistance level.
Bullish Order Block
A bullish OB forms when a confirmed swing low develops after a strong downward move. The indicator looks back from the pivot and identifies the last bearish candle (close below open) that preceded the bullish impulse. The entire candle range — from its low to its high — becomes the Order Block zone.
When price retraces back into this zone, it is returning to where institutional buying was concentrated. This is where longs have the highest structural justification.
Bearish Order Block
A bearish OB forms when a confirmed swing high develops after a strong upward move. The last bullish candle before the bearish impulse defines the zone. When price retraces into it, institutional sellers are defending their short positions.
Mitigation
An Order Block is considered mitigated when price re-enters the zone. Mitigation is the moment the OB is being tested — either institutions defend it and price rejects, or they have exited and the zone fails. The indicator marks mitigated OBs with a lighter color and adds a ✓ to the label so you can instantly distinguish fresh unmitigated zones from already-tested ones.
Mitigated OBs can be hidden entirely via the Show Mitigated OB toggle — keeping the chart clean by only showing untested zones.
What you see on the chart
Colored zone box — the Order Block price range from the candle's low to its high. Green for bullish, red for bearish. The box extends rightward until price mitigates the zone or the OB is displaced by a newer one.
50% midline — a dotted line at the exact midpoint of the OB zone. The 50% level is the most common precise entry within an OB — it offers the best risk-reward by entering in the middle of the zone with a stop beyond the far edge.
Label — shows the OB type (Bull OB / Bear OB) and the exact price range of the zone. Updates to show ✓ when mitigated.
Mitigation color change — when price enters the zone, the box transitions to a lighter transparent color. Fresh unmitigated zones remain at full opacity for immediate visual priority.
Settings reference
Swing Lookback — how many bars on each side define a confirmed pivot. Default 5. Lower values find more frequent OBs. Higher values require more significant structural pivots and produce fewer but stronger zones.
Min Impulse Size % — the minimum size of the impulse candle as a percentage of price. Filters out weak moves that produce low-quality OBs. Default 0.1%. Increase to 0.3–0.5% on volatile instruments to require more decisive institutional moves.
Max OB to Show — limits visible OBs to the N most recent. Oldest OBs are automatically removed when the limit is reached. Default 5. Increase to see more historical zones.
Show Bullish / Bearish OB — independent toggles for each direction
Bullish / Bearish OB Color — color of the active unmitigated zone
Mitigated Color — color of the zone after price has entered it
Show Mitigated OB — keep mitigated zones visible or remove them automatically
Show 50% Midline — toggle the dotted midpoint line within each OB
Show Labels — toggle the price range labels
Label Size — tiny, small, or normal
Line Width — border thickness of the OB box
Data Window
Hovering over any bar shows the nearest active unmitigated Bullish OB above price and the nearest active unmitigated Bearish OB below price — giving the two closest institutional reference zones at a glance. Also shows the total count of currently active OBs.
How to use it in practice
Entry at the OB — when price retraces into an unmitigated OB, wait for a confirmation candle before entering. A bullish rejection candle (hammer, engulfing, or pin bar) inside the bullish OB zone is a high-probability long entry. Stop goes below the OB low. Target is the next structural high or bearish OB above.
50% entry — for better risk-reward, enter at the 50% midline rather than waiting for price to reach the bottom of the zone. This gives more room before the stop and a larger move to target.
Fresh vs mitigated — always prioritize fresh unmitigated OBs. A zone that has already been entered once has partially absorbed institutional orders and is less reliable on subsequent tests. When Show Mitigated OB is enabled, the visual distinction between fresh and tested zones is immediate.
OB + structure alignment — the most reliable setups occur when an OB aligns with the current market structure. A bullish OB that forms after a bullish CHoCH is significantly stronger than one that forms in a bearish trend — structure and OB direction agree. Use SkuldX Market Structure alongside this indicator to confirm alignment.
Multiple timeframe approach — identify OBs on a higher timeframe (1h or 4h) for the macro zones, then switch to 15m or 5m for precise entry timing when price reaches those zones. A 4h bullish OB that price approaches on the 15m chart is the ideal setup for a precise entry with a tight stop.
Part of the SkuldX Suite
SkuldX Order Blocks integrates with the full suite to create high-confluence setups:
- A bullish OB that coincides with an Asian Low or VAL level from SkuldX Sessions creates double structural significance — session boundary and institutional order zone at the same price
- A CHoCH ▲ from SkuldX Market Structure followed by price returning to a bullish OB is the classic ICT reversal entry — structure changed and price is now offering a discounted entry at the institutional zone
- A bullish SFP that fires inside a bullish OB zone is one of the strongest setups available — liquidity was swept below the OB and price rejected, confirming institutional defense of the zone
- An OB that aligns with an ADR Low from SkuldX ADR Levels adds statistical confirmation that price is at a significant daily extreme while simultaneously at an institutional entry zone

Visit skuldxtrade.com to learn more about SkuldX Trading Systems.
Pernyataan Penyangkalan
Informasi dan publikasi ini tidak dimaksudkan, dan bukan merupakan, saran atau rekomendasi keuangan, investasi, trading, atau jenis lainnya yang diberikan atau didukung oleh TradingView. Baca selengkapnya di Ketentuan Penggunaan.
Visit skuldxtrade.com to learn more about SkuldX Trading Systems.
Pernyataan Penyangkalan
Informasi dan publikasi ini tidak dimaksudkan, dan bukan merupakan, saran atau rekomendasi keuangan, investasi, trading, atau jenis lainnya yang diberikan atau didukung oleh TradingView. Baca selengkapnya di Ketentuan Penggunaan.