Diupdate
EMA Pullback Signals (MTF) [bitpunk]
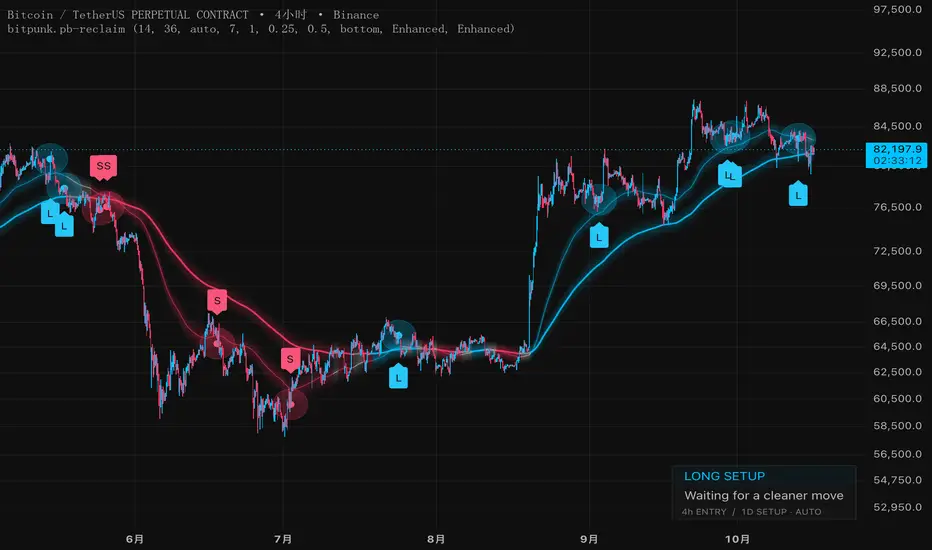
EMA Pullback Signals (MTF) [bitpunk]
Multi-timeframe EMA pullback signals with Fast and Trend zones, momentum-confirmed reclaims, and ATR-based spacing between new pullbacks.
1. THE IDEA
A visual entry tool for swing and trend-continuation trading. A higher setup timeframe defines direction and two separate EMA pullback zones; the current chart confirms recovery. A reclaim means a real candle closes beyond the active zone's directional edge after a pullback touch, with price progress and momentum confirmation.
Read the setup, wait for a pullback, then assess the confirmed recovery.
2. HOW IT WORKS
One entry or extension skip consumes that recovery attempt. A new contact with either zone can start another attempt after a pullback of at least 0.5 setup ATR from the best prior confirmed close since consumption. The preceding chart candle must not have overlapped the newly contacted zone. Setup direction must remain valid and setup departure efficiency must be at least 0.25. Continuous contact cannot repeat entries.
The ATR scale is frozen at consumption; favorable closes update the reference. Pending retouches do not extend their window; a newly qualified attempt gets its own. Heikin-Ashi supplies direction, never a synthetic entry price.
3. DESIGN FOCUS
The indicator separates shallower Fast-zone pullbacks from deeper Trend-zone pullbacks while keeping trend direction on a higher timeframe and reclaim confirmation on the current chart. Fresh contact and ATR-based spacing allow another meaningful pullback to qualify after an earlier signal, including a later Trend-zone touch after a Fast-zone entry. The design focuses on the complete trend-continuation recovery sequence; its signal conditions do not measure the probability of a successful trade.
4. READING THE CHART
Band Effects and Signal Effects offer Normal / Enhanced: lighter visuals or stronger glow and signal emphasis, with identical events.
5. SETUP AND ALERTS
Use standard candlesticks with a strictly higher setup timeframe. Auto includes 15m → 1h, 1h → 4h, 1D → 1W and 1W → 1M. Unsupported pairs disable signals. Defaults are Confirmation Window 7 setup intervals, Max Entry Extension 1 ATR, Zone Width 0.25 ATR per side and Rearm Distance 0.5 ATR. Seven approximates EMA14's decay time; the reset distance equals one full default zone width. These are coherent reference scales, not a claim of optimal signal quality.
Create one alert using Any alert() function call for both directions:
15m ▲ LONG @123.45
1h ▼ SHORT @123.45
Alerts show the entry timeframe and real confirmation close, at realtime bar close. Recreate alerts after script or calculation-setting changes. Separate Long Entry / Short Entry conditions use TradingView's native interval notation.
Designed for trend continuation; sideways conditions can produce whipsaws. Setup references use completed candles. Visual ribbons can move while the chart candle is open. Entry indications support discretionary analysis and do not provide automatic exits or execution.
Multi-timeframe EMA pullback signals with Fast and Trend zones, momentum-confirmed reclaims, and ATR-based spacing between new pullbacks.
1. THE IDEA
A visual entry tool for swing and trend-continuation trading. A higher setup timeframe defines direction and two separate EMA pullback zones; the current chart confirms recovery. A reclaim means a real candle closes beyond the active zone's directional edge after a pullback touch, with price progress and momentum confirmation.
Read the setup, wait for a pullback, then assess the confirmed recovery.
2. HOW IT WORKS
- Context — Direction comes from completed setup price relative to EMA36 and its five-bar slope. EMA14 and EMA36 each have a separate zone, defaulting to ±0.25 ATR14.
- Pullback — Price first departs efficiently beyond both zones, then retests either one. A deeper retest can upgrade a Fast-zone recovery to the Trend zone without restarting its window.
- Signal — A real candle closes beyond the active zone edge with a directional body and price progress, confirmed by either a strong candle closing near its directional extreme or improving MACD histogram with aligned Heikin-Ashi direction.
One entry or extension skip consumes that recovery attempt. A new contact with either zone can start another attempt after a pullback of at least 0.5 setup ATR from the best prior confirmed close since consumption. The preceding chart candle must not have overlapped the newly contacted zone. Setup direction must remain valid and setup departure efficiency must be at least 0.25. Continuous contact cannot repeat entries.
The ATR scale is frozen at consumption; favorable closes update the reference. Pending retouches do not extend their window; a newly qualified attempt gets its own. Heikin-Ashi supplies direction, never a synthetic entry price.
3. DESIGN FOCUS
The indicator separates shallower Fast-zone pullbacks from deeper Trend-zone pullbacks while keeping trend direction on a higher timeframe and reclaim confirmation on the current chart. Fresh contact and ATR-based spacing allow another meaningful pullback to qualify after an earlier signal, including a later Trend-zone touch after a Fast-zone entry. The design focuses on the complete trend-continuation recovery sequence; its signal conditions do not measure the probability of a successful trade.
4. READING THE CHART
- L / S — Close-confirmed long or short entry indications.
- Ribbons — Smoothed trend guides, not exact touch or entry boundaries. Read precise levels in Data Window.
- Reclaim observation — The pending recovery area and level; a reference, not a protective stop.
- Panel — Setup direction, current state and entry/setup timeframes.
Band Effects and Signal Effects offer Normal / Enhanced: lighter visuals or stronger glow and signal emphasis, with identical events.
5. SETUP AND ALERTS
Use standard candlesticks with a strictly higher setup timeframe. Auto includes 15m → 1h, 1h → 4h, 1D → 1W and 1W → 1M. Unsupported pairs disable signals. Defaults are Confirmation Window 7 setup intervals, Max Entry Extension 1 ATR, Zone Width 0.25 ATR per side and Rearm Distance 0.5 ATR. Seven approximates EMA14's decay time; the reset distance equals one full default zone width. These are coherent reference scales, not a claim of optimal signal quality.
Create one alert using Any alert() function call for both directions:
15m ▲ LONG @123.45
1h ▼ SHORT @123.45
Alerts show the entry timeframe and real confirmation close, at realtime bar close. Recreate alerts after script or calculation-setting changes. Separate Long Entry / Short Entry conditions use TradingView's native interval notation.
Designed for trend continuation; sideways conditions can produce whipsaws. Setup references use completed candles. Visual ribbons can move while the chart candle is open. Entry indications support discretionary analysis and do not provide automatic exits or execution.
Catatan Rilis
Updated indicator tittles. 
Open research and indicators on stocks and crypto. Explore the work at bitpunk.io
Pernyataan Penyangkalan
Informasi dan publikasi ini tidak dimaksudkan, dan bukan merupakan, saran atau rekomendasi keuangan, investasi, trading, atau jenis lainnya yang diberikan atau didukung oleh TradingView. Baca selengkapnya di Ketentuan Penggunaan.
Open research and indicators on stocks and crypto. Explore the work at bitpunk.io
Pernyataan Penyangkalan
Informasi dan publikasi ini tidak dimaksudkan, dan bukan merupakan, saran atau rekomendasi keuangan, investasi, trading, atau jenis lainnya yang diberikan atau didukung oleh TradingView. Baca selengkapnya di Ketentuan Penggunaan.