OPEN-SOURCE SCRIPT
Diupdate Intra Reversion Theory Dashboard
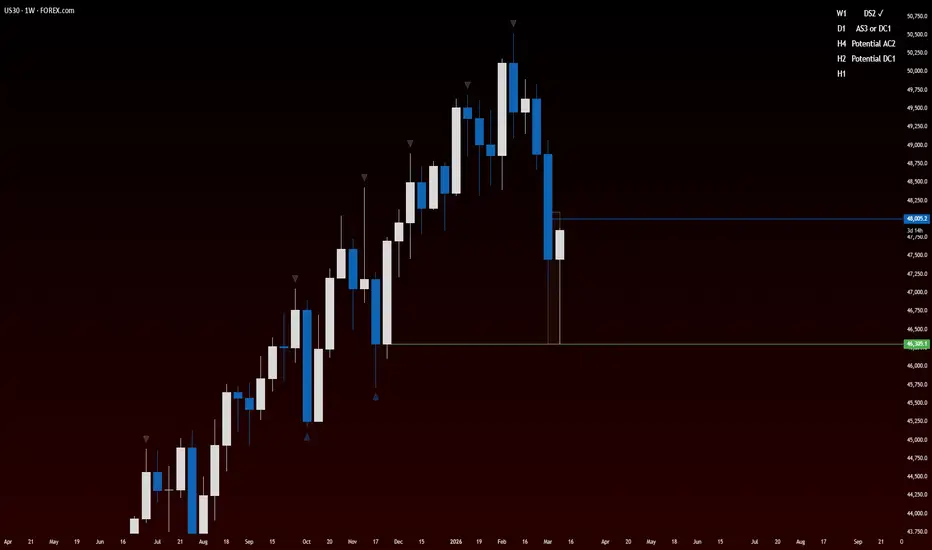
Intra Reversion Theory Dashboard
This indicator displays a dashboard in the top right of the screen which shows the potential, and completed, reversion theory set-ups.
This dashboard should only be used in conjunction with Intra technical analysis, by which we can validate or invalidate any potential reversion theory set-ups that the dashboard indicates could be printing.
The dashboard checks the Daily, H4, H2, H1 candle closures for potential set-ups and displays them accordingly.
The dashboard incorporates all AS, AC, DS, DC set-ups, either potential or completed, providing cues regarding which set-up could be forming next. As we know, many of the reversion theory set-up sequences can transpose into each other, this dashboard displays all these possibilities, helping us determine which set-ups are available in any one moment.
These cues can serve as a guide to compliment our top-down analysis, giving extra confidence to hold trades for longer to the tops and bottoms of ranges.
****Please Note****
→ The calculation is based on candle CLOSURES.
→ When back testing in replay mode, you may need to flick to and from timeframes once to 'update' the dashboard reading. In real time this is not an issue as the reading is live and accurate and we flick through timeframes during trading anyway so it's always updating.
→ Alert functionality is available, there is only one option, either alerts ON or OFF. When ON, alerts will fire ANY and EVERY time ANY criteria is met on ANY timeframe, serving as a status update regarding which set-ups are potentially printing or have printed. The alerts will not duplicate, they will only trigger once the set-up of that timeframe has CHANGED. The minimum time between alerts firing is 1 hour (as the smallest unit for the dashboard to check is the hourly close). I don't think it makes any difference but I'd personally always be on the hourly timeframe when setting the alert ON, just in case. The alerts will trigger updates indefinitely until either paused or deleted in the 'Alerts' section of TradingView.
Below is a list of examples of Dashboard readings, and explanations for their formulation.
"Completed" examples (Full List):
AC2 ✓ DC2 ✓
AS2 ✓ DS2 ✓
AS3 ✓ DS3 ✓
AS4 ✓ DS4 ✓
AS5 ✓ DS5 ✓
These fully printed sequences do not clash with any other reversion set-ups, and will be displayed in the dashboard as completed (ticked ✓) for the entirety of ONE FULL CANDLE after completion. Example: If DS5 set-up completes on the H4 timeframe, the dashboard will read "DS5 ✓" in the H4 section for THE NEXT FULL H4 candle, after ONE CANDLE the reading will clear, and remain clear until a new potential set up is presented on that timeframe.
"Completed" but transposes examples (Full List):
AS1 ✓ DS4 ?
AC1 ✓ DS3 ?
DS1 ✓ AS4 ?
DC1 ✓ AS3 ?
These behave the same as the above, except when these set-ups complete, there is potential for transposing into a new reversion set-up. For example, once AS1 completes, price could print DS4, therefore this reading (AS1 ✓ DS4 ?) prompts us to consider all options on the table.
"or" examples + candle sequence (B = bullish, S = bearish):
AS2 or DS5 - Sequence ("BBSBSB")
AC1 or DS3 - Sequence ("BBSBBS")
AS1 or DS2 - Sequence ("SSBSB")
There are more "or" examples than those listed above, but this will illustrate how they're formulated. Let's breakdown the first example, "AS2 or DS5", candle sequence BBSBSB, B being bullish, S being bearish. If we see price print, Bullish, Bullish, Bearish, Bullish, Bearish, Bullish, in THE NEXT CANDLE we would expect EITHER a bullish candle to complete AS2 or a bearish candle to start DS5, so the dashboard shows both of these possibilities. Then we use our technical analysis to determine which one is more likely and fits with the overall outlook of the market in that specific moment.
Due to the nature of reversion set-up sequences and how frequently they can transpose into one another, the major of set-ups displayed in this dashboard are "or" set-ups. The dashboard will not, and could not, tell you with certainty which set up will print next, it can only serve as a guide to compliment our full top-down technical analysis.
"Potential" examples + candle sequence (B = bullish, S = bearish):
Potential AS5 - Sequence ("SSBSBSB")
Potential AC2 - Sequence ("BBSSB")
Potential DS5 - Sequence ("BBSBSBS")
Potential DC2 - Sequence ("SSBBS")
In this category there are only 4 possible readings, Potential.. AS5, AC2, DS5, DC2. The reason for this is that in the final moments of these set-ups printing, there is only one viable non-transposing set-up available, and so it is displayed.
For example, in the "Potential AS5" sequence above, ("SSBSBSB"), Bearish, Bearish, Bullish, Bearish, Bullish, Bearish, Bullish, in THE NEXT CANDLE the only set up we could expect is bullish for completion of AS5, if a bearish candle printed next it would invalidate ANY reversion sequence. This obviously does not mean that it can't happen, just that if it did happen it's not a recognised set-up. If price did print a bearish candle in this example, the dashboard would be blank for that timeframe as no set-up would be present, but price printed the bullish candle we expected for AS5 completion, then AS5 would therefore complete and the dashboard would then read "AS5 ✓" for the entirety of the next candle.
Hope this all makes sense, I've tried to be as concise and thorough as I can with the detail above. The indicator is self explanatory and after having it on your screen for a short time you will become familiar with how it works.
If you have any questions please let me know.
Any and all feedback welcome.
...in case you were wondering, I am not a coding wizard.. ChatGPT 5.2 can be thanked for this!
Peace!
Josh B
This indicator displays a dashboard in the top right of the screen which shows the potential, and completed, reversion theory set-ups.
This dashboard should only be used in conjunction with Intra technical analysis, by which we can validate or invalidate any potential reversion theory set-ups that the dashboard indicates could be printing.
The dashboard checks the Daily, H4, H2, H1 candle closures for potential set-ups and displays them accordingly.
The dashboard incorporates all AS, AC, DS, DC set-ups, either potential or completed, providing cues regarding which set-up could be forming next. As we know, many of the reversion theory set-up sequences can transpose into each other, this dashboard displays all these possibilities, helping us determine which set-ups are available in any one moment.
These cues can serve as a guide to compliment our top-down analysis, giving extra confidence to hold trades for longer to the tops and bottoms of ranges.
****Please Note****
→ The calculation is based on candle CLOSURES.
→ When back testing in replay mode, you may need to flick to and from timeframes once to 'update' the dashboard reading. In real time this is not an issue as the reading is live and accurate and we flick through timeframes during trading anyway so it's always updating.
→ Alert functionality is available, there is only one option, either alerts ON or OFF. When ON, alerts will fire ANY and EVERY time ANY criteria is met on ANY timeframe, serving as a status update regarding which set-ups are potentially printing or have printed. The alerts will not duplicate, they will only trigger once the set-up of that timeframe has CHANGED. The minimum time between alerts firing is 1 hour (as the smallest unit for the dashboard to check is the hourly close). I don't think it makes any difference but I'd personally always be on the hourly timeframe when setting the alert ON, just in case. The alerts will trigger updates indefinitely until either paused or deleted in the 'Alerts' section of TradingView.
Below is a list of examples of Dashboard readings, and explanations for their formulation.
"Completed" examples (Full List):
AC2 ✓ DC2 ✓
AS2 ✓ DS2 ✓
AS3 ✓ DS3 ✓
AS4 ✓ DS4 ✓
AS5 ✓ DS5 ✓
These fully printed sequences do not clash with any other reversion set-ups, and will be displayed in the dashboard as completed (ticked ✓) for the entirety of ONE FULL CANDLE after completion. Example: If DS5 set-up completes on the H4 timeframe, the dashboard will read "DS5 ✓" in the H4 section for THE NEXT FULL H4 candle, after ONE CANDLE the reading will clear, and remain clear until a new potential set up is presented on that timeframe.
"Completed" but transposes examples (Full List):
AS1 ✓ DS4 ?
AC1 ✓ DS3 ?
DS1 ✓ AS4 ?
DC1 ✓ AS3 ?
These behave the same as the above, except when these set-ups complete, there is potential for transposing into a new reversion set-up. For example, once AS1 completes, price could print DS4, therefore this reading (AS1 ✓ DS4 ?) prompts us to consider all options on the table.
"or" examples + candle sequence (B = bullish, S = bearish):
AS2 or DS5 - Sequence ("BBSBSB")
AC1 or DS3 - Sequence ("BBSBBS")
AS1 or DS2 - Sequence ("SSBSB")
There are more "or" examples than those listed above, but this will illustrate how they're formulated. Let's breakdown the first example, "AS2 or DS5", candle sequence BBSBSB, B being bullish, S being bearish. If we see price print, Bullish, Bullish, Bearish, Bullish, Bearish, Bullish, in THE NEXT CANDLE we would expect EITHER a bullish candle to complete AS2 or a bearish candle to start DS5, so the dashboard shows both of these possibilities. Then we use our technical analysis to determine which one is more likely and fits with the overall outlook of the market in that specific moment.
Due to the nature of reversion set-up sequences and how frequently they can transpose into one another, the major of set-ups displayed in this dashboard are "or" set-ups. The dashboard will not, and could not, tell you with certainty which set up will print next, it can only serve as a guide to compliment our full top-down technical analysis.
"Potential" examples + candle sequence (B = bullish, S = bearish):
Potential AS5 - Sequence ("SSBSBSB")
Potential AC2 - Sequence ("BBSSB")
Potential DS5 - Sequence ("BBSBSBS")
Potential DC2 - Sequence ("SSBBS")
In this category there are only 4 possible readings, Potential.. AS5, AC2, DS5, DC2. The reason for this is that in the final moments of these set-ups printing, there is only one viable non-transposing set-up available, and so it is displayed.
For example, in the "Potential AS5" sequence above, ("SSBSBSB"), Bearish, Bearish, Bullish, Bearish, Bullish, Bearish, Bullish, in THE NEXT CANDLE the only set up we could expect is bullish for completion of AS5, if a bearish candle printed next it would invalidate ANY reversion sequence. This obviously does not mean that it can't happen, just that if it did happen it's not a recognised set-up. If price did print a bearish candle in this example, the dashboard would be blank for that timeframe as no set-up would be present, but price printed the bullish candle we expected for AS5 completion, then AS5 would therefore complete and the dashboard would then read "AS5 ✓" for the entirety of the next candle.
Hope this all makes sense, I've tried to be as concise and thorough as I can with the detail above. The indicator is self explanatory and after having it on your screen for a short time you will become familiar with how it works.
If you have any questions please let me know.
Any and all feedback welcome.
...in case you were wondering, I am not a coding wizard.. ChatGPT 5.2 can be thanked for this!
Peace!
Josh B
Catatan Rilis
02.03.26 - Improved AC/DC detection. Catatan Rilis
Added Weekly to the dashboard.Skrip open-source
Dengan semangat TradingView yang sesungguhnya, pembuat skrip ini telah menjadikannya sebagai sumber terbuka, sehingga para trader dapat meninjau dan memverifikasi fungsinya. Salut untuk penulisnya! Meskipun Anda dapat menggunakannya secara gratis, perlu diingat bahwa penerbitan ulang kode ini tunduk pada Tata Tertib kami.

Pernyataan Penyangkalan
Informasi dan publikasi ini tidak dimaksudkan, dan bukan merupakan, saran atau rekomendasi keuangan, investasi, trading, atau jenis lainnya yang diberikan atau didukung oleh TradingView. Baca selengkapnya di Ketentuan Penggunaan.
Skrip open-source
Dengan semangat TradingView yang sesungguhnya, pembuat skrip ini telah menjadikannya sebagai sumber terbuka, sehingga para trader dapat meninjau dan memverifikasi fungsinya. Salut untuk penulisnya! Meskipun Anda dapat menggunakannya secara gratis, perlu diingat bahwa penerbitan ulang kode ini tunduk pada Tata Tertib kami.
Pernyataan Penyangkalan
Informasi dan publikasi ini tidak dimaksudkan, dan bukan merupakan, saran atau rekomendasi keuangan, investasi, trading, atau jenis lainnya yang diberikan atau didukung oleh TradingView. Baca selengkapnya di Ketentuan Penggunaan.