OPEN-SOURCE SCRIPT
Trend Pullback Signals
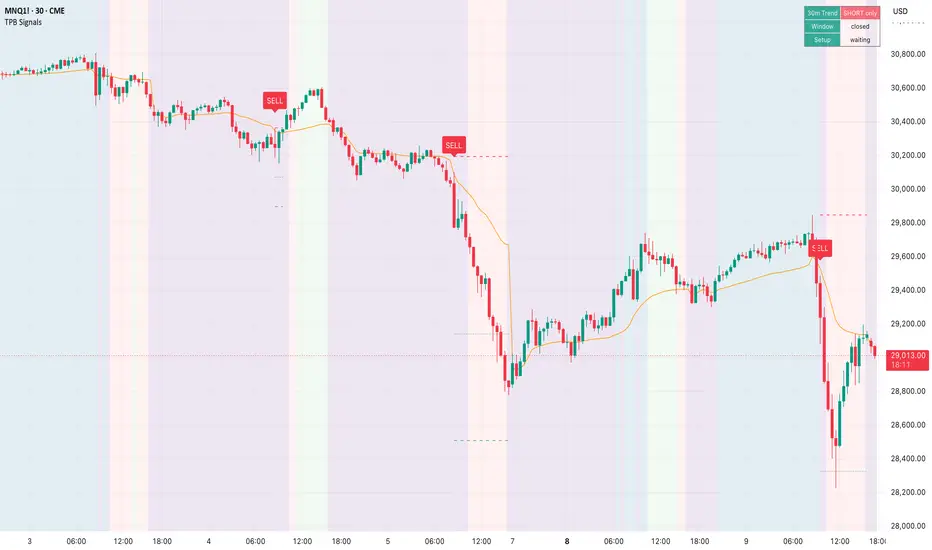
*Trend Pullback Signals**
A clean, rules-based BUY/SELL signal tool built on one of the most durable ideas in trading: trade pullbacks in the direction of the higher-timeframe trend, only during high-participation hours, with a fixed stop and defined targets. No clutter, no guessing — the chart tells you the trend, the window, and the exact level for your stop and targets.
**How it works**
Three filters have to line up before a signal fires:
- **Trend** — the indicator reads a higher timeframe (default 30m) and only allows longs when that timeframe is above a rising EMA, shorts when it's below a falling one. When the higher timeframe is flat, it stays silent.
- **Window** — signals are limited to a session window you choose (default 08:30–10:30 Central), so you skip the low-participation chop.
- **Pullback reclaim** — in an uptrend, price has to pull back to VWAP (or an EMA) and then close back above it; the mirror applies in a downtrend.
When all three align, a BUY or SELL prints on the bar close, and three lines are drawn automatically: a stop placed beyond the recent swing (red dashed), Target 1 at 1.5R (green dotted), and Target 2 at 3R (green dashed). A suggested management approach is to take partial profit at Target 1, move the stop to breakeven, and let the remainder run toward Target 2.
**On-chart guidance**
The background tints green or red to show the active trend direction, and shades the trade window in blue, so you can see at a glance why a signal is or isn't allowed. A status box summarizes the current trend, whether the window is open, and whether a trade is active. Only one signal runs at a time — a new one won't appear until the current one resolves at its stop or Target 2 — which keeps the chart readable.
**Repaint disclosure**
Signals print on bar close and do not repaint — once a BUY or SELL appears, it stays on that bar, and the stop and target levels are fixed at entry. The higher-timeframe trend filter is non-repainting: it reads the last *closed* higher-timeframe bar, so no future data is used. Stop and target lines extend forward as the trade stays open; that is the active trade being tracked, not the signal moving.
**Key settings**
- *Trend timeframe / EMA length* — the higher timeframe and moving average that define direction.
- *Trade window / Timezone* — when signals are allowed.
- *Pullback reference* — VWAP or EMA.
- *Stop basis, lookback, buffer* — how the stop is placed.
- *Target 1 / Target 2 (R)* — where the profit targets sit relative to risk.
**How to use**
Trade only in the direction the trend tint allows, only while the window is open. When a signal fires, the stop and targets are already drawn — manage partials at Target 1 and trail or exit the rest at Target 2. The signal tells you when conditions align; your risk management does the rest.
A clean chart of past signals always looks good in hindsight. Before risking real capital, forward-test on a simulator and confirm the targets actually fill the way the lines suggest. This is an analysis tool, not financial advice — trends and edges change with market conditions. Trade your own plan and manage your risk.
---
Want a one-line preview hook for the top? Something like "Trade pullbacks with the trend, only when the odds favor it — BUY/SELL signals with stops and targets built in" reads well as the scroll-by line if you publish it publicly.
A clean, rules-based BUY/SELL signal tool built on one of the most durable ideas in trading: trade pullbacks in the direction of the higher-timeframe trend, only during high-participation hours, with a fixed stop and defined targets. No clutter, no guessing — the chart tells you the trend, the window, and the exact level for your stop and targets.
**How it works**
Three filters have to line up before a signal fires:
- **Trend** — the indicator reads a higher timeframe (default 30m) and only allows longs when that timeframe is above a rising EMA, shorts when it's below a falling one. When the higher timeframe is flat, it stays silent.
- **Window** — signals are limited to a session window you choose (default 08:30–10:30 Central), so you skip the low-participation chop.
- **Pullback reclaim** — in an uptrend, price has to pull back to VWAP (or an EMA) and then close back above it; the mirror applies in a downtrend.
When all three align, a BUY or SELL prints on the bar close, and three lines are drawn automatically: a stop placed beyond the recent swing (red dashed), Target 1 at 1.5R (green dotted), and Target 2 at 3R (green dashed). A suggested management approach is to take partial profit at Target 1, move the stop to breakeven, and let the remainder run toward Target 2.
**On-chart guidance**
The background tints green or red to show the active trend direction, and shades the trade window in blue, so you can see at a glance why a signal is or isn't allowed. A status box summarizes the current trend, whether the window is open, and whether a trade is active. Only one signal runs at a time — a new one won't appear until the current one resolves at its stop or Target 2 — which keeps the chart readable.
**Repaint disclosure**
Signals print on bar close and do not repaint — once a BUY or SELL appears, it stays on that bar, and the stop and target levels are fixed at entry. The higher-timeframe trend filter is non-repainting: it reads the last *closed* higher-timeframe bar, so no future data is used. Stop and target lines extend forward as the trade stays open; that is the active trade being tracked, not the signal moving.
**Key settings**
- *Trend timeframe / EMA length* — the higher timeframe and moving average that define direction.
- *Trade window / Timezone* — when signals are allowed.
- *Pullback reference* — VWAP or EMA.
- *Stop basis, lookback, buffer* — how the stop is placed.
- *Target 1 / Target 2 (R)* — where the profit targets sit relative to risk.
**How to use**
Trade only in the direction the trend tint allows, only while the window is open. When a signal fires, the stop and targets are already drawn — manage partials at Target 1 and trail or exit the rest at Target 2. The signal tells you when conditions align; your risk management does the rest.
A clean chart of past signals always looks good in hindsight. Before risking real capital, forward-test on a simulator and confirm the targets actually fill the way the lines suggest. This is an analysis tool, not financial advice — trends and edges change with market conditions. Trade your own plan and manage your risk.
---
Want a one-line preview hook for the top? Something like "Trade pullbacks with the trend, only when the odds favor it — BUY/SELL signals with stops and targets built in" reads well as the scroll-by line if you publish it publicly.
סקריפט קוד פתוח
ברוח האמיתית של TradingView, יוצר הסקריפט הזה הפך אותו לקוד פתוח, כך שסוחרים יוכלו לעיין בו ולאמת את פעולתו. כל הכבוד למחבר! אמנם ניתן להשתמש בו בחינם, אך זכור כי פרסום חוזר של הקוד כפוף ל־כללי הבית שלנו.

כתב ויתור
המידע והפרסומים אינם מיועדים להיות, ואינם מהווים, ייעוץ או המלצה פיננסית, השקעתית, מסחרית או מכל סוג אחר המסופקת או מאושרת על ידי TradingView. קרא עוד ב־תנאי השימוש.
סקריפט קוד פתוח
ברוח האמיתית של TradingView, יוצר הסקריפט הזה הפך אותו לקוד פתוח, כך שסוחרים יוכלו לעיין בו ולאמת את פעולתו. כל הכבוד למחבר! אמנם ניתן להשתמש בו בחינם, אך זכור כי פרסום חוזר של הקוד כפוף ל־כללי הבית שלנו.
כתב ויתור
המידע והפרסומים אינם מיועדים להיות, ואינם מהווים, ייעוץ או המלצה פיננסית, השקעתית, מסחרית או מכל סוג אחר המסופקת או מאושרת על ידי TradingView. קרא עוד ב־תנאי השימוש.