OPEN-SOURCE SCRIPT
Strong Squeeze Signals | ProjectSyndicate
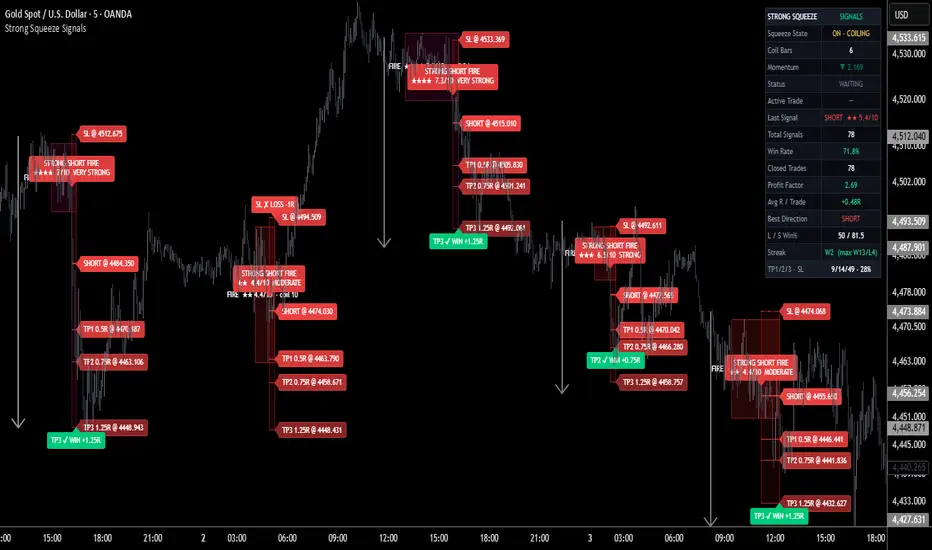
Strong Squeeze Signals catches the moment a genuine volatility coil releases — and instead of treating every flat patch as a setup, it waits for a real squeeze to fire, tags the direction from momentum, and ranks the release 0–10 with a star score. A market that has been compressing for a stretch of bars — its Bollinger Band wound tightly inside its Keltner Channel — has to actually expand back out, in the direction of momentum, before a signal arms. Every setup gets a structural stop beyond the coil that just broke and fixed R-based targets, and is tracked live on a full statistics dashboard so you can see how the logic behaves on the exact symbol and timeframe you trade.
🧠 Squeeze-Release Core — the core idea. The engine measures volatility compression directly from two bands. When a Bollinger Band contracts entirely inside a Keltner Channel, the market is coiling: range is shrinking and energy is building. A signal fires on the release — the bar where the band expands back outside the channel — and the direction is set by a linear-regression momentum oscillator that measures how far price sits from a composite centreline. Momentum above zero on the release fires a long; below zero fires a short. The longer and tighter the coil before it lets go, the more it counts. Signals are evaluated on the bar's close and are fixed once that bar closes — the release does not repaint.
📈 Coil Mapping & Tightness — while a squeeze is active, the engine continuously tracks how many bars it has been compressing, the high and low extent of the coil, and how tight it became — the Bollinger half-width as a fraction of the Keltner half-width. A long coil that wound down to a very tight ratio is a loaded spring; both the duration and the tightness feed directly into the strength score. A minimum-coil filter ignores fleeting micro-squeezes, and an optional Strict Fire setting demands a confirmed expansion on the release bar rather than just the end of the coil.
🎯 Structural Stop + R-Based Targets — the stop is placed just beyond the coil that just broke, with an ATR buffer: below the coil's low for a long, above the coil's high for a short — then capped and floored by ATR so it can never balloon into a wide stop or collapse into a meaningless one. TP1, TP2, and TP3 are set at clean R multiples and default to 0.5R / 0.75R / 1.25R — a tighter, hit-rate-leaning profile out of the box, and fully adjustable to whatever reward-to-risk you prefer. Every signal plots its complete Entry / SL / TP1 / TP2 / TP3 line set, labeled price levels, and filled TP / SL zone boxes, with a result label on exit.
🎚️ Coil-Conviction Controls — two inputs set how serious a squeeze must be before its release counts: Minimum Coil Bars To Arm how long the spring must compress and Minimum Strength the 0–10 gate. Tighten them for fewer, higher-quality fires; loosen them for more frequent signals. This is your main dial for conviction versus frequency.
🧭 HTF Trend Alignment Filter — an optional higher-timeframe EMA filter blocks counter-trend fires, keeping you on the dominant side of the market: longs only above it, shorts only below. The higher-timeframe value is read without lookahead. A signal cooldown spaces out entries so a single impulsive expansion doesn't stack multiple tickets.
⭐ 0–10 Setup-Quality Score — every release is scored and labeled with 1–5 stars and a tier FORMING → WEAK → MODERATE → STRONG → VERY STRONG → ELITE across nine squeeze-native factors: coil length stored energy, coil tightness how far the band compressed inside the channel, momentum magnitude at release, momentum acceleration in the fire direction, volume confirmation, expansion-candle body and range, band-width widening on the break, higher-timeframe alignment, and RSI agreement. Treat the score as a confluence / cleanliness read for ranking and thinning setups — it describes how textbook a squeeze release is, not a guaranteed outcome. A Minimum Strength / Only Strong gate lets you display and alert on stronger setups only, while the dashboard keeps tracking every tier in the background.
📊 Live Statistics Dashboard — a non-intrusive panel tracks, in real time on your chart: the current squeeze state coiling / fired / expanded / no squeeze, live coil-bar count, the momentum reading, current status and the active trade, the last signal with its star score, total signals, win rate, closed trades, profit factor, average R per trade, best-performing direction, long vs short win rate, current and max win/loss streaks, and a TP1 / TP2 / TP3 / SL hit breakdown. These are computed live from the signals on your current symbol and timeframe — so you can judge the settings yourself rather than trusting a number printed in a description.
🎨 Clean Themed Visuals — an institutional colour palette shades each zone by direction and score: bullish coils run a teal family that deepens as the score climbs, bearish coils a red-to-magenta-to-purple family, so quality reads at a glance. The compression zone is drawn over the bars where the coil formed and labeled with FIRE plus its star score; the TP and SL zones are harmonized to the same palette. Four lighting themes drive the lines, labels, and dashboard; an optional faint background tint marks active coils, and optional state dots can sit under the chart. A Max Zone Width control caps how far the SL / TP / Entry zones extend to the right, so long trades never stretch into oversized towers across the chart.
🔔 Detailed Alerts — fires on strong long / short squeeze releases, plus squeeze-on new coil forming, squeeze-released, partial-TP, TP3, and SL events, including direction and score, formatted for manual or automated use. The minimum-strength setting can restrict alerts to higher-conviction setups.
🔧 Fully Customizable — every component is exposed: Bollinger and Keltner lengths and multipliers, the true-range toggle, minimum coil bars and Strict Fire confirmation, the 0–10 strength gate and Only-Strong filter, ATR length, the structural-stop buffer with risk cap/floor, the three R targets, level-shelf length and Max Zone Width, the HTF alignment filter, the signal cooldown, plus the full institutional box palette, all four themes, and every label, dashboard, and zone-shading option.
🎯 Why this is different — most squeeze tools just print a histogram or drop a dot when the bands let go and leave everything after that to you. This one classifies the release direction from momentum, requires a real coil rather than a momentary flat spot measuring both how long and how tightly it compressed, demands momentum, acceleration, volume, and expansion confirmation, anchors the stop to the coil that actually broke, then layers an objective 0–10 ranking and a live, on-chart statistics panel on top — so you are tuning and judging the system on real, current data instead of a marketing figure.
🚀 Where to use it — markets that coil and expand: Forex, Gold XAUUSD, indices, and crypto, on intraday and swing timeframes M10/M15/M30/H1 and up. The ATR-based stop and R targets adapt to each asset's volatility automatically.
🎯 How to trade it
Apply it to a market that produces real volatility cycles and let the dashboard populate. Read the live win rate, profit factor, and average R for your symbol and timeframe before committing — if the logic doesn't suit that market, you'll see it.
Keep the HTF Trend Alignment filter on so you only take releases in the direction of the larger trend.
Wait for a STRONG LONG FIRE / STRONG SHORT FIRE label — it marks a confirmed coil release, with the star score and Entry, SL, and TP1/2/3 already plotted.
Manage the trade with the plotted levels: with the default sub-1R targets a common approach is to bank TP1 quickly, then trail or hold the remainder toward TP2/TP3; the structural SL defines your risk on the trade. If you prefer a higher reward-to-risk profile, widen the R targets in the inputs.
Use Minimum Coil Bars and Minimum Strength to set your style — stricter for fewer, cleaner releases; looser for more activity — and use the star score and Only-Strong gate to focus on the cleanest setups.
⚠️ Important — this is a decision-support tool, not a standalone buy/sell system, and it makes no performance guarantees. Default settings were chosen on historical data and behavior will vary by symbol, timeframe, and configuration; the dashboard's statistics are historical and descriptive, not a forecast. Note the default targets are sub-1R 0.5R / 0.75R / 1.25R: tight targets tend to raise the raw hit rate while lowering the reward-to-risk on each trade, so win rate read on its own is misleading — always weigh it together with average R and profit factor, and resize the targets to your own risk profile. Signals confirm on the closed bar, so always wait for the labeled release on a closed candle. Always combine it with your own analysis and risk management, and test it on your market before trading it live.
🧠 Squeeze-Release Core — the core idea. The engine measures volatility compression directly from two bands. When a Bollinger Band contracts entirely inside a Keltner Channel, the market is coiling: range is shrinking and energy is building. A signal fires on the release — the bar where the band expands back outside the channel — and the direction is set by a linear-regression momentum oscillator that measures how far price sits from a composite centreline. Momentum above zero on the release fires a long; below zero fires a short. The longer and tighter the coil before it lets go, the more it counts. Signals are evaluated on the bar's close and are fixed once that bar closes — the release does not repaint.
📈 Coil Mapping & Tightness — while a squeeze is active, the engine continuously tracks how many bars it has been compressing, the high and low extent of the coil, and how tight it became — the Bollinger half-width as a fraction of the Keltner half-width. A long coil that wound down to a very tight ratio is a loaded spring; both the duration and the tightness feed directly into the strength score. A minimum-coil filter ignores fleeting micro-squeezes, and an optional Strict Fire setting demands a confirmed expansion on the release bar rather than just the end of the coil.
🎯 Structural Stop + R-Based Targets — the stop is placed just beyond the coil that just broke, with an ATR buffer: below the coil's low for a long, above the coil's high for a short — then capped and floored by ATR so it can never balloon into a wide stop or collapse into a meaningless one. TP1, TP2, and TP3 are set at clean R multiples and default to 0.5R / 0.75R / 1.25R — a tighter, hit-rate-leaning profile out of the box, and fully adjustable to whatever reward-to-risk you prefer. Every signal plots its complete Entry / SL / TP1 / TP2 / TP3 line set, labeled price levels, and filled TP / SL zone boxes, with a result label on exit.
🎚️ Coil-Conviction Controls — two inputs set how serious a squeeze must be before its release counts: Minimum Coil Bars To Arm how long the spring must compress and Minimum Strength the 0–10 gate. Tighten them for fewer, higher-quality fires; loosen them for more frequent signals. This is your main dial for conviction versus frequency.
🧭 HTF Trend Alignment Filter — an optional higher-timeframe EMA filter blocks counter-trend fires, keeping you on the dominant side of the market: longs only above it, shorts only below. The higher-timeframe value is read without lookahead. A signal cooldown spaces out entries so a single impulsive expansion doesn't stack multiple tickets.
⭐ 0–10 Setup-Quality Score — every release is scored and labeled with 1–5 stars and a tier FORMING → WEAK → MODERATE → STRONG → VERY STRONG → ELITE across nine squeeze-native factors: coil length stored energy, coil tightness how far the band compressed inside the channel, momentum magnitude at release, momentum acceleration in the fire direction, volume confirmation, expansion-candle body and range, band-width widening on the break, higher-timeframe alignment, and RSI agreement. Treat the score as a confluence / cleanliness read for ranking and thinning setups — it describes how textbook a squeeze release is, not a guaranteed outcome. A Minimum Strength / Only Strong gate lets you display and alert on stronger setups only, while the dashboard keeps tracking every tier in the background.
📊 Live Statistics Dashboard — a non-intrusive panel tracks, in real time on your chart: the current squeeze state coiling / fired / expanded / no squeeze, live coil-bar count, the momentum reading, current status and the active trade, the last signal with its star score, total signals, win rate, closed trades, profit factor, average R per trade, best-performing direction, long vs short win rate, current and max win/loss streaks, and a TP1 / TP2 / TP3 / SL hit breakdown. These are computed live from the signals on your current symbol and timeframe — so you can judge the settings yourself rather than trusting a number printed in a description.
🎨 Clean Themed Visuals — an institutional colour palette shades each zone by direction and score: bullish coils run a teal family that deepens as the score climbs, bearish coils a red-to-magenta-to-purple family, so quality reads at a glance. The compression zone is drawn over the bars where the coil formed and labeled with FIRE plus its star score; the TP and SL zones are harmonized to the same palette. Four lighting themes drive the lines, labels, and dashboard; an optional faint background tint marks active coils, and optional state dots can sit under the chart. A Max Zone Width control caps how far the SL / TP / Entry zones extend to the right, so long trades never stretch into oversized towers across the chart.
🔔 Detailed Alerts — fires on strong long / short squeeze releases, plus squeeze-on new coil forming, squeeze-released, partial-TP, TP3, and SL events, including direction and score, formatted for manual or automated use. The minimum-strength setting can restrict alerts to higher-conviction setups.
🔧 Fully Customizable — every component is exposed: Bollinger and Keltner lengths and multipliers, the true-range toggle, minimum coil bars and Strict Fire confirmation, the 0–10 strength gate and Only-Strong filter, ATR length, the structural-stop buffer with risk cap/floor, the three R targets, level-shelf length and Max Zone Width, the HTF alignment filter, the signal cooldown, plus the full institutional box palette, all four themes, and every label, dashboard, and zone-shading option.
🎯 Why this is different — most squeeze tools just print a histogram or drop a dot when the bands let go and leave everything after that to you. This one classifies the release direction from momentum, requires a real coil rather than a momentary flat spot measuring both how long and how tightly it compressed, demands momentum, acceleration, volume, and expansion confirmation, anchors the stop to the coil that actually broke, then layers an objective 0–10 ranking and a live, on-chart statistics panel on top — so you are tuning and judging the system on real, current data instead of a marketing figure.
🚀 Where to use it — markets that coil and expand: Forex, Gold XAUUSD, indices, and crypto, on intraday and swing timeframes M10/M15/M30/H1 and up. The ATR-based stop and R targets adapt to each asset's volatility automatically.
🎯 How to trade it
Apply it to a market that produces real volatility cycles and let the dashboard populate. Read the live win rate, profit factor, and average R for your symbol and timeframe before committing — if the logic doesn't suit that market, you'll see it.
Keep the HTF Trend Alignment filter on so you only take releases in the direction of the larger trend.
Wait for a STRONG LONG FIRE / STRONG SHORT FIRE label — it marks a confirmed coil release, with the star score and Entry, SL, and TP1/2/3 already plotted.
Manage the trade with the plotted levels: with the default sub-1R targets a common approach is to bank TP1 quickly, then trail or hold the remainder toward TP2/TP3; the structural SL defines your risk on the trade. If you prefer a higher reward-to-risk profile, widen the R targets in the inputs.
Use Minimum Coil Bars and Minimum Strength to set your style — stricter for fewer, cleaner releases; looser for more activity — and use the star score and Only-Strong gate to focus on the cleanest setups.
⚠️ Important — this is a decision-support tool, not a standalone buy/sell system, and it makes no performance guarantees. Default settings were chosen on historical data and behavior will vary by symbol, timeframe, and configuration; the dashboard's statistics are historical and descriptive, not a forecast. Note the default targets are sub-1R 0.5R / 0.75R / 1.25R: tight targets tend to raise the raw hit rate while lowering the reward-to-risk on each trade, so win rate read on its own is misleading — always weigh it together with average R and profit factor, and resize the targets to your own risk profile. Signals confirm on the closed bar, so always wait for the labeled release on a closed candle. Always combine it with your own analysis and risk management, and test it on your market before trading it live.
סקריפט קוד פתוח
ברוח האמיתית של TradingView, יוצר הסקריפט הזה הפך אותו לקוד פתוח, כך שסוחרים יוכלו לעיין בו ולאמת את פעולתו. כל הכבוד למחבר! אמנם ניתן להשתמש בו בחינם, אך זכור כי פרסום חוזר של הקוד כפוף ל־כללי הבית שלנו.

syndicate001.com
Algo systems for prop traders
Algo systems for pro gold traders
Algo Trading and Indicator Tutorials
Levels desk Gold FX NQ ES JPN225
telegram.me/aisyndicate001
Algo systems for prop traders
Algo systems for pro gold traders
Algo Trading and Indicator Tutorials
Levels desk Gold FX NQ ES JPN225
telegram.me/aisyndicate001
כתב ויתור
המידע והפרסומים אינם מיועדים להיות, ואינם מהווים, ייעוץ או המלצה פיננסית, השקעתית, מסחרית או מכל סוג אחר המסופקת או מאושרת על ידי TradingView. קרא עוד ב־תנאי השימוש.
סקריפט קוד פתוח
ברוח האמיתית של TradingView, יוצר הסקריפט הזה הפך אותו לקוד פתוח, כך שסוחרים יוכלו לעיין בו ולאמת את פעולתו. כל הכבוד למחבר! אמנם ניתן להשתמש בו בחינם, אך זכור כי פרסום חוזר של הקוד כפוף ל־כללי הבית שלנו.
syndicate001.com
Algo systems for prop traders
Algo systems for pro gold traders
Algo Trading and Indicator Tutorials
Levels desk Gold FX NQ ES JPN225
telegram.me/aisyndicate001
Algo systems for prop traders
Algo systems for pro gold traders
Algo Trading and Indicator Tutorials
Levels desk Gold FX NQ ES JPN225
telegram.me/aisyndicate001
כתב ויתור
המידע והפרסומים אינם מיועדים להיות, ואינם מהווים, ייעוץ או המלצה פיננסית, השקעתית, מסחרית או מכל סוג אחר המסופקת או מאושרת על ידי TradingView. קרא עוד ב־תנאי השימוש.