OPEN-SOURCE SCRIPT
Strong Impulse Signals | ProjectSyndicate
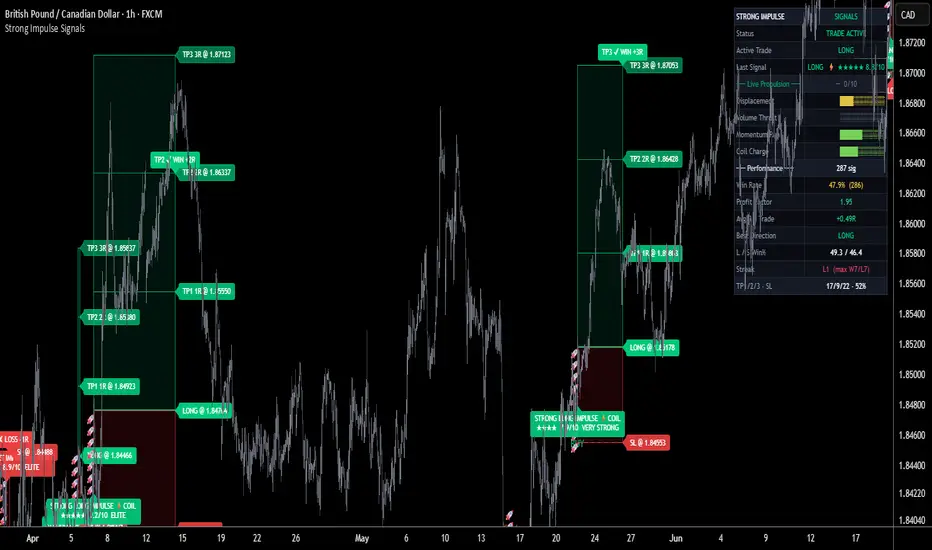
Strong Impulse Signals catches the moment a market stops coiling and commits — then fires WITH the thrust instead of fading it. Markets compress into tight bases, then release: a single displacement candle expands far beyond its recent range, dominates its own body, closes hard at its extreme, and breaks the micro-structure that was capping price. That ignition is the event. The engine measures the energy stored in that thrust as a 0–10 Propulsion Strength and fires in the direction the move is already going — with the breakout, not against it. Every setup gets a structural invalidation level behind the launch, fixed R-based targets, a 0–10 strength with a 1–5 star rank, and is tracked live on a full statistics dashboard — including honest stop-outs — so you can see exactly how the logic behaves on the symbol and timeframe you trade.
🧠 Impulse Core — the core idea, expressed as a lifecycle: COIL ▸ IGNITION ▸ BREAK ▸ THRUST ▸ TARGET. Confirmed swing pivots define the micro-structure the move has to break. A coil forms when the recent range winds tight — a loaded spring. Ignition is a displacement candle: its range must clear your ATR threshold, its body must dominate the bar, it must close in the top (long) or bottom (short) fraction of its own range, and — when enabled — it must break the most recent swing high or low. When that candle fires, the signal fires WITH it, in the direction it expanded. Pivots come from confirmed swings and every condition is evaluated on the bar's close, so the structure and the signal do not repaint.
🔋 Strength Anatomy — an ignition is not just true or false; it is scored for how much thrust it carries. The Propulsion Strength fuses breakout-native ingredients into a single 0–10 read: displacement (how far the candle's range expanded in ATR — the heart of an impulse), body dominance (clean thrust versus wick), close-in-range (did it close at its extreme rather than fade back), momentum run (net directional displacement over the run window plus consecutive same-direction closes), volume thrust (the spike over a rolling baseline), velocity / acceleration (is short-term ROC still expanding), loaded coil release (did it launch from a compressed base), structure-break confirmation, and trend / HTF alignment. Each ingredient contributes to the 0–10 total, and you shape what qualifies through the ignition thresholds and requirement toggles rather than chasing a single number.
🎯 Structural Invalidation + R-Based Targets — the stop is anchored to the launch, not guessed. Choose the Stop Basis: Structural sits behind the leg origin (the launch swing over the run window); Ignition Bar sits behind the trigger candle's own extreme. An ATR buffer adds cushion beyond that anchor, and the distance is then clamped between an ATR floor and an ATR ceiling — so a structural stop never balloons into a wide stop, and the 1R target never collapses into a tight TP. TP1, TP2, and TP3 are set at clean R multiples, defaulting to a balanced 1R / 2R / 3R and fully adjustable to your reward profile. Every signal plots its complete Entry / SL / TP1 / TP2 / TP3 line set, labeled level prices, and filled TP / SL zone boxes, with a result label on exit — and the zones are width-capped so long trades never draw towering boxes.
🚀 Rocket Power Stack — because the whole point of an impulse is the size of the thrust, each signal can stack a column of 🚀 in the direction of the move: from 5 rockets (weak) up to 10 (elite), scaled to the strength score, so the raw power of the thrust reads at a glance without checking the number. A left-offset control keeps the stack clear of the SL / TP zone box. It is a visual conviction read that sits alongside the numeric score and stars.
🎚️ Conviction Controls — a compact set of dials sets how serious an ignition must be before it counts: the Min Strength To Signal (the 0–10 floor to fire at all), a Strong Threshold with an optional Only Show Strong Signals filter, the Ignition Range in ATR (the core displacement test), the Min Body Dominance, the Close-In-Range Strength, the Require Structure Break switch, the Require Coil Release switch, and the Require Volume Thrust switch with its multiplier and baseline. Tighten them for fewer, cleaner impulses; loosen them for more activity. This is your main control over conviction versus frequency.
🧭 Trend Gating & Single-Ticket Discipline — where a fade tool blocks trend, this engine leans into it. HTF Trend Alignment permits only long impulses above the higher-timeframe EMA and only short impulses below it, so counter-trend thrusts are filtered out; alignment here is the edge, not the enemy. A Signal Cooldown enforces a minimum gap between entries so one violent session can't stack overlapping trades, and only one ticket is active at a time. Resolution is SL-first pessimistic with honest partial-TP accounting — if a stop is hit after TP1 or TP2, that partial result is booked rather than rounded up.
⭐ 0–10 Strength with Star Tiers — every signal is labeled with its numeric strength, a 1–5 star rank, and a tier ladder running FORMING → WEAK → MODERATE → STRONG → VERY STRONG → ELITE, with a ⚡COIL tag flagging impulses that launched from a compressed base. Treat the strength as a cleanliness and confluence read for ranking and thinning setups — it describes how textbook an ignition is, not a guaranteed outcome. The Min Strength and Only-Strong gate restrict what is displayed and alerted, while the dashboard keeps tracking every tier in the background.
📊 Live Statistics Dashboard — a non-intrusive panel tracks, in real time on your chart: the current status (waiting → trade active) and the active trade side, the last signal with its star score and ⚡COIL flag, a Live Propulsion read with separate long- and short-impulse strength, component meters for Displacement, Volume Thrust, Momentum Run, and Coil Charge, total signals, win rate, closed trades, profit factor, average R per trade, best-performing direction, long vs short win rate, current and max win/loss streaks, and a TP1 / TP2 / TP3 / SL outcome breakdown. Every filled trade that reaches an outcome is counted — winners and stop-outs alike — so the numbers are computed live from the real signals on your current symbol and timeframe, not a figure printed in a description.
🎨 Clean Themed Visuals — four coherent palettes (Emerald default, plus Ice Blue, Gold Black, and Aqua Violet) shade the ⚡ signal labels, the BUY / SELL arrows, the per-trade SL / TP ladder and zone boxes, the rocket power stack, and the dashboard to one look, so direction and quality read at a glance. Each ignition prints a ⚡ impulse label with its strength, star tier, and direction, plus a crisp BUY or SELL arrow at the bar. The active ticket extends live to the right and then snaps cleanly back to its exit bar on close, so labels never float away — and a max-drawn-trades cap keeps only the most recent tickets on the chart while the statistics stay cumulative over the full history.
🔔 Detailed Alerts — fires on a Strong Long Impulse, a Strong Short Impulse, any impulse, and on TP3 Hit, Partial TP Exit, and SL events, formatted for manual or automated use. The strength gate can restrict alerts to higher-conviction impulses.
🔧 Fully Customizable — every component is exposed: the structure pivot period that defines which swings count; the ignition range, min body dominance, close-in-range strength, momentum run window, and the structure-break requirement; the coil lookback and tightness reference, the coil-release requirement, and the volume-thrust requirement with its multiplier and baseline; the min-strength floor, the strong threshold, and the only-strong filter; the ATR length, stop basis, stop buffer, the max-risk cap and min-risk floor, and the three R targets; the level-shelf length, max zone width, and max historical trades; the HTF alignment, its timeframe and EMA length, and the signal cooldown; all four themes; and every signal label, BUY/SELL arrow, star, rocket, line, box, and dashboard toggle.
🎯 Why this is different — most momentum tools just color a candle or flag a breakout after it has already run. This one treats the ignition itself as the event, scores how much thrust that displacement stored across range, body, close, run, volume, acceleration, coil release, structure break, and trend, and fires WITH the move — riding the thrust the way price actually tends to extend — then anchors invalidation behind the launch, ranks every impulse on an objective 0–10 scale, and layers a live, honest statistics panel that counts stop-outs in full. You tune and judge it on real, current data from your own chart instead of a marketing number.
🚀 Where to use it — the engine is symbol-agnostic and built on universal behavior: displacement and breakouts happen in every liquid market, so it can be applied to FX majors and crosses, metals, indices, and crypto, on intraday timeframes. Pivot length and the ATR-based stop adapt to each instrument's volatility automatically. Because it is a momentum-continuation engine, it shines in trending and expanding-volatility conditions and demands more care in dead, choppy ranges where thrusts stall and reverse — let the dashboard tell you whether the logic suits the pair and timeframe before you commit.
🎯 How to trade it
Apply it to a liquid symbol on an intraday timeframe and let the dashboard populate. Read the live win rate, profit factor, and average R for your symbol and timeframe first — if the logic doesn't suit that market, you'll see it.
Wait for a ⚡ LONG / ⚡ SHORT impulse label and its BUY / SELL arrow — it marks a confirmed close through an ignition candle that broke structure, with the strength, star tier, and full Entry / SL / TP1 / TP2 / TP3 already plotted.
Read the rocket stack and ⚡COIL tag for a fast conviction check — more rockets and a coil launch mean a cleaner, more loaded thrust.
Manage the trade with the plotted levels — the ATR-clamped structural stop defines your risk and TP1/2/3 sit at your chosen R multiples. Bank or trail however suits your style.
Use HTF Trend Alignment, the Signal Cooldown, the Min-Strength floor, and the six ignition requirements to set your tempo — stricter for fewer, cleaner impulses; looser for more activity — and lean on the star tier to focus on the most textbook thrusts.
⚠️ Important — this is a decision-support tool, not a standalone buy/sell system, and it makes no performance guarantees. Default settings were chosen on historical data and behavior will vary by symbol, timeframe, session, and configuration; the dashboard's statistics are historical and descriptive, not a forecast. The trade model resolves stop-first and books partial-target exits honestly, so some trades close for a fraction of a target rather than a full win or loss — these are counted in full, which is honest but means win rate alone is misleading; always weigh it together with average R and profit factor, and resize the R targets to your own risk profile. Signals confirm on the closed bar, so always wait for the labeled impulse on a closed candle. Because the system trades WITH momentum, a false breakout or a sharp reversal can run straight through a stop — combine it with your own analysis and risk management, and test it on your market before trading it live.
🧠 Impulse Core — the core idea, expressed as a lifecycle: COIL ▸ IGNITION ▸ BREAK ▸ THRUST ▸ TARGET. Confirmed swing pivots define the micro-structure the move has to break. A coil forms when the recent range winds tight — a loaded spring. Ignition is a displacement candle: its range must clear your ATR threshold, its body must dominate the bar, it must close in the top (long) or bottom (short) fraction of its own range, and — when enabled — it must break the most recent swing high or low. When that candle fires, the signal fires WITH it, in the direction it expanded. Pivots come from confirmed swings and every condition is evaluated on the bar's close, so the structure and the signal do not repaint.
🔋 Strength Anatomy — an ignition is not just true or false; it is scored for how much thrust it carries. The Propulsion Strength fuses breakout-native ingredients into a single 0–10 read: displacement (how far the candle's range expanded in ATR — the heart of an impulse), body dominance (clean thrust versus wick), close-in-range (did it close at its extreme rather than fade back), momentum run (net directional displacement over the run window plus consecutive same-direction closes), volume thrust (the spike over a rolling baseline), velocity / acceleration (is short-term ROC still expanding), loaded coil release (did it launch from a compressed base), structure-break confirmation, and trend / HTF alignment. Each ingredient contributes to the 0–10 total, and you shape what qualifies through the ignition thresholds and requirement toggles rather than chasing a single number.
🎯 Structural Invalidation + R-Based Targets — the stop is anchored to the launch, not guessed. Choose the Stop Basis: Structural sits behind the leg origin (the launch swing over the run window); Ignition Bar sits behind the trigger candle's own extreme. An ATR buffer adds cushion beyond that anchor, and the distance is then clamped between an ATR floor and an ATR ceiling — so a structural stop never balloons into a wide stop, and the 1R target never collapses into a tight TP. TP1, TP2, and TP3 are set at clean R multiples, defaulting to a balanced 1R / 2R / 3R and fully adjustable to your reward profile. Every signal plots its complete Entry / SL / TP1 / TP2 / TP3 line set, labeled level prices, and filled TP / SL zone boxes, with a result label on exit — and the zones are width-capped so long trades never draw towering boxes.
🚀 Rocket Power Stack — because the whole point of an impulse is the size of the thrust, each signal can stack a column of 🚀 in the direction of the move: from 5 rockets (weak) up to 10 (elite), scaled to the strength score, so the raw power of the thrust reads at a glance without checking the number. A left-offset control keeps the stack clear of the SL / TP zone box. It is a visual conviction read that sits alongside the numeric score and stars.
🎚️ Conviction Controls — a compact set of dials sets how serious an ignition must be before it counts: the Min Strength To Signal (the 0–10 floor to fire at all), a Strong Threshold with an optional Only Show Strong Signals filter, the Ignition Range in ATR (the core displacement test), the Min Body Dominance, the Close-In-Range Strength, the Require Structure Break switch, the Require Coil Release switch, and the Require Volume Thrust switch with its multiplier and baseline. Tighten them for fewer, cleaner impulses; loosen them for more activity. This is your main control over conviction versus frequency.
🧭 Trend Gating & Single-Ticket Discipline — where a fade tool blocks trend, this engine leans into it. HTF Trend Alignment permits only long impulses above the higher-timeframe EMA and only short impulses below it, so counter-trend thrusts are filtered out; alignment here is the edge, not the enemy. A Signal Cooldown enforces a minimum gap between entries so one violent session can't stack overlapping trades, and only one ticket is active at a time. Resolution is SL-first pessimistic with honest partial-TP accounting — if a stop is hit after TP1 or TP2, that partial result is booked rather than rounded up.
⭐ 0–10 Strength with Star Tiers — every signal is labeled with its numeric strength, a 1–5 star rank, and a tier ladder running FORMING → WEAK → MODERATE → STRONG → VERY STRONG → ELITE, with a ⚡COIL tag flagging impulses that launched from a compressed base. Treat the strength as a cleanliness and confluence read for ranking and thinning setups — it describes how textbook an ignition is, not a guaranteed outcome. The Min Strength and Only-Strong gate restrict what is displayed and alerted, while the dashboard keeps tracking every tier in the background.
📊 Live Statistics Dashboard — a non-intrusive panel tracks, in real time on your chart: the current status (waiting → trade active) and the active trade side, the last signal with its star score and ⚡COIL flag, a Live Propulsion read with separate long- and short-impulse strength, component meters for Displacement, Volume Thrust, Momentum Run, and Coil Charge, total signals, win rate, closed trades, profit factor, average R per trade, best-performing direction, long vs short win rate, current and max win/loss streaks, and a TP1 / TP2 / TP3 / SL outcome breakdown. Every filled trade that reaches an outcome is counted — winners and stop-outs alike — so the numbers are computed live from the real signals on your current symbol and timeframe, not a figure printed in a description.
🎨 Clean Themed Visuals — four coherent palettes (Emerald default, plus Ice Blue, Gold Black, and Aqua Violet) shade the ⚡ signal labels, the BUY / SELL arrows, the per-trade SL / TP ladder and zone boxes, the rocket power stack, and the dashboard to one look, so direction and quality read at a glance. Each ignition prints a ⚡ impulse label with its strength, star tier, and direction, plus a crisp BUY or SELL arrow at the bar. The active ticket extends live to the right and then snaps cleanly back to its exit bar on close, so labels never float away — and a max-drawn-trades cap keeps only the most recent tickets on the chart while the statistics stay cumulative over the full history.
🔔 Detailed Alerts — fires on a Strong Long Impulse, a Strong Short Impulse, any impulse, and on TP3 Hit, Partial TP Exit, and SL events, formatted for manual or automated use. The strength gate can restrict alerts to higher-conviction impulses.
🔧 Fully Customizable — every component is exposed: the structure pivot period that defines which swings count; the ignition range, min body dominance, close-in-range strength, momentum run window, and the structure-break requirement; the coil lookback and tightness reference, the coil-release requirement, and the volume-thrust requirement with its multiplier and baseline; the min-strength floor, the strong threshold, and the only-strong filter; the ATR length, stop basis, stop buffer, the max-risk cap and min-risk floor, and the three R targets; the level-shelf length, max zone width, and max historical trades; the HTF alignment, its timeframe and EMA length, and the signal cooldown; all four themes; and every signal label, BUY/SELL arrow, star, rocket, line, box, and dashboard toggle.
🎯 Why this is different — most momentum tools just color a candle or flag a breakout after it has already run. This one treats the ignition itself as the event, scores how much thrust that displacement stored across range, body, close, run, volume, acceleration, coil release, structure break, and trend, and fires WITH the move — riding the thrust the way price actually tends to extend — then anchors invalidation behind the launch, ranks every impulse on an objective 0–10 scale, and layers a live, honest statistics panel that counts stop-outs in full. You tune and judge it on real, current data from your own chart instead of a marketing number.
🚀 Where to use it — the engine is symbol-agnostic and built on universal behavior: displacement and breakouts happen in every liquid market, so it can be applied to FX majors and crosses, metals, indices, and crypto, on intraday timeframes. Pivot length and the ATR-based stop adapt to each instrument's volatility automatically. Because it is a momentum-continuation engine, it shines in trending and expanding-volatility conditions and demands more care in dead, choppy ranges where thrusts stall and reverse — let the dashboard tell you whether the logic suits the pair and timeframe before you commit.
🎯 How to trade it
Apply it to a liquid symbol on an intraday timeframe and let the dashboard populate. Read the live win rate, profit factor, and average R for your symbol and timeframe first — if the logic doesn't suit that market, you'll see it.
Wait for a ⚡ LONG / ⚡ SHORT impulse label and its BUY / SELL arrow — it marks a confirmed close through an ignition candle that broke structure, with the strength, star tier, and full Entry / SL / TP1 / TP2 / TP3 already plotted.
Read the rocket stack and ⚡COIL tag for a fast conviction check — more rockets and a coil launch mean a cleaner, more loaded thrust.
Manage the trade with the plotted levels — the ATR-clamped structural stop defines your risk and TP1/2/3 sit at your chosen R multiples. Bank or trail however suits your style.
Use HTF Trend Alignment, the Signal Cooldown, the Min-Strength floor, and the six ignition requirements to set your tempo — stricter for fewer, cleaner impulses; looser for more activity — and lean on the star tier to focus on the most textbook thrusts.
⚠️ Important — this is a decision-support tool, not a standalone buy/sell system, and it makes no performance guarantees. Default settings were chosen on historical data and behavior will vary by symbol, timeframe, session, and configuration; the dashboard's statistics are historical and descriptive, not a forecast. The trade model resolves stop-first and books partial-target exits honestly, so some trades close for a fraction of a target rather than a full win or loss — these are counted in full, which is honest but means win rate alone is misleading; always weigh it together with average R and profit factor, and resize the R targets to your own risk profile. Signals confirm on the closed bar, so always wait for the labeled impulse on a closed candle. Because the system trades WITH momentum, a false breakout or a sharp reversal can run straight through a stop — combine it with your own analysis and risk management, and test it on your market before trading it live.
סקריפט קוד פתוח
ברוח האמיתית של TradingView, יוצר הסקריפט הזה הפך אותו לקוד פתוח, כך שסוחרים יוכלו לעיין בו ולאמת את פעולתו. כל הכבוד למחבר! אמנם ניתן להשתמש בו בחינם, אך זכור כי פרסום חוזר של הקוד כפוף ל־כללי הבית שלנו.

syndicate001.com
Algo systems for prop traders
Algo systems for pro gold traders
Algo Trading and Indicator Tutorials
Levels desk Gold FX NQ ES JPN225
telegram.me/aisyndicate001
Algo systems for prop traders
Algo systems for pro gold traders
Algo Trading and Indicator Tutorials
Levels desk Gold FX NQ ES JPN225
telegram.me/aisyndicate001
כתב ויתור
המידע והפרסומים אינם מיועדים להיות, ואינם מהווים, ייעוץ או המלצה פיננסית, השקעתית, מסחרית או מכל סוג אחר המסופקת או מאושרת על ידי TradingView. קרא עוד ב־תנאי השימוש.
סקריפט קוד פתוח
ברוח האמיתית של TradingView, יוצר הסקריפט הזה הפך אותו לקוד פתוח, כך שסוחרים יוכלו לעיין בו ולאמת את פעולתו. כל הכבוד למחבר! אמנם ניתן להשתמש בו בחינם, אך זכור כי פרסום חוזר של הקוד כפוף ל־כללי הבית שלנו.
syndicate001.com
Algo systems for prop traders
Algo systems for pro gold traders
Algo Trading and Indicator Tutorials
Levels desk Gold FX NQ ES JPN225
telegram.me/aisyndicate001
Algo systems for prop traders
Algo systems for pro gold traders
Algo Trading and Indicator Tutorials
Levels desk Gold FX NQ ES JPN225
telegram.me/aisyndicate001
כתב ויתור
המידע והפרסומים אינם מיועדים להיות, ואינם מהווים, ייעוץ או המלצה פיננסית, השקעתית, מסחרית או מכל סוג אחר המסופקת או מאושרת על ידי TradingView. קרא עוד ב־תנאי השימוש.