OPEN-SOURCE SCRIPT
Omega Zones [OmegaTools]
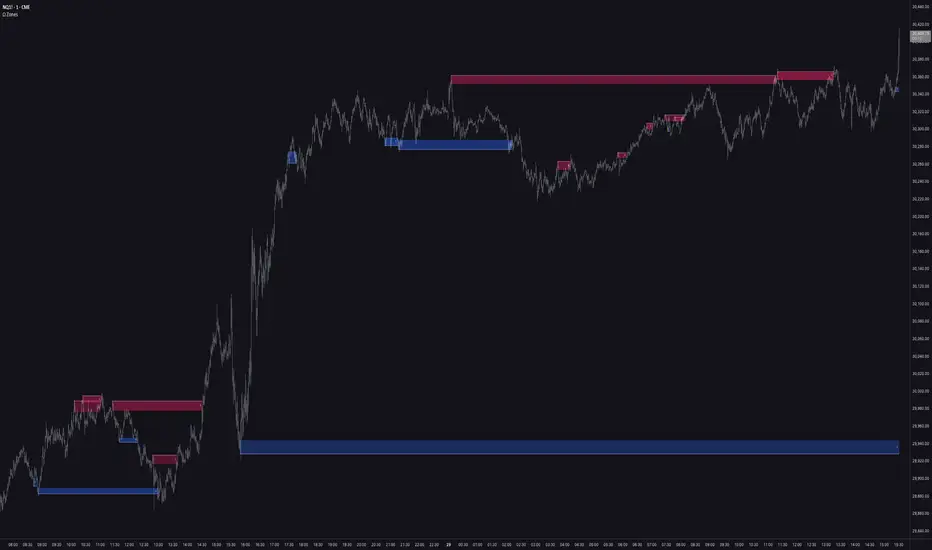
Omega Zones
Overview
Omega Zones is a supply and demand mapping tool that automatically detects, scores, and manages institutional order-block zones directly on the price chart. Rather than treating every swing as equally significant, it identifies the specific candles where meaningful order flow originated, grades each one on a multi-factor confidence scale, and then tracks its entire lifecycle — from untouched, to tested, to broken. The result is a clean, self-maintaining map of the price levels where supply and demand are most likely to react, with the strongest zones visually emphasized and weaker noise filtered out.
The indicator runs as an overlay on any symbol and any timeframe.
How It Works
Every zone is anchored to a confirmation window whose length you control through the Confidence Bars input. This is the central design idea of the tool: a zone is only registered once price has had a defined number of bars to validate the move away from its origin. A short window plots zones earlier and closer to real time; a longer window demands more confirmation before committing a level to the chart. This lets you tune the trade-off between recency and reliability instead of being locked into a fixed lookahead.
Within that window, Omega Zones detects order blocks through two independent structural pathways:
Swing reversal — a confirmed swing high or low (built from an asymmetric pivot: a longer window on the left, the confirmation window on the right) where price subsequently reclaims back through the pivot's extreme and thrusts away with conviction. The zone is anchored to the true origin candle — the last opposite-colored candle before the move — rather than naively to the pivot bar itself.
Trend pause — a compact base candle bracketed by directional momentum on both sides (the classic rally-base-rally and drop-base-drop structures). A tight bullish pause inside an advance becomes demand; a tight bearish pause inside a decline becomes supply. The momentum leg leaving the base is measured across the full confirmation window, so longer windows require sustained follow-through.
The Confidence Score
What separates a high-probability zone from a marginal one is not whether it formed, but how it formed. Each detected zone is graded on a composite strength score that aggregates several orthogonal pieces of evidence:
Displacement — how forcefully price left the zone, measured in volatility-adjusted (ATR) units, with additional credit awarded for exceptionally strong departures.
Volume conviction — the volume on the origin candle expressed as a standardized z-score against its recent distribution, scored on a graduated scale so that progressively heavier participation earns progressively more confidence. This is the most heavily weighted dimension of the score, reflecting that genuine order blocks are footprinted by abnormal volume.
Fair value gap — whether the origin produced a three-candle imbalance, a signature of aggressive, one-sided execution.
Liquidity sweep — whether the origin candle ran a prior high or low before closing back inside, capturing stop-hunt and absorption behavior.
The combined score drives two things: the zone must clear the minimum confidence set by the Filter input to be drawn at all, and the opacity of each zone scales with its score, so stronger levels appear bolder and weaker ones fade into the background. Each box is also labeled with its numeric strength for quick reference.
Adaptive Zone Geometry
When the origin candle is dominated by a rejection wick, Omega Zones intelligently narrows the zone to the candle's body rather than its full range — marking where the orders actually sit instead of the rejection tail. When the candle is more balanced, the full high-to-low range is used. This produces tighter, more precise zones and cleaner retest behavior.
Zone Lifecycle Management
Each zone carries a live state that the tool tracks bar by bar:
Virgin — untested; price has not yet entered the zone.
Touched — price has tapped the zone and reacted, but has not closed through it.
Broken — price has decisively closed beyond the zone, invalidating it.
Active zones extend forward automatically until they are broken. How spent zones are handled is governed by the Remove Old Orderblocs setting, giving you full control over chart cleanliness:
No — every zone is preserved indefinitely.
Only Broken — zones are removed the moment they are broken.
Only Virgin — only untouched zones remain on the chart; once a zone is tapped it is retained briefly, then cleared, isolating the fresh, unmitigated levels.
Yes — the most aggressive housekeeping, removing zones on break and retiring stale levels by age.
Settings
Confidence Bars — the confirmation window; lower values plot zones sooner and closer to price, higher values require more validation.
Filter — minimum confidence score required to display a zone (Permissive, Normal, or Strict), letting you choose between coverage and selectivity.
Remove Old Orderblocs — the lifecycle housekeeping mode described above.
Lines — choose which boundary lines to draw: the proximal edge, the distal edge, both, or none.
Areas — whether zone boxes extend dynamically to the current bar, stay fixed at their origin, or are hidden.
Bullish / Bearish Colors — fully customizable color scheme applied across boxes, edge lines, and labels.
How To Use It
Treat the zones as decision-support context rather than standalone signals. The boldest boxes mark the levels with the most order-flow evidence behind them and deserve the most attention. Reactions at virgin zones — those being tested for the first time — are generally the highest-quality opportunities, which is precisely what the Only Virgin housekeeping mode is built to surface. Demand zones are natural areas to look for long setups and supply zones for short setups, ideally in alignment with your higher-timeframe bias and confirmed by your own entry method. Raise the Filter to Strict and lengthen Confidence Bars when you want only the most validated levels; loosen both when you want fuller coverage of developing structure.
Notes
Zones are confirmed using completed pivots and a defined confirmation window, so they finalize after that window elapses; this is intentional confirmation logic, not repainting. The tool combines dual-path detection, a graduated multi-factor confidence model weighted toward volume, adaptive body-versus-range geometry, and a full three-state lifecycle with multiple housekeeping modes into a single self-maintaining framework.
Disclaimer
This indicator is provided for informational and educational purposes only and does not constitute financial advice. Trading carries substantial risk, and the past behavior of any tool or market is not indicative of future results. Always perform your own analysis and manage risk accordingly.
Overview
Omega Zones is a supply and demand mapping tool that automatically detects, scores, and manages institutional order-block zones directly on the price chart. Rather than treating every swing as equally significant, it identifies the specific candles where meaningful order flow originated, grades each one on a multi-factor confidence scale, and then tracks its entire lifecycle — from untouched, to tested, to broken. The result is a clean, self-maintaining map of the price levels where supply and demand are most likely to react, with the strongest zones visually emphasized and weaker noise filtered out.
The indicator runs as an overlay on any symbol and any timeframe.
How It Works
Every zone is anchored to a confirmation window whose length you control through the Confidence Bars input. This is the central design idea of the tool: a zone is only registered once price has had a defined number of bars to validate the move away from its origin. A short window plots zones earlier and closer to real time; a longer window demands more confirmation before committing a level to the chart. This lets you tune the trade-off between recency and reliability instead of being locked into a fixed lookahead.
Within that window, Omega Zones detects order blocks through two independent structural pathways:
Swing reversal — a confirmed swing high or low (built from an asymmetric pivot: a longer window on the left, the confirmation window on the right) where price subsequently reclaims back through the pivot's extreme and thrusts away with conviction. The zone is anchored to the true origin candle — the last opposite-colored candle before the move — rather than naively to the pivot bar itself.
Trend pause — a compact base candle bracketed by directional momentum on both sides (the classic rally-base-rally and drop-base-drop structures). A tight bullish pause inside an advance becomes demand; a tight bearish pause inside a decline becomes supply. The momentum leg leaving the base is measured across the full confirmation window, so longer windows require sustained follow-through.
The Confidence Score
What separates a high-probability zone from a marginal one is not whether it formed, but how it formed. Each detected zone is graded on a composite strength score that aggregates several orthogonal pieces of evidence:
Displacement — how forcefully price left the zone, measured in volatility-adjusted (ATR) units, with additional credit awarded for exceptionally strong departures.
Volume conviction — the volume on the origin candle expressed as a standardized z-score against its recent distribution, scored on a graduated scale so that progressively heavier participation earns progressively more confidence. This is the most heavily weighted dimension of the score, reflecting that genuine order blocks are footprinted by abnormal volume.
Fair value gap — whether the origin produced a three-candle imbalance, a signature of aggressive, one-sided execution.
Liquidity sweep — whether the origin candle ran a prior high or low before closing back inside, capturing stop-hunt and absorption behavior.
The combined score drives two things: the zone must clear the minimum confidence set by the Filter input to be drawn at all, and the opacity of each zone scales with its score, so stronger levels appear bolder and weaker ones fade into the background. Each box is also labeled with its numeric strength for quick reference.
Adaptive Zone Geometry
When the origin candle is dominated by a rejection wick, Omega Zones intelligently narrows the zone to the candle's body rather than its full range — marking where the orders actually sit instead of the rejection tail. When the candle is more balanced, the full high-to-low range is used. This produces tighter, more precise zones and cleaner retest behavior.
Zone Lifecycle Management
Each zone carries a live state that the tool tracks bar by bar:
Virgin — untested; price has not yet entered the zone.
Touched — price has tapped the zone and reacted, but has not closed through it.
Broken — price has decisively closed beyond the zone, invalidating it.
Active zones extend forward automatically until they are broken. How spent zones are handled is governed by the Remove Old Orderblocs setting, giving you full control over chart cleanliness:
No — every zone is preserved indefinitely.
Only Broken — zones are removed the moment they are broken.
Only Virgin — only untouched zones remain on the chart; once a zone is tapped it is retained briefly, then cleared, isolating the fresh, unmitigated levels.
Yes — the most aggressive housekeeping, removing zones on break and retiring stale levels by age.
Settings
Confidence Bars — the confirmation window; lower values plot zones sooner and closer to price, higher values require more validation.
Filter — minimum confidence score required to display a zone (Permissive, Normal, or Strict), letting you choose between coverage and selectivity.
Remove Old Orderblocs — the lifecycle housekeeping mode described above.
Lines — choose which boundary lines to draw: the proximal edge, the distal edge, both, or none.
Areas — whether zone boxes extend dynamically to the current bar, stay fixed at their origin, or are hidden.
Bullish / Bearish Colors — fully customizable color scheme applied across boxes, edge lines, and labels.
How To Use It
Treat the zones as decision-support context rather than standalone signals. The boldest boxes mark the levels with the most order-flow evidence behind them and deserve the most attention. Reactions at virgin zones — those being tested for the first time — are generally the highest-quality opportunities, which is precisely what the Only Virgin housekeeping mode is built to surface. Demand zones are natural areas to look for long setups and supply zones for short setups, ideally in alignment with your higher-timeframe bias and confirmed by your own entry method. Raise the Filter to Strict and lengthen Confidence Bars when you want only the most validated levels; loosen both when you want fuller coverage of developing structure.
Notes
Zones are confirmed using completed pivots and a defined confirmation window, so they finalize after that window elapses; this is intentional confirmation logic, not repainting. The tool combines dual-path detection, a graduated multi-factor confidence model weighted toward volume, adaptive body-versus-range geometry, and a full three-state lifecycle with multiple housekeeping modes into a single self-maintaining framework.
Disclaimer
This indicator is provided for informational and educational purposes only and does not constitute financial advice. Trading carries substantial risk, and the past behavior of any tool or market is not indicative of future results. Always perform your own analysis and manage risk accordingly.
סקריפט קוד פתוח
ברוח האמיתית של TradingView, יוצר הסקריפט הזה הפך אותו לקוד פתוח, כך שסוחרים יוכלו לעיין בו ולאמת את פעולתו. כל הכבוד למחבר! אמנם ניתן להשתמש בו בחינם, אך זכור כי פרסום חוזר של הקוד כפוף ל־כללי הבית שלנו.

כתב ויתור
המידע והפרסומים אינם מיועדים להיות, ואינם מהווים, ייעוץ או המלצה פיננסית, השקעתית, מסחרית או מכל סוג אחר המסופקת או מאושרת על ידי TradingView. קרא עוד ב־תנאי השימוש.
סקריפט קוד פתוח
ברוח האמיתית של TradingView, יוצר הסקריפט הזה הפך אותו לקוד פתוח, כך שסוחרים יוכלו לעיין בו ולאמת את פעולתו. כל הכבוד למחבר! אמנם ניתן להשתמש בו בחינם, אך זכור כי פרסום חוזר של הקוד כפוף ל־כללי הבית שלנו.
כתב ויתור
המידע והפרסומים אינם מיועדים להיות, ואינם מהווים, ייעוץ או המלצה פיננסית, השקעתית, מסחרית או מכל סוג אחר המסופקת או מאושרת על ידי TradingView. קרא עוד ב־תנאי השימוש.