OPEN-SOURCE SCRIPT
מעודכן [ A L P H A X ] Sniper - Tiered Entry + TP/SL Levels
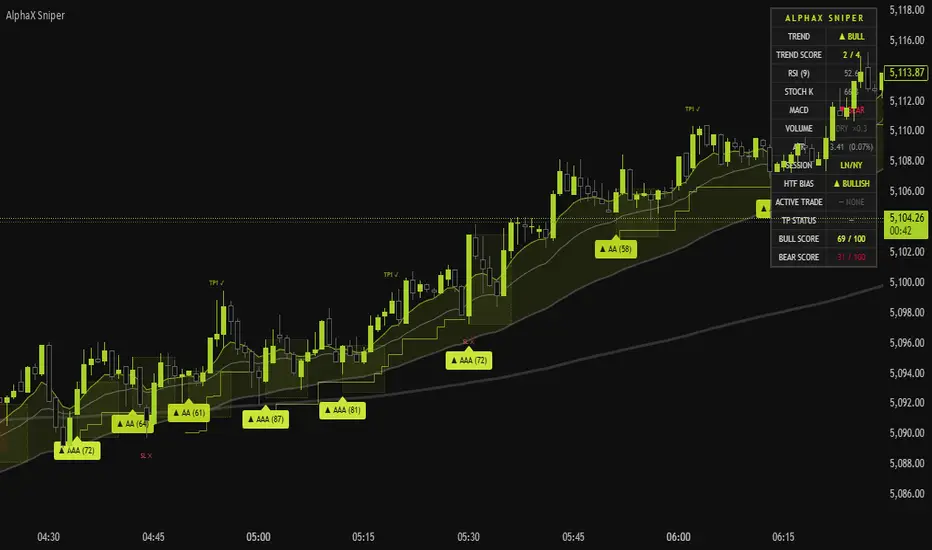
AlphaX Sniper — Multi-Layer Confluence Scoring, Tiered Entry Grading, ATR-Based TP/SL Levels, Trailing Stop & Sniper Kill Zones

AlphaX Sniper is a precision entry system built around a multi-factor confluence scoring engine that evaluates trend strength, oscillator positioning, volume, session quality, and higher timeframe bias simultaneously — then grades every signal into one of three tiers: A, AA, or AAA. Designed for traders who want surgical, high-confidence entries rather than a constant stream of noise. Built for XAUUSD, forex majors, and indices across intraday timeframes.
━━━━━━━━━━━━━━━━━━━━━━━━━━━━━━━━━━━━━━━━
📸 Visual Overview
Full chart view showing trend ribbon, tiered signal labels, TP/SL levels, sniper kill zones, and trailing stop
━━━━━━━━━━━━━━━━━━━━━━━━━━━━━━━━━━━━━━━━
🔬 The Trend Engine — How It Works
At the foundation of AlphaX Sniper is a four-EMA Trend Engine that scores the current market structure from -4 to +4 and classifies it into distinct trend states:
The engine scores four independent conditions each bar:
Each condition contributes ±1 to the Trend Score, producing a value from -4 to +4:
The space between the Fast EMA and Slow EMA is filled with a Trend Ribbon — yellow-green during bull conditions, red during bear conditions, and gray when the market is neutral or transitioning. The ribbon visually communicates the current trend state at a glance without requiring you to read any values.
━━━━━━━━━━━━━━━━━━━━━━━━━━━━━━━━━━━━━━━━
📊 The Confluence Scoring System
Every signal in AlphaX Sniper is produced by a real-time confluence scoring engine that evaluates six independent factors and produces a bull score and a bear score from 0 to 100 on every bar.
Trend Strength (up to 30 points)
RSI Positioning (up to 20 points)
Stochastic Trigger (up to 15 points)
MACD Alignment (up to 10 points)
Volume Quality (up to 10 points)
Candle Structure, HTF Bias & Session (up to 10 points)
Penalty Deductions
━━━━━━━━━━━━━━━━━━━━━━━━━━━━━━━━━━━━━━━━
🎯 Three-Tier Signal Grading (A / AA / AAA)
Tiered signal labels — AAA signals carry the highest confluence score and strongest setup quality
Once the confluence scores are calculated and all filters pass, signals are graded into three quality tiers:
Signals below 30 are never displayed regardless of trigger conditions. The tier label appears directly on the chart with the score printed in parentheses so you can see exactly how strong the confluence was: e.g. ▲ AAA (71) or ▼ AA (52).
A cooldown window (default: 5 bars) prevents back-to-back signals from firing in quick succession during choppy conditions. Bull and bear cooldowns are tracked independently.
━━━━━━━━━━━━━━━━━━━━━━━━━━━━━━━━━━━━━━━━
📐 ATR-Based TP/SL Levels
Automatically plotted TP1, TP2, TP3, and SL dashed lines extending forward from every signal bar
Every signal automatically generates a full set of Take Profit and Stop Loss levels based on the current ATR, placing them at configurable multiples of market volatility rather than fixed pip values:
All levels are plotted as dashed horizontal lines extending 25 bars forward from the signal bar with clean price labels. As price hits each level, a TP1 ✓ / TP2 ✓ / TP3 ✓ marker appears on the chart and the dashboard TP Status updates in real time. When the stop loss is hit, a SL ✕ marker appears and the active trade state resets.
All ATR multiples are fully configurable. Adjust the SL multiple tighter for higher-timeframe trades or wider for volatile instruments like XAUUSD during news events.
━━━━━━━━━━━━━━━━━━━━━━━━━━━━━━━━━━━━━━━━
🛡 Trailing Stop
A dynamic trailing stop</b> follows the active trade, ratcheting in the direction of the move to protect accumulated profits:
The trailing stop is plotted as a step-line in the bull or bear color and updates on every bar in real time.
━━━━━━━━━━━━━━━━━━━━━━━━━━━━━━━━━━━━━━━━
🗺 Sniper Kill Zones
Shaded entry zones appearing on signal bars — the price area between the entry candle and the stop loss level
On every signal bar, AlphaX Sniper draws a Sniper Kill Zone — a shaded rectangular box that marks the entry price area:
Kill zones serve as a visual reminder of where a valid re-entry or limit order can be placed after the initial signal bar closes. If price pulls back into the zone during the next few bars, the setup is still within its original risk structure.
━━━━━━━━━━━━━━━━━━━━━━━━━━━━━━━━━━━━━━━━
⏱ Session Filter & Session Quality
Session timing has a direct impact on signal quality. AlphaX Sniper tracks four session windows based on UTC/GMT time:
The optional Session Filter can be enabled to block all signals outside of London and NY entirely. When disabled (default), the session quality factor still penalizes Asian session signals through the scoring system — you see them, but they score lower.
━━━━━━━━━━━━━━━━━━━━━━━━━━━━━━━━━━━━━━━━
📋 Live Dashboard
Real-time dashboard showing all key market state values at a glance
The built-in dashboard displays a full snapshot of current market conditions in real time:
Dashboard position (Top Right default), text size, and colors are all configurable.
━━━━━━━━━━━━━━━━━━━━━━━━━━━━━━━━━━━━━━━━
🚀 How to Trade with AlphaX Sniper — Step by Step
Step 1 — Read the Dashboard
Step 2 — Wait for a Tiered Signal
Step 3 — Use the Kill Zone for Entry
Step 4 — Set Your Levels
Step 5 — Monitor TP Progress
Step 6 — Reset on SL Hit
━━━━━━━━━━━━━━━━━━━━━━━━━━━━━━━━━━━━━━━━
⚡ Key Features
━━━━━━━━━━━━━━━━━━━━━━━━━━━━━━━━━━━━━━━━
⚙ Settings Reference
Trend Engine
Sniper Entry
Precision Filters
TP / SL
Sniper Zones
Session Filter
Appearance
Colors
Dashboard
━━━━━━━━━━━━━━━━━━━━━━━━━━━━━━━━━━━━━━━━
🔔 Alert Conditions
All alert messages include {{ticker}} and {{interval}} placeholders for clean webhook integration.
━━━━━━━━━━━━━━━━━━━━━━━━━━━━━━━━━━━━━━━━
🎯 Default Settings — Optimized For
The default configuration is specifically tuned for XAUUSD (Gold) on the 1-minute and 5-minute timeframes:
For other instruments or timeframes, consider adjusting:
━━━━━━━━━━━━━━━━━━━━━━━━━━━━━━━━━━━━━━━━
👥 Who This Is For
━━━━━━━━━━━━━━━━━━━━━━━━━━━━━━━━━━━━━━━━
📝 Notes
━━━━━━━━━━━━━━━━━━━━━━━━━━━━━━━━━━━━━━━━
⚠ Disclaimer
This indicator is a technical analysis and visualization tool intended for educational and informational purposes only. It does not constitute financial advice or a recommendation to buy or sell any financial instrument. All signals are generated from historical and real-time price data using mathematical calculations — their accuracy or profitability is not guaranteed. Past performance of any signal type does not guarantee future results. Always conduct your own analysis, use proper risk management, and consult a licensed financial advisor before making any trading decisions. The author accepts no responsibility for any losses incurred from the use of this indicator.
━━━━━━━━━━━━━━━━━━━━━━━━━━━━━━━━━━━━━━━━
Built for traders who demand precision over volume — fewer signals, higher conviction, complete trade management.
AlphaX Sniper is a precision entry system built around a multi-factor confluence scoring engine that evaluates trend strength, oscillator positioning, volume, session quality, and higher timeframe bias simultaneously — then grades every signal into one of three tiers: A, AA, or AAA. Designed for traders who want surgical, high-confidence entries rather than a constant stream of noise. Built for XAUUSD, forex majors, and indices across intraday timeframes.
━━━━━━━━━━━━━━━━━━━━━━━━━━━━━━━━━━━━━━━━
📸 Visual Overview
Full chart view showing trend ribbon, tiered signal labels, TP/SL levels, sniper kill zones, and trailing stop
━━━━━━━━━━━━━━━━━━━━━━━━━━━━━━━━━━━━━━━━
🔬 The Trend Engine — How It Works
At the foundation of AlphaX Sniper is a four-EMA Trend Engine that scores the current market structure from -4 to +4 and classifies it into distinct trend states:
- Fast EMA (8) — immediate momentum reference, most sensitive to price changes
- Medium EMA (21) — intermediate trend confirmation layer
- Slow EMA (55) — the trend backbone, filters short-term noise
- Anchor EMA (200) — the macro structural divider; being above or below it determines the dominant bias
The engine scores four independent conditions each bar:
- EMA ribbon alignment (Fast > Medium > Slow for bull, reverse for bear)
- Fast EMA slope direction (accelerating up or down)
- Medium EMA slope direction
- Price position relative to the Anchor EMA
Each condition contributes ±1 to the Trend Score, producing a value from -4 to +4:
- +4 / +3 — Strong Bull Trend
- +2 — Moderate Bull Trend
- +1 — Mild Bull
- 0 — Neutral / Ranging
- -1 — Mild Bear
- -2 — Moderate Bear Trend
- -4 / -3 — Strong Bear Trend
The space between the Fast EMA and Slow EMA is filled with a Trend Ribbon — yellow-green during bull conditions, red during bear conditions, and gray when the market is neutral or transitioning. The ribbon visually communicates the current trend state at a glance without requiring you to read any values.
━━━━━━━━━━━━━━━━━━━━━━━━━━━━━━━━━━━━━━━━
📊 The Confluence Scoring System
Every signal in AlphaX Sniper is produced by a real-time confluence scoring engine that evaluates six independent factors and produces a bull score and a bear score from 0 to 100 on every bar.
Trend Strength (up to 30 points)
- Strong Bull/Bear Trend (score ±3 or ±4) — 30 points
- Moderate Trend (score ±2) — 20 points
- Mild Trend (score ±1) — 10 points
- Neutral — 0 points
RSI Positioning (up to 20 points)
- RSI recovering from pullback zone (crossing back above/below threshold) — 20 points
- RSI sitting in pullback zone — 12 points
- RSI already extended in the opposite direction — up to -15 points (penalty)
Stochastic Trigger (up to 15 points)
- %K crossing %D while recovering from oversold/overbought territory — 15 points
- %K/%D crossover alone — 12 points
- %K exiting oversold or overbought zone — 8 points
MACD Alignment (up to 10 points)
- When MACD filter is enabled: aligned and accelerating — 10 points; aligned but flat — 5 points
- When MACD filter is disabled: full 10 points awarded by default (does not penalize)
Volume Quality (up to 10 points)
- Volume spike (>1.5× the 20-SMA) — 10 points
- Above-average volume (>1.0×) — 7 points
- Meets minimum volume threshold — 4 points
Candle Structure, HTF Bias & Session (up to 10 points)
- Strong directional candle with solid body — 5 points
- Higher timeframe EMA alignment confirming the same direction — 5 points
- London/NY overlap session — 5 points; London or NY solo — 3 points; Asia — 0 points
Penalty Deductions
- RSI at extreme opposing level — up to -15 points
- Low volatility (ATR filter active and failing) — -10 points
- Asian session — -8 points
━━━━━━━━━━━━━━━━━━━━━━━━━━━━━━━━━━━━━━━━
🎯 Three-Tier Signal Grading (A / AA / AAA)
Tiered signal labels — AAA signals carry the highest confluence score and strongest setup quality
Once the confluence scores are calculated and all filters pass, signals are graded into three quality tiers:
- AAA ▲ / ▼ — Score ≥ 65. Maximum confluence. All major factors aligned. Highest-conviction entries. Displayed with the brightest label color.
- AA ▲ / ▼ — Score 45–64. Strong setup with multiple confirming factors. High-quality entry with most conditions in your favor.
- A ▲ / ▼ — Score 30–44. Valid setup meeting all trigger and filter requirements, but fewer confirming factors. Still a filtered, quality signal — not noise.
Signals below 30 are never displayed regardless of trigger conditions. The tier label appears directly on the chart with the score printed in parentheses so you can see exactly how strong the confluence was: e.g. ▲ AAA (71) or ▼ AA (52).
A cooldown window (default: 5 bars) prevents back-to-back signals from firing in quick succession during choppy conditions. Bull and bear cooldowns are tracked independently.
━━━━━━━━━━━━━━━━━━━━━━━━━━━━━━━━━━━━━━━━
📐 ATR-Based TP/SL Levels
Automatically plotted TP1, TP2, TP3, and SL dashed lines extending forward from every signal bar
Every signal automatically generates a full set of Take Profit and Stop Loss levels based on the current ATR, placing them at configurable multiples of market volatility rather than fixed pip values:
- Stop Loss — 1.5× ATR from entry (default) — tight enough to protect capital, wide enough to breathe
- TP1 — 1.5× ATR — the conservative first target, ideal for partial profit-taking
- TP2 — 3.0× ATR — the primary target for the main portion of the position
- TP3 — 5.0× ATR — the extended runner target for strong momentum moves
All levels are plotted as dashed horizontal lines extending 25 bars forward from the signal bar with clean price labels. As price hits each level, a TP1 ✓ / TP2 ✓ / TP3 ✓ marker appears on the chart and the dashboard TP Status updates in real time. When the stop loss is hit, a SL ✕ marker appears and the active trade state resets.
All ATR multiples are fully configurable. Adjust the SL multiple tighter for higher-timeframe trades or wider for volatile instruments like XAUUSD during news events.
━━━━━━━━━━━━━━━━━━━━━━━━━━━━━━━━━━━━━━━━
🛡 Trailing Stop
A dynamic trailing stop</b> follows the active trade, ratcheting in the direction of the move to protect accumulated profits:
- During a long trade — the trail is calculated as close − (ATR × multiplier) and only moves upward, never retracing
- During a short trade — the trail is close + (ATR × multiplier) and only moves downward
- If price violates the trailing stop, the active trade state resets and the trail line disappears
- Default trail multiplier: 2.0× ATR — aggressive enough to capture trends while giving the position room to breathe
The trailing stop is plotted as a step-line in the bull or bear color and updates on every bar in real time.
━━━━━━━━━━━━━━━━━━━━━━━━━━━━━━━━━━━━━━━━
🗺 Sniper Kill Zones
Shaded entry zones appearing on signal bars — the price area between the entry candle and the stop loss level
On every signal bar, AlphaX Sniper draws a Sniper Kill Zone — a shaded rectangular box that marks the entry price area:
- For bull signals — the zone spans from the signal bar's high down to the stop loss level, colored in the bull theme
- For bear signals — the zone spans from the stop loss level down to the bar's low, colored in the bear theme
- The box extends forward a configurable number of bars (default: 6) to visually represent the entry window
Kill zones serve as a visual reminder of where a valid re-entry or limit order can be placed after the initial signal bar closes. If price pulls back into the zone during the next few bars, the setup is still within its original risk structure.
━━━━━━━━━━━━━━━━━━━━━━━━━━━━━━━━━━━━━━━━
⏱ Session Filter & Session Quality
Session timing has a direct impact on signal quality. AlphaX Sniper tracks four session windows based on UTC/GMT time:
- London/NY Overlap — highest liquidity, strongest follow-through, 100 session quality score
- New York — strong directional sessions, 85 quality score
- London — clean trend sessions especially in the open, 80 quality score
- Asia — lowest liquidity, prone to false moves, 30 quality score — signals here receive an -8 point penalty
The optional Session Filter can be enabled to block all signals outside of London and NY entirely. When disabled (default), the session quality factor still penalizes Asian session signals through the scoring system — you see them, but they score lower.
━━━━━━━━━━━━━━━━━━━━━━━━━━━━━━━━━━━━━━━━
📋 Live Dashboard
Real-time dashboard showing all key market state values at a glance
The built-in dashboard displays a full snapshot of current market conditions in real time:
- TREND — current trend state: STRONG BULL / BULL / MILD BULL / NEUTRAL / MILD BEAR / BEAR / STRONG BEAR
- TREND SCORE — the raw score from -4 to +4 powering the trend classification
- RSI — current RSI value color-coded by zone (overbought / neutral / oversold)
- STOCH K — current stochastic %K value with overbought/oversold coloring
- MACD — current MACD state: BULL MOM / BULL / BEAR MOM / BEAR / FLAT
- VOLUME — volume classification (SPIKE / HIGH / NORMAL / DRY) with live ×ratio vs the 20-SMA
- ATR — current ATR value and ATR as a percentage of price
- SESSION — current active session name (LN/NY / NEW YORK / LONDON / ASIA / OFF-SESSION)
- HTF BIAS — higher timeframe EMA alignment: BULLISH / BEARISH / NEUTRAL
- ACTIVE TRADE — current trade direction: LONG / SHORT / NONE
- TP STATUS — live progress through the TP levels: RUNNING → TP1 ✓ → TP2 ✓✓ → TP3 ✓✓✓ / SL HIT
- BULL SCORE — current bull confluence score out of 100
- BEAR SCORE — current bear confluence score out of 100
Dashboard position (Top Right default), text size, and colors are all configurable.
━━━━━━━━━━━━━━━━━━━━━━━━━━━━━━━━━━━━━━━━
🚀 How to Trade with AlphaX Sniper — Step by Step
Step 1 — Read the Dashboard
- Check the Trend and Trend Score — are you in a strong trend or a neutral range?
- Check HTF Bias — does the higher timeframe EMA structure confirm your direction?
- Check Session — are you in London or NY? If Asia, expect lower-quality signals.
Step 2 — Wait for a Tiered Signal
- An ▲ AAA / AA / A label below the bar is your bull entry signal
- A ▼ AAA / AA / A label above the bar is your bear entry signal
- Prioritize AAA signals in trending markets — these represent maximum confluence
- AA signals are still high quality and tradable in most conditions
- A signals are valid but consider taking smaller size or waiting for additional confirmation
Step 3 — Use the Kill Zone for Entry
- Enter at the close of the signal bar, or wait for a pullback into the Kill Zone
- A limit order inside the Kill Zone can offer a better entry price while staying within the original risk structure
Step 4 — Set Your Levels
- Stop Loss is plotted automatically — honor it
- Target TP1 first for a partial close, then trail the remainder toward TP2 and TP3
- Let the trailing stop manage the remainder once TP1 is achieved
Step 5 — Monitor TP Progress
- The dashboard TP Status updates as each level is hit
- TP ✓ markers appear on the chart at the bar where each target was reached
- If the trailing stop tightens and triggers before TP3, that is the system protecting your profit — respect it
Step 6 — Reset on SL Hit
- An SL ✕ marker appears when price hits the stop level
- The active trade state resets — the dashboard returns to NONE and TP tracking clears
- Reassess the dashboard for a fresh signal before re-entering
━━━━━━━━━━━━━━━━━━━━━━━━━━━━━━━━━━━━━━━━
⚡ Key Features
- 📊 Four-EMA Trend Engine with -4 to +4 scoring — classifies trend into 7 distinct strength states
- 🎯 Three-tier signal grading (A / AA / AAA) — score printed on every label for full transparency
- 🧠 Multi-factor confluence scoring across trend, RSI, Stochastic, MACD, volume, session, and HTF bias
- 📐 Automatic ATR-based TP1 / TP2 / TP3 and SL levels plotted on every signal
- 🛡 Dynamic trailing stop — ratchets with the move, resets on breach
- 🗺 Sniper Kill Zones — shaded entry boxes marking the valid entry area for limit orders
- ⏱ Session-aware scoring — London/NY overlap rewarded, Asia penalized
- 🔭 Higher timeframe bias filter — built-in HTF EMA alignment check without switching charts
- ⚙ Optional filters — Volume, Candle Body Strength, MACD Alignment, ATR Volatility Minimum, Session
- 🕒 Configurable signal cooldown — prevents signal spam during choppy transitions
- 📋 Live 13-row dashboard — trend state, scores, oscillators, volume, session, trade status, TP progress
- 🎨 Cohesive dual-tone color system — yellow-green for bull, red for bear, gray for neutral
- 🔔 17 alert conditions — tiered entries, any entry, TP levels, SL, trend state changes
- ⚙ Fully configurable — all EMA periods, RSI/Stoch parameters, TP/SL multiples, filters, colors, and dashboard settings
━━━━━━━━━━━━━━━━━━━━━━━━━━━━━━━━━━━━━━━━
⚙ Settings Reference
Trend Engine
- Trend Fast EMA — momentum reference (default: 8)
- Trend Medium EMA — intermediate confirmation (default: 21)
- Trend Slow EMA — trend backbone (default: 55)
- Trend Anchor EMA — macro structural divider (default: 200)
- Show Trend EMAs — toggle EMA line and ribbon visibility
- Show Anchor EMA (200) — toggle the 200 EMA separately
Sniper Entry
- RSI Period — oscillator lookback (default: 9)
- RSI Bull Pullback ≤ — threshold defining the bull pullback zone (default: 48)
- RSI Bear Pullback ≥ — threshold defining the bear pullback zone (default: 52)
- Stoch Length — stochastic lookback (default: 14)
- Stoch Smooth — %K smoothing period (default: 3)
- Stoch Overbought / Oversold — extreme zone thresholds (default: 75 / 25)
Precision Filters
- Require Volume Confirmation — enforce minimum volume vs 20-SMA (default: off)
- Min Volume vs 20-SMA — minimum volume ratio when filter is on (default: 0.6×)
- Require Candle Strength — enforce minimum body/range ratio (default: on)
- Min Body/Range Ratio — minimum candle body as a fraction of full range (default: 0.25)
- Require MACD Alignment — block signals when MACD is counter-directional (default: off)
- Filter Low Volatility — require minimum ATR % of price (default: off)
- Min ATR % of Price — minimum ATR threshold when volatility filter is on (default: 0.02%)
- Signal Cooldown (bars) — minimum bars between same-direction signals (default: 5)
TP / SL
- Show TP/SL Levels — toggle all TP and SL line display
- ATR Period for TP/SL — ATR calculation period (default: 14)
- Stop Loss ATR Multiple — SL distance (default: 1.5×)
- TP1 / TP2 / TP3 ATR Multiples — target distances (defaults: 1.5× / 3.0× / 5.0×)
Sniper Zones
- Show Sniper Kill Zones — toggle entry zone boxes
- Zone Forward Extension — how many bars the zone box extends forward (default: 6)
Session Filter
- Enable Session Filter — block signals outside kill zone windows (default: off)
- London Open / NY Open / NY Close / Asia Open / Asia Close — configurable GMT hour boundaries
Appearance
- Label Size — Tiny / Small / Normal
- Show Trailing Stop — toggle trailing stop line
- Trail ATR Multiple — trailing stop distance (default: 2.0×)
Colors
- Full dual-tone color system — every bull, bear, and neutral element is independently configurable
- Separate colors for: ribbon, EMAs, labels (background + text), TP lines, SL lines, kill zones, trailing stops, dashboard
Dashboard
- Show Dashboard — toggle visibility
- Position — Top Left / Top Right / Bottom Left / Bottom Right (default: Top Right)
- Text Size — Tiny / Small / Normal
━━━━━━━━━━━━━━━━━━━━━━━━━━━━━━━━━━━━━━━━
🔔 Alert Conditions
- AAA Bull Sniper Entry — fires on maximum-confluence bull signals only
- AA Bull Sniper Entry — fires on high-quality bull signals
- A Bull Sniper Entry — fires on valid bull signals
- AAA / AA / A Bear Sniper Entry — same three tiers for bear signals
- Any Bull Sniper Entry — fires on any bull signal regardless of tier
- Any Bear Sniper Entry — fires on any bear signal regardless of tier
- Any Sniper Entry — fires on any signal in either direction
- TP1 Hit / TP2 Hit / TP3 Hit — fires when each take profit level is reached
- Stop Loss Hit — fires when the stop loss is breached
- Strong Bull Trend Started — fires when Trend Score first reaches ≥ +3
- Strong Bear Trend Started — fires when Trend Score first reaches ≤ -3
All alert messages include {{ticker}} and {{interval}} placeholders for clean webhook integration.
━━━━━━━━━━━━━━━━━━━━━━━━━━━━━━━━━━━━━━━━
🎯 Default Settings — Optimized For
The default configuration is specifically tuned for XAUUSD (Gold) on the 1-minute and 5-minute timeframes:
- RSI period of 9 for fast response to gold's intraday price swings
- Candle Strength filter on (0.25 body ratio) to avoid wicks and indecision candles
- Cooldown of 5 bars prevents signal clustering during volatile transitions
- Session scoring automatically penalizes Asian-session signals on gold
- Trail ATR multiple at 2.0× provides generous breathing room for gold's characteristic oscillations
For other instruments or timeframes, consider adjusting:
- Higher timeframes (15m, 1H) — increase EMA periods, increase TP2/TP3 multiples to 4×/7×
- Forex majors — reduce Fast EMA to 5–8, reduce SL multiple to 1.0–1.2×
- Indices (NAS100, US30) — increase RSI period to 11–14, enable MACD filter for extra precision
- More signals — reduce cooldown, disable Candle Strength filter, lower score threshold to ~25
- Fewer signals — enable all filters, increase cooldown to 8–10 bars, use AAA alerts only
━━━━━━━━━━━━━━━━━━━━━━━━━━━━━━━━━━━━━━━━
👥 Who This Is For
- 🥇 Gold (XAUUSD) scalpers and intraday traders — default settings tuned specifically for gold's session structure and volatility
- 📉 Forex traders — applicable to all majors and minors with minor EMA and RSI adjustments
- 📊 Index traders — works on US30, NAS100, SPX500, DAX, and others
- 🧠 Data-driven traders — the scored, graded signal system provides a quantitative framework rather than arbitrary lines on a chart
- 🎯 Precision-focused traders — tiered grading lets you focus exclusively on AAA setups for the highest-conviction trades
- 📈 Trade management focused traders — the automatic TP/SL levels, trailing stop, and live TP status tracker remove the guesswork from position management
- ⚠ Traders who struggle with overtrading — the cooldown, minimum score threshold, and optional filters physically prevent low-quality signals from appearing
━━━━━━━━━━━━━━━━━━━━━━━━━━━━━━━━━━━━━━━━
📝 Notes
- Session detection uses UTC/GMT — the indicator automatically identifies London, NY, and Asia windows on any broker timezone
- Higher timeframe bias is calculated using multiplied EMA periods on the same chart rather than requesting a secondary timeframe — this avoids repainting and keeps all calculations on bar close
- All signal conditions are evaluated on bar close — the indicator does not repaint
- The trailing stop logic and TP hit detection use intrabar high/low values to accurately reflect when levels were reached, consistent with standard trade execution behavior
- Maximum 500 labels are used — on very long chart histories at low timeframes, the oldest labels may be automatically removed by TradingView's rendering limits
- Volume-based features (volume filter, volume score) may behave differently on instruments with limited volume data — consider disabling the volume filter on synthetics and CFDs if volume data is unreliable
━━━━━━━━━━━━━━━━━━━━━━━━━━━━━━━━━━━━━━━━
⚠ Disclaimer
This indicator is a technical analysis and visualization tool intended for educational and informational purposes only. It does not constitute financial advice or a recommendation to buy or sell any financial instrument. All signals are generated from historical and real-time price data using mathematical calculations — their accuracy or profitability is not guaranteed. Past performance of any signal type does not guarantee future results. Always conduct your own analysis, use proper risk management, and consult a licensed financial advisor before making any trading decisions. The author accepts no responsibility for any losses incurred from the use of this indicator.
━━━━━━━━━━━━━━━━━━━━━━━━━━━━━━━━━━━━━━━━
Built for traders who demand precision over volume — fewer signals, higher conviction, complete trade management.
הערות שחרור
Score system enhancedהערות שחרור
Minor style changes.סקריפט קוד פתוח
ברוח האמיתית של TradingView, יוצר הסקריפט הזה הפך אותו לקוד פתוח, כך שסוחרים יוכלו לעיין בו ולאמת את פעולתו. כל הכבוד למחבר! אמנם ניתן להשתמש בו בחינם, אך זכור כי פרסום חוזר של הקוד כפוף ל־כללי הבית שלנו.

🌐 alphax.trading
Institutional Grade Signals --> Engineered for Retail
💎ᴠɪᴘ tradingview.com/v/TaXohZvb/
[ A L P H A X ] PRIME - Premium Signal Engine
🔢 alphax.trading/resources/calculators
AlphaX Calculators
Institutional Grade Signals --> Engineered for Retail
💎ᴠɪᴘ tradingview.com/v/TaXohZvb/
[ A L P H A X ] PRIME - Premium Signal Engine
🔢 alphax.trading/resources/calculators
AlphaX Calculators
כתב ויתור
המידע והפרסומים אינם מיועדים להיות, ואינם מהווים, ייעוץ או המלצה פיננסית, השקעתית, מסחרית או מכל סוג אחר המסופקת או מאושרת על ידי TradingView. קרא עוד ב־תנאי השימוש.
סקריפט קוד פתוח
ברוח האמיתית של TradingView, יוצר הסקריפט הזה הפך אותו לקוד פתוח, כך שסוחרים יוכלו לעיין בו ולאמת את פעולתו. כל הכבוד למחבר! אמנם ניתן להשתמש בו בחינם, אך זכור כי פרסום חוזר של הקוד כפוף ל־כללי הבית שלנו.
🌐 alphax.trading
Institutional Grade Signals --> Engineered for Retail
💎ᴠɪᴘ tradingview.com/v/TaXohZvb/
[ A L P H A X ] PRIME - Premium Signal Engine
🔢 alphax.trading/resources/calculators
AlphaX Calculators
Institutional Grade Signals --> Engineered for Retail
💎ᴠɪᴘ tradingview.com/v/TaXohZvb/
[ A L P H A X ] PRIME - Premium Signal Engine
🔢 alphax.trading/resources/calculators
AlphaX Calculators
כתב ויתור
המידע והפרסומים אינם מיועדים להיות, ואינם מהווים, ייעוץ או המלצה פיננסית, השקעתית, מסחרית או מכל סוג אחר המסופקת או מאושרת על ידי TradingView. קרא עוד ב־תנאי השימוש.