

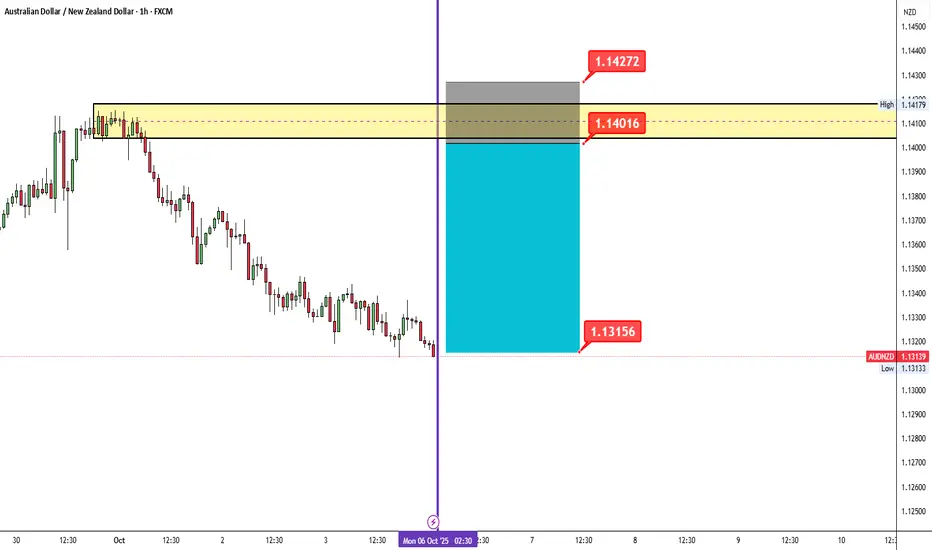
📊 AUDNZD – Bearish Setup (H1 Chart)
Pair: AUDNZD
Timeframe: 1H
Bias: Short Position
🔎 Market Context:
Price has been in a downtrend, forming lower highs and lower lows.
A key resistance zone (1.14016 – 1.14272) is identified where sellers may take control again.
Current price action is showing weakness, suggesting a potential continuation to the downside.
📌 Trade Plan:
Entry Zone: 1.14016 – 1.14272
Stop Loss (SL): Above 1.14272
Take Profit (TP): 1.13156 (previous support / liquidity area)
⚖️ Risk-Reward (RR):
Approx 1:3, aligning with my weekly trading plan.
📅 Setup valid for Oct 6 – Oct 10, 2025
⚠️ Disclaimer: This post is for educational purposes only, not financial advice. Always manage your risk properly before trading.
Pair: AUDNZD
Timeframe: 1H
Bias: Short Position
🔎 Market Context:
Price has been in a downtrend, forming lower highs and lower lows.
A key resistance zone (1.14016 – 1.14272) is identified where sellers may take control again.
Current price action is showing weakness, suggesting a potential continuation to the downside.
📌 Trade Plan:
Entry Zone: 1.14016 – 1.14272
Stop Loss (SL): Above 1.14272
Take Profit (TP): 1.13156 (previous support / liquidity area)
⚖️ Risk-Reward (RR):
Approx 1:3, aligning with my weekly trading plan.
📅 Setup valid for Oct 6 – Oct 10, 2025
⚠️ Disclaimer: This post is for educational purposes only, not financial advice. Always manage your risk properly before trading.

Disclaimer
The information and publications are not meant to be, and do not constitute, financial, investment, trading, or other types of advice or recommendations supplied or endorsed by TradingView. Read more in the Terms of Use.
Disclaimer
The information and publications are not meant to be, and do not constitute, financial, investment, trading, or other types of advice or recommendations supplied or endorsed by TradingView. Read more in the Terms of Use.