

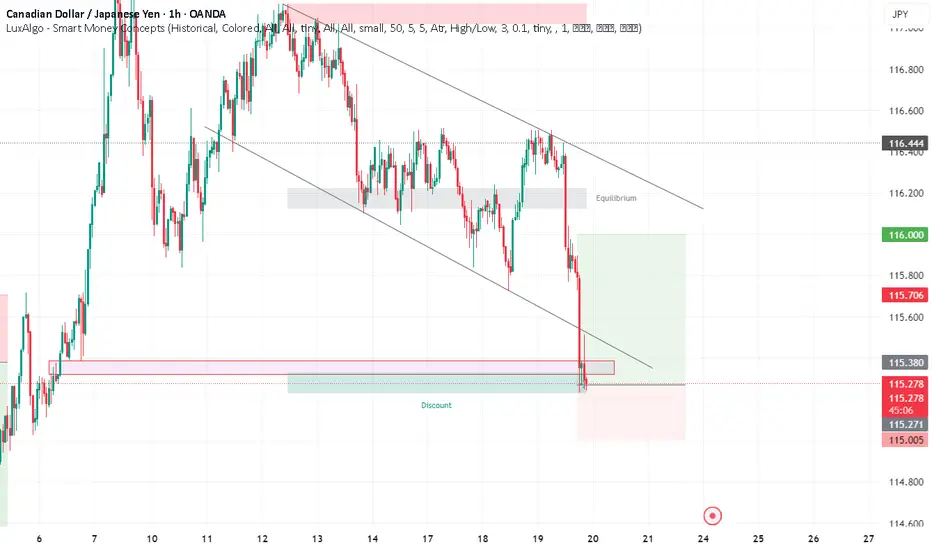
Trade Type: Short
Entry: 115.271
Stop-Loss: 26 pips
Take-Profit: 72 pips
🧠 Trade Idea Explanation
Price on CADJPY (1H) is moving inside a clear descending channel, consistently making lower highs and lower lows. After a strong impulsive drop, price tapped into a discount zone and showed a liquidity sweep beneath a minor support area.
Why This Sell Setup Makes Sense?
✔ Descending Structure: The pair is respecting the channel, rejecting the trendline perfectly.
✔ Liquidity Grab: Price wicked below previous lows, taking out stop-losses, showing exhaustion.
✔ Premium-to-Discount Move: Market fell straight from the premium zone and is now continuing the bearish leg.
✔ Weak Pullback: The minor bullish reaction failed to break structure → sellers still in control.
📌 Entry Logic
Entering at 115.271 aligns with the rejection zone after the liquidity sweep and confirms sellers stepping back in.
📉 Stop-Loss (26 pips)
Placed safely above the internal structure & small bullish reaction zone to avoid noise while maintaining tight risk.
🎯 Take-Profit (72 pips)
Targets the next liquidity pool & measured move inside the descending channel — offering 1:2.75 RR, ideal for trend continuation.
📊 Summary
Bias: Bearish
Reason: Liquidity sweep + channel rejection + bearish momentum
RR: ~1:2.75 (high-quality setup)
Expectation: Continuation to downside toward next discount zone
Entry: 115.271
Stop-Loss: 26 pips
Take-Profit: 72 pips
🧠 Trade Idea Explanation
Price on CADJPY (1H) is moving inside a clear descending channel, consistently making lower highs and lower lows. After a strong impulsive drop, price tapped into a discount zone and showed a liquidity sweep beneath a minor support area.
Why This Sell Setup Makes Sense?
✔ Descending Structure: The pair is respecting the channel, rejecting the trendline perfectly.
✔ Liquidity Grab: Price wicked below previous lows, taking out stop-losses, showing exhaustion.
✔ Premium-to-Discount Move: Market fell straight from the premium zone and is now continuing the bearish leg.
✔ Weak Pullback: The minor bullish reaction failed to break structure → sellers still in control.
📌 Entry Logic
Entering at 115.271 aligns with the rejection zone after the liquidity sweep and confirms sellers stepping back in.
📉 Stop-Loss (26 pips)
Placed safely above the internal structure & small bullish reaction zone to avoid noise while maintaining tight risk.
🎯 Take-Profit (72 pips)
Targets the next liquidity pool & measured move inside the descending channel — offering 1:2.75 RR, ideal for trend continuation.
📊 Summary
Bias: Bearish
Reason: Liquidity sweep + channel rejection + bearish momentum
RR: ~1:2.75 (high-quality setup)
Expectation: Continuation to downside toward next discount zone

Disclaimer
The information and publications are not meant to be, and do not constitute, financial, investment, trading, or other types of advice or recommendations supplied or endorsed by TradingView. Read more in the Terms of Use.
Disclaimer
The information and publications are not meant to be, and do not constitute, financial, investment, trading, or other types of advice or recommendations supplied or endorsed by TradingView. Read more in the Terms of Use.