

GBPNZD 4H Short Setup | Supply Rejection & Mean-Reversion Thesis
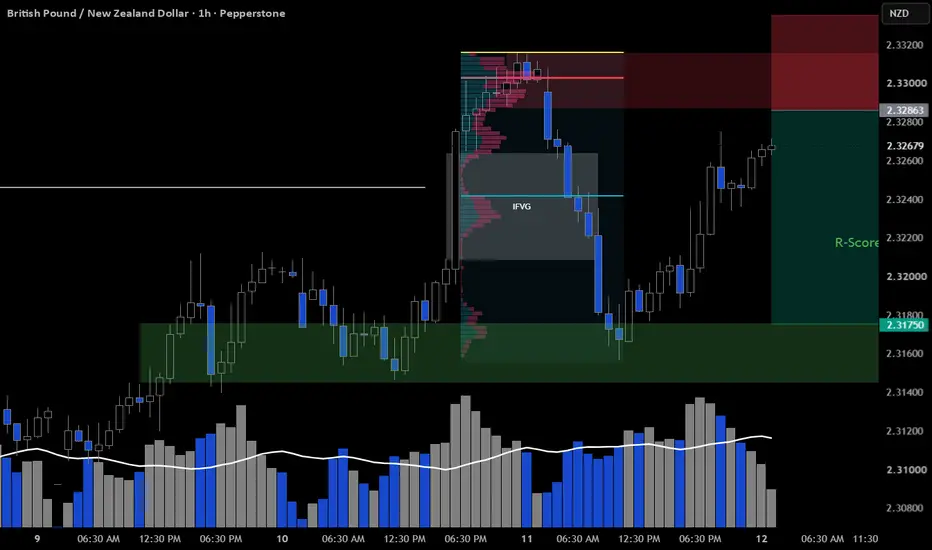
GBP/NZD 4H — Short Setup | Supply Rejection & Mean-Reversion Thesis
Trade Structure
Bias: Bearish
Instrument: GBP/NZD
Timeframe: 4H
Entry: 2.32679
Stop: 2.33354
Target: 2.31750
R-Score: 2.27
Investment Thesis
GBP/NZD is trading into a well-defined 4H supply zone following an extended upside impulse. The current price location presents a favorable tactical opportunity to express a short bias, provided the market confirms seller absorption and a subsequent loss of bullish structure.
The setup is based on a simple premise:
Price has delivered into overhead supply. If demand fails to support further upside at this location, the next logical repricing is toward the underlying support and liquidity zone.
The trade is therefore not predicated on calling an exact market top. It is a location-driven short with predefined structural invalidation, seeking to monetize a potential mean-reversion move following an extended upside auction.
Market Structure
The recent GBP/NZD advance has been characterized by a sequence of higher highs and higher lows, accompanied by increasing participation as price moved toward the upper end of the current range.
That bullish structure has now delivered price directly into the 2.3286–2.3335 supply region.
This creates an important inflection point.
At current levels, the risk/reward profile of initiating fresh longs becomes less attractive because price is approaching an area where historical selling pressure is expected to emerge.
Conversely, a confirmed failure to auction higher creates an opportunity to position for a rotation back into the lower part of the recent range.
Supply & Liquidity
The 2.3286–2.3335 region is the primary supply area for this thesis.
This zone represents the area where the market is expected to encounter meaningful overhead inventory.
The upper boundary around 2.3335 is particularly important.
A sustained acceptance above this level would indicate that the market has successfully absorbed the available supply and that the bearish thesis is no longer valid.
Until that occurs, the area remains a potential distribution / rejection zone.
Imbalance / FVG
The recent upside displacement has left an identifiable fair value gap (FVG) within the price delivery.
From a market-structure perspective, this provides an additional reference point for a potential retracement.
If the supply zone produces a rejection, the market does not need to immediately reverse into a full-scale downtrend.
A more realistic base case is:
Supply interaction → failure to extend → bearish displacement → imbalance retracement → continuation toward support.
The FVG therefore functions as part of the expected path of price rather than being treated as an independent entry signal.
Volume & Participation
The volume profile provides additional context.
Participation has increased as GBP/NZD advanced toward the upper portion of the structure.
This is important because the market is not reaching supply after an inactive, low-participation drift.
The current area is being tested following a period of expansion and increased market participation.
The key question is therefore whether that participation produces continued price acceptance above supply or absorption followed by rejection.
If buyers fail to generate additional upside despite elevated participation, that would strengthen the bearish interpretation.
Trade Expression
Short Entry — 2.32679
The position is designed to express the bearish thesis from within the supply region rather than chase price after a downside move has already occurred.
The objective is to establish exposure while the market is still close to the structural invalidation point.
This creates a clearly defined asymmetric trade:
Known risk above supply → potential repricing toward support.
Risk Management
Stop Loss — 2.33354
The stop is positioned above the identified supply region.
This is a thesis-based stop, not an arbitrary distance from entry.
If GBP/NZD trades through the supply zone and establishes acceptance above 2.3335, the market is providing evidence that the anticipated seller response is not materializing.
At that point, the original trade thesis is invalidated.
There is no reason to remain structurally committed to a short position after the market has invalidated the premise on which the position was established.
Downside Objective
Take Profit — 2.31750
The primary objective is the 2.3150–2.3175 support zone.
This area represents the opposing structural reference and provides a logical destination for a short-term mean-reversion trade.
The thesis does not require GBP/NZD to establish a larger bearish trend.
The trade only requires sufficient downside repricing from the supply region into the underlying support.
Expected Price Path
The preferred scenario is:
2.3286–2.3335 Supply
↓
Seller Absorption / Rejection
↓
Bearish Displacement
↓
Break of Short-Term Structure
↓
FVG / Imbalance Repricing
↓
2.3175 Support
This is the path that would validate the trade.
Confirmation Framework
The supply zone itself is not the complete signal.
The highest-quality outcome would be evidence that buyers are unable to sustain the auction above the supply region, followed by a meaningful bearish displacement.
The critical distinction is:
> Supply provides the location.
> Structure provides the confirmation.
A simple wick into supply without follow-through is not sufficient confirmation.
Conversely, a decisive rejection followed by a break of short-term bullish structure materially improves the probability of a downside rotation.
Invalidation
The bearish thesis is invalidated by sustained acceptance above 2.3335.
A temporary liquidity sweep above the level does not automatically invalidate the setup.
What matters is whether price can reclaim, hold, and continue trading above the supply zone.
If that occurs, the market is effectively communicating that available supply has been absorbed and that the prior bearish assumption is incorrect.
No averaging down. No widening the stop. No thesis modification after invalidation.
The predefined risk level exists to eliminate that discretion.
Trade Management
Once the position moves in the anticipated direction, management should be driven by price behavior rather than emotion.
The preferred outcome is a clean bearish repricing away from supply.
If price fails to produce downside displacement and instead continues consolidating around the entry area, the expected trade efficiency deteriorates.
The position should therefore be evaluated based on whether the market continues to confirm the original thesis.
Why This Trade Exists
This is fundamentally a risk-defined tactical short at a structurally unfavorable location for fresh longs.
The trade is not based on:
* guessing the top,
* predicting a crash,
* selling simply because price is overextended,
* or relying on a single candlestick pattern.
It is based on the convergence of:
Supply + Liquidity + Price Extension + Imbalance + Volume Expansion + Structural Invalidation + Defined Downside Objective.
The edge comes from where the position is established and how risk is defined, not from certainty about the next candle.
Final Trade Thesis
GBP/NZD is approaching a significant 4H supply region after an extended upside expansion. I am looking for evidence that the market cannot sustain acceptance above this area and that sellers regain control following the supply interaction.
The tactical objective is a rotation from the 2.3286–2.3335 supply region toward the 2.3150–2.3175 support zone.
The thesis remains valid below 2.3335 and is invalidated by sustained acceptance above that level.
Trade: Short 2.32679
SL: 2.33354
TP: 2.31750
R-Score: 2.27
> The objective is not to predict the market. The objective is to define an asymmetric opportunity, identify the conditions that validate the thesis, and know precisely when the thesis is wrong.
Rayen | Independent Market Research
Quantitative research • Risk & performance analytics
Independent analysis of financial markets, trading strategies, market behaviour and risk. Research is based on historical data, quantitative methods and observed market structure.
Disclaimer: All content is provided for educational and informational purposes only. It is not investment advice, a recommendation, solicitation, or an offer to buy or sell any financial instrument. Trading and investing involve substantial risk, and past performance or research results do not guarantee future results. Readers are responsible for their own investment decisions and risk management.
#GBPNZD #Forex #FX #PriceAction #MarketStructure #SupplyAndDemand #Liquidity #FVG #RiskManagement #TradingSetup #TechnicalAnalysis
Trade Structure
Bias: Bearish
Instrument: GBP/NZD
Timeframe: 4H
Entry: 2.32679
Stop: 2.33354
Target: 2.31750
R-Score: 2.27
Investment Thesis
GBP/NZD is trading into a well-defined 4H supply zone following an extended upside impulse. The current price location presents a favorable tactical opportunity to express a short bias, provided the market confirms seller absorption and a subsequent loss of bullish structure.
The setup is based on a simple premise:
Price has delivered into overhead supply. If demand fails to support further upside at this location, the next logical repricing is toward the underlying support and liquidity zone.
The trade is therefore not predicated on calling an exact market top. It is a location-driven short with predefined structural invalidation, seeking to monetize a potential mean-reversion move following an extended upside auction.
Market Structure
The recent GBP/NZD advance has been characterized by a sequence of higher highs and higher lows, accompanied by increasing participation as price moved toward the upper end of the current range.
That bullish structure has now delivered price directly into the 2.3286–2.3335 supply region.
This creates an important inflection point.
At current levels, the risk/reward profile of initiating fresh longs becomes less attractive because price is approaching an area where historical selling pressure is expected to emerge.
Conversely, a confirmed failure to auction higher creates an opportunity to position for a rotation back into the lower part of the recent range.
Supply & Liquidity
The 2.3286–2.3335 region is the primary supply area for this thesis.
This zone represents the area where the market is expected to encounter meaningful overhead inventory.
The upper boundary around 2.3335 is particularly important.
A sustained acceptance above this level would indicate that the market has successfully absorbed the available supply and that the bearish thesis is no longer valid.
Until that occurs, the area remains a potential distribution / rejection zone.
Imbalance / FVG
The recent upside displacement has left an identifiable fair value gap (FVG) within the price delivery.
From a market-structure perspective, this provides an additional reference point for a potential retracement.
If the supply zone produces a rejection, the market does not need to immediately reverse into a full-scale downtrend.
A more realistic base case is:
Supply interaction → failure to extend → bearish displacement → imbalance retracement → continuation toward support.
The FVG therefore functions as part of the expected path of price rather than being treated as an independent entry signal.
Volume & Participation
The volume profile provides additional context.
Participation has increased as GBP/NZD advanced toward the upper portion of the structure.
This is important because the market is not reaching supply after an inactive, low-participation drift.
The current area is being tested following a period of expansion and increased market participation.
The key question is therefore whether that participation produces continued price acceptance above supply or absorption followed by rejection.
If buyers fail to generate additional upside despite elevated participation, that would strengthen the bearish interpretation.
Trade Expression
Short Entry — 2.32679
The position is designed to express the bearish thesis from within the supply region rather than chase price after a downside move has already occurred.
The objective is to establish exposure while the market is still close to the structural invalidation point.
This creates a clearly defined asymmetric trade:
Known risk above supply → potential repricing toward support.
Risk Management
Stop Loss — 2.33354
The stop is positioned above the identified supply region.
This is a thesis-based stop, not an arbitrary distance from entry.
If GBP/NZD trades through the supply zone and establishes acceptance above 2.3335, the market is providing evidence that the anticipated seller response is not materializing.
At that point, the original trade thesis is invalidated.
There is no reason to remain structurally committed to a short position after the market has invalidated the premise on which the position was established.
Downside Objective
Take Profit — 2.31750
The primary objective is the 2.3150–2.3175 support zone.
This area represents the opposing structural reference and provides a logical destination for a short-term mean-reversion trade.
The thesis does not require GBP/NZD to establish a larger bearish trend.
The trade only requires sufficient downside repricing from the supply region into the underlying support.
Expected Price Path
The preferred scenario is:
2.3286–2.3335 Supply
↓
Seller Absorption / Rejection
↓
Bearish Displacement
↓
Break of Short-Term Structure
↓
FVG / Imbalance Repricing
↓
2.3175 Support
This is the path that would validate the trade.
Confirmation Framework
The supply zone itself is not the complete signal.
The highest-quality outcome would be evidence that buyers are unable to sustain the auction above the supply region, followed by a meaningful bearish displacement.
The critical distinction is:
> Supply provides the location.
> Structure provides the confirmation.
A simple wick into supply without follow-through is not sufficient confirmation.
Conversely, a decisive rejection followed by a break of short-term bullish structure materially improves the probability of a downside rotation.
Invalidation
The bearish thesis is invalidated by sustained acceptance above 2.3335.
A temporary liquidity sweep above the level does not automatically invalidate the setup.
What matters is whether price can reclaim, hold, and continue trading above the supply zone.
If that occurs, the market is effectively communicating that available supply has been absorbed and that the prior bearish assumption is incorrect.
No averaging down. No widening the stop. No thesis modification after invalidation.
The predefined risk level exists to eliminate that discretion.
Trade Management
Once the position moves in the anticipated direction, management should be driven by price behavior rather than emotion.
The preferred outcome is a clean bearish repricing away from supply.
If price fails to produce downside displacement and instead continues consolidating around the entry area, the expected trade efficiency deteriorates.
The position should therefore be evaluated based on whether the market continues to confirm the original thesis.
Why This Trade Exists
This is fundamentally a risk-defined tactical short at a structurally unfavorable location for fresh longs.
The trade is not based on:
* guessing the top,
* predicting a crash,
* selling simply because price is overextended,
* or relying on a single candlestick pattern.
It is based on the convergence of:
Supply + Liquidity + Price Extension + Imbalance + Volume Expansion + Structural Invalidation + Defined Downside Objective.
The edge comes from where the position is established and how risk is defined, not from certainty about the next candle.
Final Trade Thesis
GBP/NZD is approaching a significant 4H supply region after an extended upside expansion. I am looking for evidence that the market cannot sustain acceptance above this area and that sellers regain control following the supply interaction.
The tactical objective is a rotation from the 2.3286–2.3335 supply region toward the 2.3150–2.3175 support zone.
The thesis remains valid below 2.3335 and is invalidated by sustained acceptance above that level.
Trade: Short 2.32679
SL: 2.33354
TP: 2.31750
R-Score: 2.27
> The objective is not to predict the market. The objective is to define an asymmetric opportunity, identify the conditions that validate the thesis, and know precisely when the thesis is wrong.
Rayen | Independent Market Research
Quantitative research • Risk & performance analytics
Independent analysis of financial markets, trading strategies, market behaviour and risk. Research is based on historical data, quantitative methods and observed market structure.
Disclaimer: All content is provided for educational and informational purposes only. It is not investment advice, a recommendation, solicitation, or an offer to buy or sell any financial instrument. Trading and investing involve substantial risk, and past performance or research results do not guarantee future results. Readers are responsible for their own investment decisions and risk management.
#GBPNZD #Forex #FX #PriceAction #MarketStructure #SupplyAndDemand #Liquidity #FVG #RiskManagement #TradingSetup #TechnicalAnalysis

Disclaimer
The information and publications are not meant to be, and do not constitute, financial, investment, trading, or other types of advice or recommendations supplied or endorsed by TradingView. Read more in the Terms of Use.
Disclaimer
The information and publications are not meant to be, and do not constitute, financial, investment, trading, or other types of advice or recommendations supplied or endorsed by TradingView. Read more in the Terms of Use.