
📊 Breakdown of the Analysis
🔎 Context
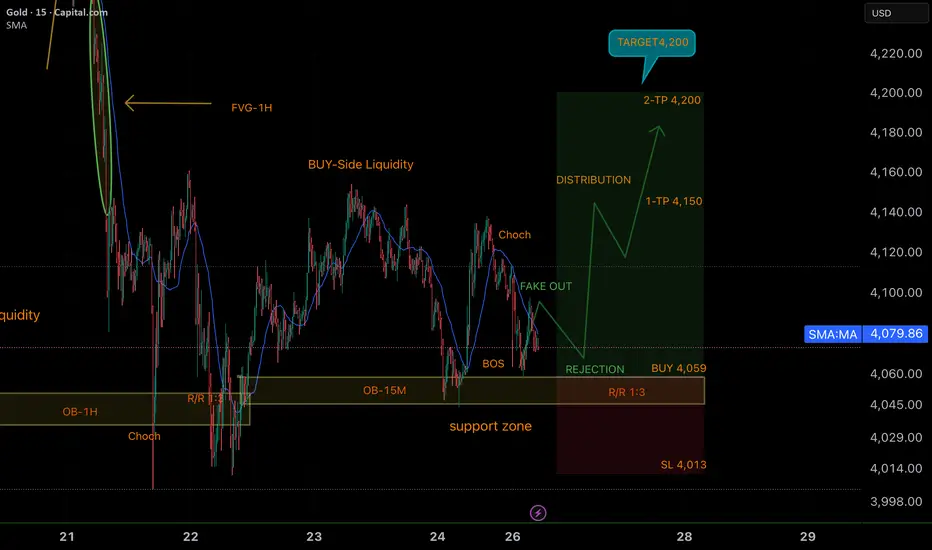
The chart shows a bullish structure in Gold (15M), with clear liquidity manipulation and a potential rejection at a key support zone (OB 15M & OB 1H).
📍 Key Points
• BOS + ChoCh: Structure shift signals confirming institutional accumulation.
• Fake Out: Liquidity sweep before the possible upward move.
• Support Zone: Critical area where reaction is expected (BUY 4,059).
• Risk Management: SL at 4,013 with a solid R:R of 1:3.
🎯 Targets
• TP1: 4,150 – first target to secure profits and move stop to break-even.
• TP2: 4,200 – final target where bullish distribution is expected to complete.
✅ Strategy
Wait for rejection confirmation in the marked zone, enter BUY, and secure partial profits at TP1 while letting the rest run toward TP2.
Patience and risk management are the key. It’s not about catching every move, but about executing high-probability setups with discipline. 🚀📈”
GOOD LUCK TRADERS..;)
🔎 Context
The chart shows a bullish structure in Gold (15M), with clear liquidity manipulation and a potential rejection at a key support zone (OB 15M & OB 1H).
📍 Key Points
• BOS + ChoCh: Structure shift signals confirming institutional accumulation.
• Fake Out: Liquidity sweep before the possible upward move.
• Support Zone: Critical area where reaction is expected (BUY 4,059).
• Risk Management: SL at 4,013 with a solid R:R of 1:3.
🎯 Targets
• TP1: 4,150 – first target to secure profits and move stop to break-even.
• TP2: 4,200 – final target where bullish distribution is expected to complete.
✅ Strategy
Wait for rejection confirmation in the marked zone, enter BUY, and secure partial profits at TP1 while letting the rest run toward TP2.
Patience and risk management are the key. It’s not about catching every move, but about executing high-probability setups with discipline. 🚀📈”
GOOD LUCK TRADERS..;)

Related publications
Disclaimer
The information and publications are not meant to be, and do not constitute, financial, investment, trading, or other types of advice or recommendations supplied or endorsed by TradingView. Read more in the Terms of Use.
Related publications
Disclaimer
The information and publications are not meant to be, and do not constitute, financial, investment, trading, or other types of advice or recommendations supplied or endorsed by TradingView. Read more in the Terms of Use.