
🔎 Overview
────────────────────────────
📘 EMA & RSI
────────────────────────────
🛠 How to Use
────────────────────────────
✅ Validation & Devalidation Rules
────────────────────────────
📌 EMA Band Confirmation
────────────────────────────
📉 RSI Confirmation
────────────────────────────
📊 Chart Explanation
────────────────────────────
📝 Summary
────────────────────────────
⚠️ Disclaimer
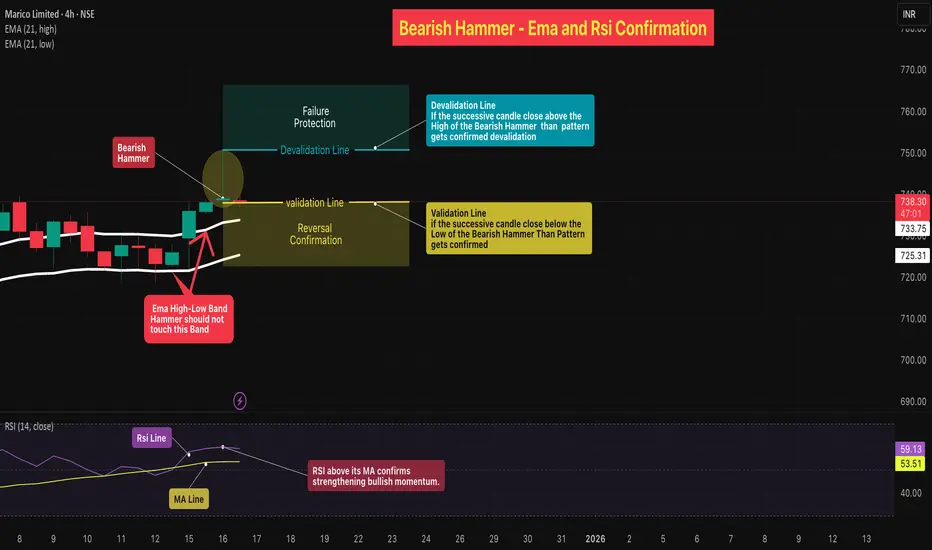
The Bearish Hammer with EMA and RSI Confirmation is a structure-based reversal setup that focuses on price rejection at higher levels, supported by EMA positioning and RSI behavior. This setup helps filter weak candles and highlights situations where selling pressure begins to emerge after an upward move.
────────────────────────────
📘 EMA & RSI
EMA (Exponential Moving Average)
• EMA represents short-term price balance and dynamic support/resistance.
• The EMA High–Low Band defines the acceptable price zone for healthy trend structure.
RSI (Relative Strength Index)
• RSI measures momentum strength.
• The RSI MA (signal line) helps confirm whether momentum is sustaining or shifting.
────────────────────────────
🛠 How to Use
Bearish Hammer Formation Rules
• The Bearish Hammer must form at a swing high.
• The candle should show rejection from higher prices with a long upper wick.
• This indicates exhaustion of upward price movement.
────────────────────────────
✅ Validation & Devalidation Rules
Validation (Reversal Confirmation)
• A successive candle close below the low of the Bearish Hammer confirms the setup.
• This shows acceptance below the rejection zone.
Devalidation (Failure Protection)
• A successive candle close above the high of the Bearish Hammer invalidates the setup
────────────────────────────
📌 EMA Band Confirmation
• The Bearish Hammer must form completely above the EMA High–Low Band.
• The EMA High–Low Band should NOT touch the Bearish Hammer candle.
• This confirms that price is stretched away from value and rejection is valid.
────────────────────────────
📉 RSI Confirmation
• RSI should be above its MA line.
• This reflects mature momentum before rejection occurs.
• RSI alignment helps filter low-quality signals.
────────────────────────────
📊 Chart Explanation
• Bearish Hammer forms at a clear swing high.
• EMA High–Low Band remains below the candle, confirming price extension.
• Validation and devalidation lines define the decision zone.
• RSI supports momentum context during the setup.
────────────────────────────
📝 Summary
• Swing-high Bearish Hammer highlights rejection.
• EMA High–Low Band confirms price stretch.
• RSI MA alignment validates momentum context.
• Validation and devalidation levels provide clear structure.
• The setup emphasizes rule-based and disciplined analysis.
────────────────────────────
⚠️ Disclaimer
📘 For educational purposes only.
🙅 Not SEBI registered.
❌ Not a buy/sell recommendation.
🧠 Purely a learning resource.
📊 Not Financial Advice.

Pine Script Developer • Market Analysis
Disclaimer
The information and publications are not meant to be, and do not constitute, financial, investment, trading, or other types of advice or recommendations supplied or endorsed by TradingView. Read more in the Terms of Use.
Pine Script Developer • Market Analysis
Disclaimer
The information and publications are not meant to be, and do not constitute, financial, investment, trading, or other types of advice or recommendations supplied or endorsed by TradingView. Read more in the Terms of Use.