 STABLE / TetherUS PERPETUAL CONTRACT
Education
Traders Demon Finder: The Hidden Reason Retail Traders Lose
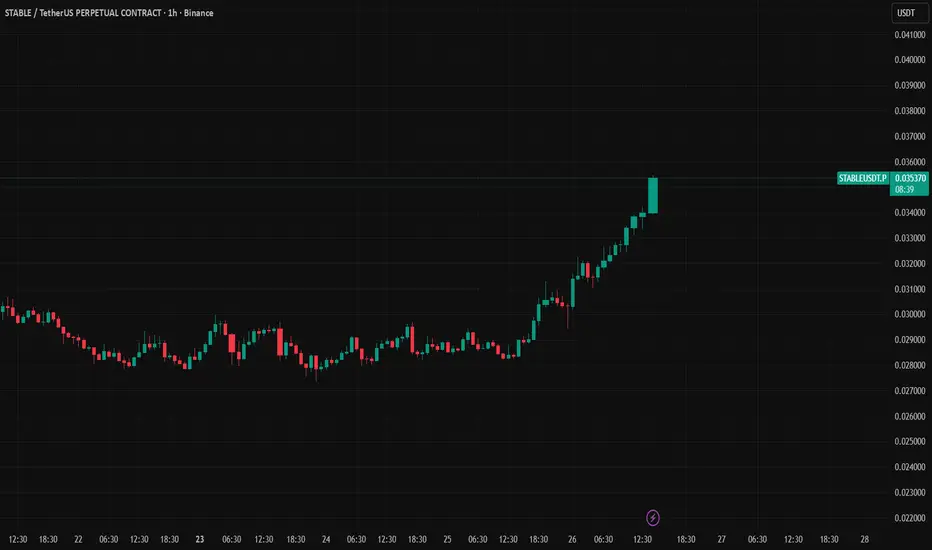
Traders Demon Finder (Live Panel Walkthrough): When a “Perfect Long” Is Still a Trap — and How MARAL Filters It
Chart reference: STABLEUSDT.P (1H) with MARAL — Execution Workflow panels (Router + Regime + Cost + Stress Bridge + Cap27)

Retail traders usually lose on moves like this even when the direction is correct.
Not because the market “cheated” — but because the hidden demon shows up:
The Demon = “Permission ≠ Safety”
Retail sees green, sees bullish candles, enters hard…
…and gets punished by liquidity thinness, overextension, and cost/fill risk.
Your attached panel is literally a Demon Finder because it exposes those hidden killers before they become losses.
1) What your attached panels are saying (in plain words)
A) Context Board (top-right)
Bias is Bullish (HTF alignment looks strong).
Structure/momentum are supportive.
Daily context shows Neutral (important: not a clean trend day every time).
Liquidity context is LOW (this matters more than most traders think).
Meaning: Direction supports LONG, but the environment may still punish sloppy entries.
B) Accuracy Audit (left) Panel ..
You have:
PERMIT LONG with a limited entry window (5 bars)
HTF / Regime / Momentum scoring looks strong (green)
Sweep = Pending
Reclaim = No
Liquidity threat showing LOW, but sweep/reclaim state is not complete.
Meaning: The system is not saying “buy anytime.”
It’s saying: “Long is allowed — but liquidity sequence is not fully resolved.”
Retail usually ignores this and becomes exit liquidity.
How this panel works
Accuracy Audit Panel (Pre-Entry Gate) — Full Details (Console-Style)
Purpose:
The Accuracy Audit is the final gate before entry.
Even if bias is bullish, this panel decides if the entry is safe, timely, and valid.
Think of it like an aircraft checklist:
Direction is not permission. Audit is permission.
1) STATE
What it is: Current phase of the workflow.
Typical states you may see:
PRE-ENTRY → you are still qualifying the trade
IN TRADE → trade is active (now management rules apply)
STAND-DOWN → no trade allowed (block)
How to act:
If PRE-ENTRY → you are allowed to evaluate only, not to “force entry”
If STAND-DOWN → do nothing, wait for next cycle
2) PERMIT
What it is: The permission direction printed by the workflow.
Examples:
PERMIT LONG
PERMIT SHORT
NO PERMIT
How to act:
If NO PERMIT → trade is invalid even if chart looks bullish/bearish.
If PERMIT LONG/SHORT → continue to the next audit items (not instant entry).
3) HTF (Higher Timeframe Alignment)
What it is: Whether higher-timeframe context supports the direction.
Often shown like:
2/2 (strong alignment)
1/2 (partial)
0/2 (misaligned)
How to act:
2/2 → green light for evaluation
1/2 → caution: reduce aggression / wait for cleaner confirmation
0/2 → stand down (don’t fight HTF)
4) REGIME
What it is: Market operating mode.
Examples:
TREND (2/2)
RANGE
TRANSITION
How to act (simple):
TREND → continuation trades are valid (with rules)
RANGE → only range logic; no chasing breakouts
TRANSITION → highest trap risk; only take entries if other gates are perfect
5) LIQ THREAT (Liquidity Threat)
What it is: How dangerous the liquidity environment is for wicks/stop hunts.
Examples:
LOW / MED / HIGH
How to act:
LOW → normal execution
HIGH → smaller size, tighter timing, avoid late entries
Liquidity threat is where retail gets “mystery wicked.”
6) SWEEP
What it is: Whether the liquidity sweep sequence is completed.
Examples:
PENDING
DONE
NOT REQUIRED
How to act:
PENDING → do not rush; market may still hunt liquidity
DONE → cleaner execution zone
7) RECLAIM
What it is: Confirmation that price reclaimed the level after sweep.
Examples:
NO / YES
How to act:
NO → sweep may still be active; entry is risky
YES → stronger confirmation that trap phase ended
8) MOMENTUM
What it is: Whether momentum supports the direction now.
Often shown like:
2/2 or STRONG / WEAK
How to act:
Momentum strong = good only if liquidity + timing gates are ok
Momentum without reclaim = retail chase trap (classic)
9) RISK
What it is: Risk health check (internal risk state).
Often shown like:
2/2 or OK / WARNING
How to act:
If risk is not green → you don’t “force entry”
Risk gate protects your account, not your ego.
10) ENTRY SCORE
What it is: The final “quality score” of the setup.
Example:
8/10 GREEN
How to act:
8–10 → eligible for entry inside window
6–7 → acceptable only with reduced size
<6 → skip (this is the demon filter)
11) DECISION
What it is: The action outcome of the audit.
Examples:
ENTER (rare; only when fully clean)
WAIT (Liquidity pending)
STAND-DOWN
How to act:
WAIT is a valid decision (it prevents traps).
Enter only when Decision + Window allow it.
12) MODE
What it is: Governance mode.
AUTO = workflow drives decisions
MANUAL = operator override rules apply (if you use)
How to act:
AUTO mode is best for consistency and discipline.
The Most Important Part — The Entry Window (5 bars)
When the audit says PERMIT LONG it may also say:
“LONG | Window 5 Bars”
Meaning:
Entry is only valid within that short window
If you miss it → your entry becomes late, and the demon returns (overextension + wick risk)
Example interpretation (common real case)
If you see:
PERMIT LONG ✅
HTF 2/2 ✅
REGIME TREND ✅
SWEEP PENDING ⚠️
RECLAIM NO ⚠️
ENTRY SCORE 8/10 ✅
DECISION: WAIT (Liquidity pending)
MARAL meaning:
“Bias is correct, but liquidity sequence is not clean. If you enter now, you may get wicked.”
That’s exactly how the Audit panel saves retail traders.
C) Execution Console (center)
Key lines in your console are the real story:
GLOBAL STATE: ENTRY_PERMITTED
SETUP: LONG
Entry permission: Allowed (but still shows a WAIT component)
LIQ Reason: Low Liquidity
Trade status: VALID
Exit permission: HOLD
Meaning: This is the exact “retail demon” zone:
✅ Long is permitted
⚠️ But the reason says LOW LIQUIDITY → spreads/slippage + wick risk + fake continuation bursts
So MARAL is permitting participation with caution, not cheering aggression.
D) Scalp / Execution Panel (right-mid)
You’re showing:
Setup LONG / Entry OK
Route lock armed
LTF Exec: Supportive
Stress (pre): Low
Cost/Fills: RISK
Exit: HOLD
Meaning: Price action is cooperating, but execution quality can still degrade (fills/cost).
This is where retail over-sizes and then blames the market for a stop-out wick.
E) Post-Entry Stress Panel (bottom-right)
You have:
IN TRADE: YES
Stress: NORMAL
Exit pressure: LOW
Obstacle: NO
Overextension: YES
Cost/Fills: RISK
Action: HOLD
Meaning: The trade can continue — but it’s in an overextended state.
That changes how you manage: protect structure, don’t chase.
2) The hidden reason retail loses even in bullish context
When a market is bullish, retail still loses because they do this:
Retail Pattern
Sees bullish move → enters late
Uses wide/random stop because “it’s strong”
Price does a normal pullback → they panic-exit or get wicked
Trend continues → they re-enter worse → emotional spiral
What your panel exposes
Low Liquidity → higher wick probability
Overextended = YES → late entries have poor R:R
Cost/Fills = RISK → execution quality can erase edge
Sweep Pending / Reclaim No → liquidity sequence may not be “clean” yet
That combination is the demon.
3) What MARAL is designed to do here (the correct behavior)
This is the exact moment MARAL was built for:
✅ If LONG is permitted but Low Liquidity / Overextended / Cost Risk is present:
MARAL-style response is NOT “go big.”
It’s:
Reduce aggression
smaller size / tighter participation
Respect the window
if you miss the 5-bar window → stand down
Do not chase vertical candles
overextension means entries must be precise or skipped
Let management be state-driven
if Exit Pressure is LOW and Action says HOLD → don’t invent fear
If Cost/Fills stays RISK
you treat it as “execution tax” and avoid adding risk
This is execution governance, not prediction.
Traders Demon Finder
The Hidden Execution Traps That Destroy Retail Traders — and the MARAL Solutions That Neutralize Them
Retail traders don’t lose because they can’t “predict direction.”
They lose because they keep walking into execution demons — invisible problems that hit after the bias looks correct.
Your attached MARAL panel is a Demon Finder because it exposes those hidden issues in real-time and forces a governed response.
Demon #1 — Late Entry / Chasing
What retail does:
Price moves strong → they chase the candle → stop goes “somewhere” → a normal pullback wipes them.
How it shows in the panel:
Entry Window = 5 bars (if you miss it, you’re late)
Overextension = YES (late entries have poor R:R)
✅ MARAL Solution:
Entry is allowed only inside the permission window.
If window expires → stand down (no chase).
Overextension flag tells you: “If you enter now, you are paying premium.”
Demon #2 — Liquidity Trap (Sweep Pending / Reclaim Not Done)
What retail does:
They buy/sell into a zone where liquidity is still being collected → wick-out → then price moves without them.
How it shows in the panel:
Sweep = PENDING
Reclaim = NO
✅ MARAL Solution:
MARAL does not treat “bias” as execution-ready until liquidity sequence is clean.
This prevents becoming exit liquidity for smarter participants.
Demon #3 — Low Liquidity Environment (Wick + Slippage Risk)
What retail does:
They assume all markets execute the same way.
But low liquidity = more wicks, poor fills, and fake continuation spikes.
How it shows in the panel:
LIQ Reason: Low Liquidity
Liquidity Context: LOW
✅ MARAL Solution:
MARAL labels the environment and forces a conservative mode:
reduce aggression
avoid late entries
no “market order gambling”
treat this as execution-risk, not “analysis failure”
Demon #4 — Cost/Fills Risk (Execution Tax)
What retail does:
They ignore the “cost of trading” (spread + slippage + entry quality).
Even correct trades become weak outcomes.
How it shows in the panel:
Cost/Fills = RISK
✅ MARAL Solution:
MARAL surfaces cost as a live constraint.
If Cost/Fills stays RISK → you don’t add size or force entries.
It prevents “death by small execution cuts.”
Demon #5 — Permission Confusion (Signal Mentality)
What retail does:
They treat any green condition as a permanent “BUY signal.”
How it shows in the panel:
ENTRY PERMITTED (not “guaranteed”)
Permission can still have a WAIT component and require sequence completion.
✅ MARAL Solution:
MARAL is not “signal = buy.”
It is permission = you may participate only if rules remain valid.
This stops impulse trading.
Demon #6 — Post-Entry Panic (Emotional Exits)
What retail does:
They enter, then panic-exit on normal pullbacks… or hold blindly with hope.
How it shows in the panel:
IN TRADE = YES
Stress = NORMAL
Exit Pressure = LOW
Action = HOLD
✅ MARAL Solution:
MARAL provides state-based management:
If Exit Pressure is LOW and Action says HOLD → don’t invent fear.
If stress/exit pressure rises → management adapts early.
This is the “trade stability” layer retail doesn’t have.
Demon #7 — Oversizing Into Danger
What retail does:
They size biggest when confidence is highest (usually late and overextended).
How it shows in the panel:
Overextension = YES + Cost/Fills = RISK + Low Liquidity
This combination is the classic “retail trap zone.”
✅ MARAL Solution:
When 2 or more risk flags appear, MARAL response is:
reduce size
no add-ons
only window-based entry
manage by state (not emotion)
The MARAL Demon Finder Rule (simple and powerful)
If these flags appear together:
LIQ Reason = Low Liquidity
Overextension = YES
Cost/Fills = RISK
Sweep Pending / Reclaim No
Then MARAL treats the trade as:
✅ Direction may be right
⚠️ Execution is dangerous
➡️ Participate only with governance, or stand down.
That’s the whole point.
Why MARAL Execution work flow Was Built
Retail loses from execution chaos, not analysis errors — so MARAL was built as an execution-governance system that audits entry, controls permission, and manages post-entry stress in real time.
Note :
This is an educational workflow demonstration only. It is not financial advice, not a signal service, and not a guarantee of returns. Trading involves risk; use your own risk limits and judgment.
Chart reference: STABLEUSDT.P (1H) with MARAL — Execution Workflow panels (Router + Regime + Cost + Stress Bridge + Cap27)
Retail traders usually lose on moves like this even when the direction is correct.
Not because the market “cheated” — but because the hidden demon shows up:
The Demon = “Permission ≠ Safety”
Retail sees green, sees bullish candles, enters hard…
…and gets punished by liquidity thinness, overextension, and cost/fill risk.
Your attached panel is literally a Demon Finder because it exposes those hidden killers before they become losses.
1) What your attached panels are saying (in plain words)
A) Context Board (top-right)
Bias is Bullish (HTF alignment looks strong).
Structure/momentum are supportive.
Daily context shows Neutral (important: not a clean trend day every time).
Liquidity context is LOW (this matters more than most traders think).
Meaning: Direction supports LONG, but the environment may still punish sloppy entries.
B) Accuracy Audit (left) Panel ..
You have:
PERMIT LONG with a limited entry window (5 bars)
HTF / Regime / Momentum scoring looks strong (green)
Sweep = Pending
Reclaim = No
Liquidity threat showing LOW, but sweep/reclaim state is not complete.
Meaning: The system is not saying “buy anytime.”
It’s saying: “Long is allowed — but liquidity sequence is not fully resolved.”
Retail usually ignores this and becomes exit liquidity.
How this panel works
Accuracy Audit Panel (Pre-Entry Gate) — Full Details (Console-Style)
Purpose:
The Accuracy Audit is the final gate before entry.
Even if bias is bullish, this panel decides if the entry is safe, timely, and valid.
Think of it like an aircraft checklist:
Direction is not permission. Audit is permission.
1) STATE
What it is: Current phase of the workflow.
Typical states you may see:
PRE-ENTRY → you are still qualifying the trade
IN TRADE → trade is active (now management rules apply)
STAND-DOWN → no trade allowed (block)
How to act:
If PRE-ENTRY → you are allowed to evaluate only, not to “force entry”
If STAND-DOWN → do nothing, wait for next cycle
2) PERMIT
What it is: The permission direction printed by the workflow.
Examples:
PERMIT LONG
PERMIT SHORT
NO PERMIT
How to act:
If NO PERMIT → trade is invalid even if chart looks bullish/bearish.
If PERMIT LONG/SHORT → continue to the next audit items (not instant entry).
3) HTF (Higher Timeframe Alignment)
What it is: Whether higher-timeframe context supports the direction.
Often shown like:
2/2 (strong alignment)
1/2 (partial)
0/2 (misaligned)
How to act:
2/2 → green light for evaluation
1/2 → caution: reduce aggression / wait for cleaner confirmation
0/2 → stand down (don’t fight HTF)
4) REGIME
What it is: Market operating mode.
Examples:
TREND (2/2)
RANGE
TRANSITION
How to act (simple):
TREND → continuation trades are valid (with rules)
RANGE → only range logic; no chasing breakouts
TRANSITION → highest trap risk; only take entries if other gates are perfect
5) LIQ THREAT (Liquidity Threat)
What it is: How dangerous the liquidity environment is for wicks/stop hunts.
Examples:
LOW / MED / HIGH
How to act:
LOW → normal execution
HIGH → smaller size, tighter timing, avoid late entries
Liquidity threat is where retail gets “mystery wicked.”
6) SWEEP
What it is: Whether the liquidity sweep sequence is completed.
Examples:
PENDING
DONE
NOT REQUIRED
How to act:
PENDING → do not rush; market may still hunt liquidity
DONE → cleaner execution zone
7) RECLAIM
What it is: Confirmation that price reclaimed the level after sweep.
Examples:
NO / YES
How to act:
NO → sweep may still be active; entry is risky
YES → stronger confirmation that trap phase ended
8) MOMENTUM
What it is: Whether momentum supports the direction now.
Often shown like:
2/2 or STRONG / WEAK
How to act:
Momentum strong = good only if liquidity + timing gates are ok
Momentum without reclaim = retail chase trap (classic)
9) RISK
What it is: Risk health check (internal risk state).
Often shown like:
2/2 or OK / WARNING
How to act:
If risk is not green → you don’t “force entry”
Risk gate protects your account, not your ego.
10) ENTRY SCORE
What it is: The final “quality score” of the setup.
Example:
8/10 GREEN
How to act:
8–10 → eligible for entry inside window
6–7 → acceptable only with reduced size
<6 → skip (this is the demon filter)
11) DECISION
What it is: The action outcome of the audit.
Examples:
ENTER (rare; only when fully clean)
WAIT (Liquidity pending)
STAND-DOWN
How to act:
WAIT is a valid decision (it prevents traps).
Enter only when Decision + Window allow it.
12) MODE
What it is: Governance mode.
AUTO = workflow drives decisions
MANUAL = operator override rules apply (if you use)
How to act:
AUTO mode is best for consistency and discipline.
The Most Important Part — The Entry Window (5 bars)
When the audit says PERMIT LONG it may also say:
“LONG | Window 5 Bars”
Meaning:
Entry is only valid within that short window
If you miss it → your entry becomes late, and the demon returns (overextension + wick risk)
Example interpretation (common real case)
If you see:
PERMIT LONG ✅
HTF 2/2 ✅
REGIME TREND ✅
SWEEP PENDING ⚠️
RECLAIM NO ⚠️
ENTRY SCORE 8/10 ✅
DECISION: WAIT (Liquidity pending)
MARAL meaning:
“Bias is correct, but liquidity sequence is not clean. If you enter now, you may get wicked.”
That’s exactly how the Audit panel saves retail traders.
C) Execution Console (center)
Key lines in your console are the real story:
GLOBAL STATE: ENTRY_PERMITTED
SETUP: LONG
Entry permission: Allowed (but still shows a WAIT component)
LIQ Reason: Low Liquidity
Trade status: VALID
Exit permission: HOLD
Meaning: This is the exact “retail demon” zone:
✅ Long is permitted
⚠️ But the reason says LOW LIQUIDITY → spreads/slippage + wick risk + fake continuation bursts
So MARAL is permitting participation with caution, not cheering aggression.
D) Scalp / Execution Panel (right-mid)
You’re showing:
Setup LONG / Entry OK
Route lock armed
LTF Exec: Supportive
Stress (pre): Low
Cost/Fills: RISK
Exit: HOLD
Meaning: Price action is cooperating, but execution quality can still degrade (fills/cost).
This is where retail over-sizes and then blames the market for a stop-out wick.
E) Post-Entry Stress Panel (bottom-right)
You have:
IN TRADE: YES
Stress: NORMAL
Exit pressure: LOW
Obstacle: NO
Overextension: YES
Cost/Fills: RISK
Action: HOLD
Meaning: The trade can continue — but it’s in an overextended state.
That changes how you manage: protect structure, don’t chase.
2) The hidden reason retail loses even in bullish context
When a market is bullish, retail still loses because they do this:
Retail Pattern
Sees bullish move → enters late
Uses wide/random stop because “it’s strong”
Price does a normal pullback → they panic-exit or get wicked
Trend continues → they re-enter worse → emotional spiral
What your panel exposes
Low Liquidity → higher wick probability
Overextended = YES → late entries have poor R:R
Cost/Fills = RISK → execution quality can erase edge
Sweep Pending / Reclaim No → liquidity sequence may not be “clean” yet
That combination is the demon.
3) What MARAL is designed to do here (the correct behavior)
This is the exact moment MARAL was built for:
✅ If LONG is permitted but Low Liquidity / Overextended / Cost Risk is present:
MARAL-style response is NOT “go big.”
It’s:
Reduce aggression
smaller size / tighter participation
Respect the window
if you miss the 5-bar window → stand down
Do not chase vertical candles
overextension means entries must be precise or skipped
Let management be state-driven
if Exit Pressure is LOW and Action says HOLD → don’t invent fear
If Cost/Fills stays RISK
you treat it as “execution tax” and avoid adding risk
This is execution governance, not prediction.
Traders Demon Finder
The Hidden Execution Traps That Destroy Retail Traders — and the MARAL Solutions That Neutralize Them
Retail traders don’t lose because they can’t “predict direction.”
They lose because they keep walking into execution demons — invisible problems that hit after the bias looks correct.
Your attached MARAL panel is a Demon Finder because it exposes those hidden issues in real-time and forces a governed response.
Demon #1 — Late Entry / Chasing
What retail does:
Price moves strong → they chase the candle → stop goes “somewhere” → a normal pullback wipes them.
How it shows in the panel:
Entry Window = 5 bars (if you miss it, you’re late)
Overextension = YES (late entries have poor R:R)
✅ MARAL Solution:
Entry is allowed only inside the permission window.
If window expires → stand down (no chase).
Overextension flag tells you: “If you enter now, you are paying premium.”
Demon #2 — Liquidity Trap (Sweep Pending / Reclaim Not Done)
What retail does:
They buy/sell into a zone where liquidity is still being collected → wick-out → then price moves without them.
How it shows in the panel:
Sweep = PENDING
Reclaim = NO
✅ MARAL Solution:
MARAL does not treat “bias” as execution-ready until liquidity sequence is clean.
This prevents becoming exit liquidity for smarter participants.
Demon #3 — Low Liquidity Environment (Wick + Slippage Risk)
What retail does:
They assume all markets execute the same way.
But low liquidity = more wicks, poor fills, and fake continuation spikes.
How it shows in the panel:
LIQ Reason: Low Liquidity
Liquidity Context: LOW
✅ MARAL Solution:
MARAL labels the environment and forces a conservative mode:
reduce aggression
avoid late entries
no “market order gambling”
treat this as execution-risk, not “analysis failure”
Demon #4 — Cost/Fills Risk (Execution Tax)
What retail does:
They ignore the “cost of trading” (spread + slippage + entry quality).
Even correct trades become weak outcomes.
How it shows in the panel:
Cost/Fills = RISK
✅ MARAL Solution:
MARAL surfaces cost as a live constraint.
If Cost/Fills stays RISK → you don’t add size or force entries.
It prevents “death by small execution cuts.”
Demon #5 — Permission Confusion (Signal Mentality)
What retail does:
They treat any green condition as a permanent “BUY signal.”
How it shows in the panel:
ENTRY PERMITTED (not “guaranteed”)
Permission can still have a WAIT component and require sequence completion.
✅ MARAL Solution:
MARAL is not “signal = buy.”
It is permission = you may participate only if rules remain valid.
This stops impulse trading.
Demon #6 — Post-Entry Panic (Emotional Exits)
What retail does:
They enter, then panic-exit on normal pullbacks… or hold blindly with hope.
How it shows in the panel:
IN TRADE = YES
Stress = NORMAL
Exit Pressure = LOW
Action = HOLD
✅ MARAL Solution:
MARAL provides state-based management:
If Exit Pressure is LOW and Action says HOLD → don’t invent fear.
If stress/exit pressure rises → management adapts early.
This is the “trade stability” layer retail doesn’t have.
Demon #7 — Oversizing Into Danger
What retail does:
They size biggest when confidence is highest (usually late and overextended).
How it shows in the panel:
Overextension = YES + Cost/Fills = RISK + Low Liquidity
This combination is the classic “retail trap zone.”
✅ MARAL Solution:
When 2 or more risk flags appear, MARAL response is:
reduce size
no add-ons
only window-based entry
manage by state (not emotion)
The MARAL Demon Finder Rule (simple and powerful)
If these flags appear together:
LIQ Reason = Low Liquidity
Overextension = YES
Cost/Fills = RISK
Sweep Pending / Reclaim No
Then MARAL treats the trade as:
✅ Direction may be right
⚠️ Execution is dangerous
➡️ Participate only with governance, or stand down.
That’s the whole point.
Why MARAL Execution work flow Was Built
Retail loses from execution chaos, not analysis errors — so MARAL was built as an execution-governance system that audits entry, controls permission, and manages post-entry stress in real time.
Note :
This is an educational workflow demonstration only. It is not financial advice, not a signal service, and not a guarantee of returns. Trading involves risk; use your own risk limits and judgment.

MARAL Execution Workflow, Long & Short Permission , Dynamic risk mapper & Deep Candle Intelligence
Context → Liquidity Event → Displacement → Structure Shift → POI Confirmation → Risk Clearance (Discretionary | Educational)
Context → Liquidity Event → Displacement → Structure Shift → POI Confirmation → Risk Clearance (Discretionary | Educational)
Related publications
Disclaimer
The information and publications are not meant to be, and do not constitute, financial, investment, trading, or other types of advice or recommendations supplied or endorsed by TradingView. Read more in the Terms of Use.
MARAL Execution Workflow, Long & Short Permission , Dynamic risk mapper & Deep Candle Intelligence
Context → Liquidity Event → Displacement → Structure Shift → POI Confirmation → Risk Clearance (Discretionary | Educational)
Context → Liquidity Event → Displacement → Structure Shift → POI Confirmation → Risk Clearance (Discretionary | Educational)
Related publications
Disclaimer
The information and publications are not meant to be, and do not constitute, financial, investment, trading, or other types of advice or recommendations supplied or endorsed by TradingView. Read more in the Terms of Use.