
Overview
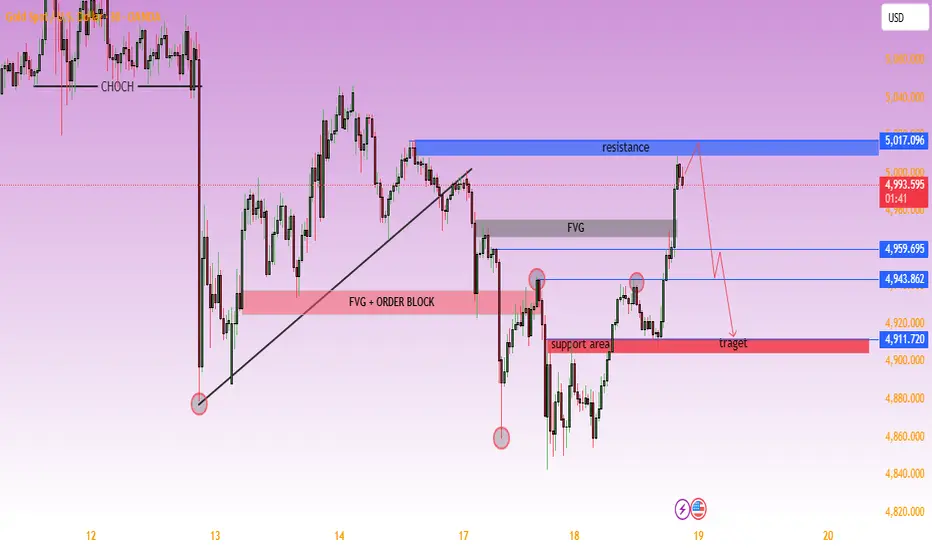
The chart shows an earlier CHoCH (Change of Character) on the left side, confirming a bearish structural shift.
After the sharp sell-off, price formed a higher low and began a corrective bullish move.
However, the broader structure remains fragile as price recently created equal highs and liquidity sweeps before moving higher.
📍 2. Key Zones Identified
🔵 Resistance Zone: 5,017 Area
Strong supply zone.
Previous reaction point.
Current price has impulsively tapped into this level.
Likely liquidity grab above prior highs.
This is the critical decision point.
🟫 FVG (Fair Value Gap) – Mid Zone
Located below current price.
Acts as imbalance that price may revisit.
Often works as a magnet after impulsive moves.
🔴 Support / Target Zone: 4,911 Area
Marked as strong demand.
Previous reaction base.
Aligns with projected bearish path.
Logical downside target if rejection confirms.
📊 Current Price Behavior
Strong bullish impulse into resistance.
No major pullback yet (overextended move).
Reaction from resistance will determine next direction.
📉 Bearish Scenario (Higher Probability Setup)
If price:
Rejects strongly from 5,017 resistance
Forms bearish structure (lower high on lower timeframe)
Then likely path:
Drop into FVG
Break minor structure
Continue toward 4,911 support (target zone)
This aligns with liquidity sweep + mean reversion logic.
📈 Bullish Invalidation Scenario
If price:
Breaks and closes strongly above 5,017
Holds above resistance as support
Then:
Structure shifts bullish
Next upside expansion likely
🎯 Trade Idea Summary (Conceptual)
Setup Entry Zone Target Invalidation
Short 5,017 resistance rejection 4,911 Strong close above resistance
🧠 Overall Bias
Short-term bias: Bearish from resistance
Confirmation needed: Lower timeframe rejection + structure break
This is a classic liquidity grab into supply → potential distribution move setup.
The chart shows an earlier CHoCH (Change of Character) on the left side, confirming a bearish structural shift.
After the sharp sell-off, price formed a higher low and began a corrective bullish move.
However, the broader structure remains fragile as price recently created equal highs and liquidity sweeps before moving higher.
📍 2. Key Zones Identified
🔵 Resistance Zone: 5,017 Area
Strong supply zone.
Previous reaction point.
Current price has impulsively tapped into this level.
Likely liquidity grab above prior highs.
This is the critical decision point.
🟫 FVG (Fair Value Gap) – Mid Zone
Located below current price.
Acts as imbalance that price may revisit.
Often works as a magnet after impulsive moves.
🔴 Support / Target Zone: 4,911 Area
Marked as strong demand.
Previous reaction base.
Aligns with projected bearish path.
Logical downside target if rejection confirms.
📊 Current Price Behavior
Strong bullish impulse into resistance.
No major pullback yet (overextended move).
Reaction from resistance will determine next direction.
📉 Bearish Scenario (Higher Probability Setup)
If price:
Rejects strongly from 5,017 resistance
Forms bearish structure (lower high on lower timeframe)
Then likely path:
Drop into FVG
Break minor structure
Continue toward 4,911 support (target zone)
This aligns with liquidity sweep + mean reversion logic.
📈 Bullish Invalidation Scenario
If price:
Breaks and closes strongly above 5,017
Holds above resistance as support
Then:
Structure shifts bullish
Next upside expansion likely
🎯 Trade Idea Summary (Conceptual)
Setup Entry Zone Target Invalidation
Short 5,017 resistance rejection 4,911 Strong close above resistance
🧠 Overall Bias
Short-term bias: Bearish from resistance
Confirmation needed: Lower timeframe rejection + structure break
This is a classic liquidity grab into supply → potential distribution move setup.
Trade active
Trade closed manually
BE picked after 50% profit booked.

Join My telegram channel Free:
t.me/+r-thYiraqh4xNjI0
t.me/+r-thYiraqh4xNjI0
Disclaimer
The information and publications are not meant to be, and do not constitute, financial, investment, trading, or other types of advice or recommendations supplied or endorsed by TradingView. Read more in the Terms of Use.
Join My telegram channel Free:
t.me/+r-thYiraqh4xNjI0
t.me/+r-thYiraqh4xNjI0
Disclaimer
The information and publications are not meant to be, and do not constitute, financial, investment, trading, or other types of advice or recommendations supplied or endorsed by TradingView. Read more in the Terms of Use.