BSL Rejection Opens Corrective Move
Fundamental Analysis
Gold remains supported by softer oil prices and easing Treasury yields after the Fed’s latest rate hike. However, the Fed has signaled that further tightening is still possible, so Gold may remain sensitive to changes in yields, the dollar and energy prices.
Technical Analysis
On H1, Gold confirmed a bullish BOS and pushed into the 4,390–4,405 BSL, where price is now showing rejection.
This makes a short-term correction more likely. The first support sits around 4,350–4,367 OB + Fibo. If sellers break this zone, price could extend toward the 4,300–4,318 POC.
Important Key Levels
4,390–4,405 — BSL / Major Resistance
4,350–4,367 — OB + Fibo
4,300–4,318 — POC
4,235–4,250 — SSL / Major Support
Trading Scenario
Sell priority remains after rejection from 4,390–4,405.
Target: 4,350–4,367 first, then 4,300–4,318 if support fails.
Invalidation: H1 acceptance above 4,405.
Overall View
Gold has reached major upper liquidity after a strong recovery. The cleaner setup now is to watch for a corrective move toward lower support rather than chase buys near resistance.
Will Gold hold the OB + Fibo, or correct deeper toward the POC?  Short
Short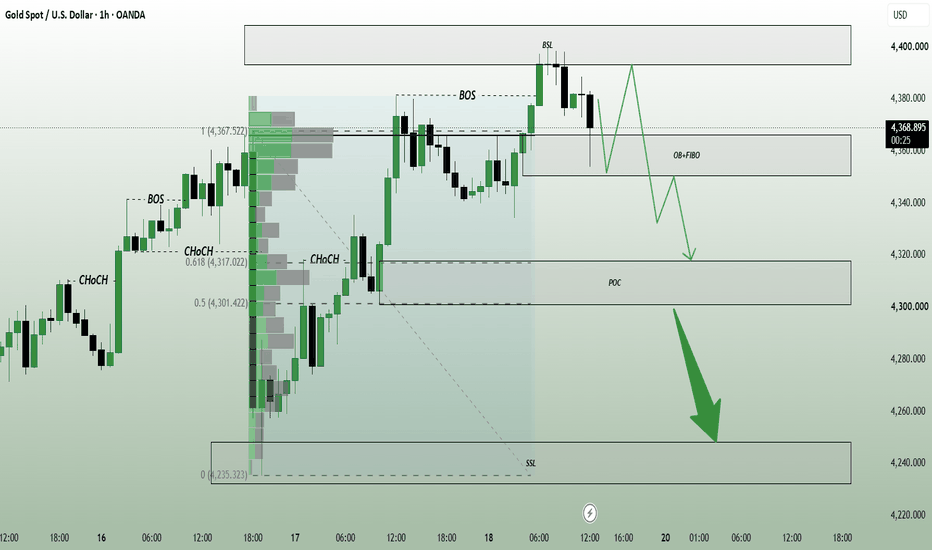
 Education

 Education

Education


Short 
Long 
 Long
Long
SUPREMEIND Strong Expansion Above the Descending Trendline🔥 Supreme Industries: Strong Expansion Above the Descending Trendline
📊 MARKET STRUCTURE SNAPSHOT | NSE: SUPREMEIND | DAILY
Closing Price: 3,580.30
Core Trend: Developing Recovery within a Broader Downtrend
Market State: Strong Bullish Expansion / Breakout Attempt
Chart Pattern: Descending Trendline Breakout Attempt
Candlestick Pattern: Strong Bullish Candle
Price Structure: Price has recovered sharply from the lower part of the broader range and has now moved above the long-standing descending trendline visible on the daily chart. The latest session closed at 3,580.30, placing price above the recent 3,500–3,550 region, while the broader chart still contains a series of lower highs from the previous peak.
Technicals: Mixed — short-term bullish momentum within a broader bearish structure
Volume: 469.75K vs 200.05K average — approximately 2.35× average
Moving Average Structure: Full Bearish EMA Stack
CPR & Market Structure: Bullish Zone — Narrow CPR
Next Session CPR: Wide — Pivot 3,502.70 | Top 3,541.50 | Base 3,463.90
Model Reference: 3,580.30
Observation References: 3,895.60 | 4,210.80
Resistance References: 3,657.93 | 3,735.57 | 3,890.83
Support References: 3,425.03 | 3,269.77 | 3,192.13
📚 STWP EDUCATIONAL OBSERVATION
Supreme Industries is showing a strong short-term expansion after recovering from the lower portion of its broader consolidation range. The latest session gained 7.05% and closed at 3,580.30, with volume of approximately 469.75K, around 2.35× the average, indicating substantially higher participation. On the clean daily chart, price has moved above the long-standing descending trendline that has been defining the broader structure, creating an important breakout area for observation. However, the longer-term structure remains mixed because the major EMA sequence is still in a bearish alignment, while the dashboard identifies the broader market structure as ranging and multi-timeframe signals as mixed. RSI around 55.75 has moved into a more positive zone without reaching an extreme reading. The area around 3,657.93–3,735.57 therefore becomes an important reference zone for studying whether the recent expansion develops further, while 3,425.03–3,269.77 remains a useful lower structural reference area.
📚 STWP EDUCATIONAL NOTE
This content is provided strictly for educational and informational purposes only.
The information presented should not be construed as investment advice, research advice, financial advice, a recommendation, solicitation or an offer to buy, sell or hold any security.
Technical analysis and historical price behaviour cannot guarantee or predict future market performance. STWP and the author make no representation or guarantee regarding future price movements, returns, performance or outcomes. Past performance is not indicative of future results.
Kindly consult an appropriately SEBI-registered investment professional.  Long
Long
LGEINDIA Breakout from Descending Triangle with Strong Volume🔥 LG Electronics India: Breakout from Descending Triangle with Strong Volume
📊 MARKET STRUCTURE SNAPSHOT | NSE: LGINDIA | DAILY
Closing Price: 1,696.90
Core Trend: Uptrend
Market State: Bullish Expansion / Breakout
Chart Pattern: Descending Triangle Breakout
Candlestick Pattern: Three Outside Up
Price Structure: Price has moved above the upper boundary of the developing descending-triangle structure and is now trading around 1,696.90, with the breakout accompanied by strong volume. Price remains above VWAP and the complete EMA structure.
Technicals: Bullish
Volume: 1.34M vs 534.53K average — approximately 2.50× average
Moving Average Structure: Full Bullish EMA Stack
CPR & Market Structure: Bullish Zone — Narrow CPR
Next Session CPR: Wide — Pivot 1,687.60 | Top 1,692.20 | Base 1,682.90
Model Reference: 1,696.90
Observation Reference: 1,816.90
Resistance References: 1,708.50 | 1,739.90 | 1,767.10 | 1,799.10
Support References: 1,668.23 | 1,639.57 | 1,620.23
📚 STWP EDUCATIONAL OBSERVATION
LG Electronics India is showing a notable technical expansion after moving above the upper boundary of the descending-triangle structure visible on the daily chart. The latest session closed at 1,696.90, gaining 2.66%, while volume reached approximately 1.34M, around 2.5× the average, providing strong participation during the move. Price is trading above VWAP at 1,687.57 and remains above the 9, 21, 50, 100 and 200-period EMAs, maintaining a full bullish alignment. RSI at 60.76 indicates positive momentum without reaching the extreme zone seen in some of the other recent charts. The Three Outside Up pattern adds further context to the recent price expansion. The immediate area around 1,708.50–1,739.90 is now important for studying whether the breakout structure sustains, while the 1,668.23–1,620.23 region provides the broader reference area for observing subsequent price behaviour.
📚 STWP EDUCATIONAL NOTE
This content is provided strictly for educational and informational purposes only.
The information presented should not be construed as investment advice, research advice, financial advice, a recommendation, solicitation or an offer to buy, sell or hold any security.
Technical analysis and historical price behaviour cannot guarantee or predict future market performance. STWP and the author make no representation or guarantee regarding future price movements, returns, performance or outcomes. Past performance is not indicative of future results.
Kindly consult an appropriately SEBI-registered investment professional.  Long
Long
AUROPHARMA Bullish Expansion with Short Consolidation Breakout🔥 Aurobindo Pharma: Bullish Expansion with Short Consolidation Breakout
📊 MARKET STRUCTURE SNAPSHOT | NSE: AUROPHARMA | DAILY
Closing Price: 1,734.00
Core Trend: Uptrend
Market State: Bullish Structure / Momentum Expansion
Chart Pattern: Short Consolidation Breakout
Candlestick Pattern: Three Outside Up
Price Structure: Price has maintained a series of higher levels within the broader rising structure and is currently positioned near the upper boundary of the consolidation. The latest session closed at 1,734 with strong momentum and increased volume.
Technicals: Bullish
Volume: 1.21M vs 797.13K average — approximately 1.52× average
Moving Average Structure: Full Bullish EMA Stack
CPR & Market Structure: Bullish Zone — Wide CPR
Next Session CPR: Wide — Pivot 1,714.70 | Top 1,724.40 | Base 1,705.10
Model Reference: 1,734.00
Observation References: 1,847.00 | 1,960.10
Resistance References: 1,753.30 | 1,772.60 | 1,811.20
Support References: 1,695.40 | 1,656.80 | 1,637.50
📚 STWP EDUCATIONAL OBSERVATION
Aurobindo Pharma is displaying a constructive daily structure, with price trading above VWAP and all major EMAs while the 9/21/50/100/200 EMA sequence remains fully bullish. The latest session added 2.60%, taking the closing price to 1,734, while volume reached approximately 1.21M, around 1.52 times the average. Momentum indicators remain supportive, with RSI at 63.24, CCI at 161.31 and Stochastic at 100, although the Stochastic reading also places price in an extended momentum zone that warrants observation. The chart shows a developing symmetrical consolidation structure with price currently near its upper boundary, while the Three Outside Up annotation reflects the recent bullish price behaviour. The immediate technical references around 1,753.30–1,811.20 and the support area around 1,695.40–1,637.50 provide useful zones for studying how the structure develops.
📚 STWP EDUCATIONAL NOTE
This content is provided strictly for educational and informational purposes only.
The information presented should not be construed as investment advice, research advice, financial advice, a recommendation, solicitation or an offer to buy, sell or hold any security.
Technical analysis and historical price behaviour cannot guarantee or predict future market performance. STWP and the author make no representation or guarantee regarding future price movements, returns, performance or outcomes. Past performance is not indicative of future results.
Kindly consult an appropriately SEBI-registered investment professional.  Long
Long
APLAPOLLO Large Symmetrical Triangle + Consolidation 🔥 APL Apollo Tubes: Testing the Upper Boundary of a Long-Term Consolidation
📊 MARKET STRUCTURE SNAPSHOT | NSE: APLAPOLLO | DAILY
Closing Price: 2,270.10
Core Trend: Uptrend
Market State: Bullish Expansion / Upper-Boundary Test
Chart Pattern: Large Symmetrical Triangle / Consolidation
Candlestick Pattern: Strong Bullish Candle
Price Structure: The chart shows a broad higher-low structure developing along the rising lower trendline, while the upper boundary slopes gradually downward from the earlier peak. Price has now advanced back towards this long-term upper boundary around 2,270, making the current zone technically significant.
Technicals: Bullish structure
Volume: 1.12M vs 711.96K average — approximately 1.57× average volume
Moving Average Structure: Full Bullish EMA Stack
CPR & Market Structure: Bullish Zone — Narrow CPR
Next Session CPR: Wide — Pivot 2,228.80 | Top 2,249.50 | Base 2,208.20
Model Reference: 2,270.10
Observation References: 2,502.10 | 2,734.10 | 2,966.00
Resistance References: 2,311.37 | 2,352.63 | 2,435.17
Support References: 2,187.57 | 2,105.03 | 2,063.77
📚 STWP EDUCATIONAL OBSERVATION
APL Apollo Tubes is currently positioned at an important technical area, with price returning to the upper boundary of a large symmetrical consolidation structure visible on the daily chart. The rising lower trendline has continued to support the broader higher-low formation, while the descending upper trendline has acted as the opposing boundary. The latest move has brought price to approximately 2,270, directly around this upper boundary, making the behaviour of price around this zone important from a chart-study perspective. Volume has increased to 1.12M, compared with an average of 711.96K, while price remains above VWAP and the major EMAs. The structure therefore shows improving momentum, but the chart is now at a clearly defined long-term resistance boundary where subsequent price behaviour can provide information about whether the consolidation continues or develops into a confirmed structural expansion.
📚 STWP EDUCATIONAL NOTE
This content is provided strictly for educational and informational purposes only.
The information presented should not be construed as investment advice, research advice, financial advice, a recommendation, solicitation or an offer to buy, sell or hold any security.
Technical analysis and historical price behaviour cannot guarantee or predict future market performance. STWP and the author make no representation or guarantee regarding future price movements, returns, performance or outcomes. Past performance is not indicative of future results. Kindly consult an appropriately SEBI-registered investment professional.  Long
Long
ADANIPORTS Strong Expansion from Consolidation🔥 Adani Ports: Strong Expansion from Consolidation
📊 MARKET STRUCTURE SNAPSHOT | NSE: ADANIPORTS | DAILY
Closing Price: 1,824.00
Core Trend: Uptrend
Market State: Bullish Structure / Strong Price Expansion
Chart Pattern: No confirmed chart pattern
Candlestick Pattern: Bullish Marubozu
Price Structure: Price has moved above the upper boundary of the developing symmetrical triangle, with the dashboard showing Buyers Active, Sellers Weak and Bullish Structure. The session closed at 1,824.00 after a 4.93% rise, with price holding above VWAP and all major EMAs.
Technicals: Bullish
Volume: High Participation — 4.15M vs 2.55M average
Moving Average Structure: Bullish — EMA structure remains positively aligned
CPR & Market Structure: Bullish Zone — NR7 Active
Next Session CPR: Wide — Pivot 1,797.30 | Top 1,810.70 | Base 1,784.00
Model Reference: 1,824.00
Observation References: 2,062.10 | 2,181.20
Resistance References: 1,850.67 | 1,877.33 | 1,930.67
Support References: 1,770.67 | 1,717.33 | 1,690.67
📚 STWP EDUCATIONAL OBSERVATION
Adani Ports is showing a notable technical expansion after moving above the upper boundary of a developing symmetrical triangle, with the breakout accompanied by increased volume participation. The latest session recorded a 4.93% price expansion, while volume of 4.15M was approximately 1.62× the average. Price remains above VWAP and the major EMA levels, with RSI at 64.04 reflecting positive momentum and the dashboard identifying a bullish structure. The 1,824.00 reference area is now close to the immediate resistance zone beginning at 1,850.67, while the projected next-session CPR around 1,784.00–1,810.70 provides an additional reference area for studying subsequent price behaviour. The broader observation references shown on the chart are 2,062.10 and 2,181.20.
📚 STWP EDUCATIONAL NOTE
This content is provided strictly for educational and informational purposes only.
The information presented should not be construed as investment advice, research advice, financial advice, a recommendation, solicitation or an offer to buy, sell or hold any security.
Technical analysis and historical price behaviour cannot guarantee or predict future market performance. STWP and the author make no representation or guarantee regarding future price movements, returns, performance or outcomes. Past performance is not indicative of future results. Kindly consult an appropriately SEBI-registered investment professional.  Long
Long
Pullback Before Another BSL TestFundamental Analysis
Gold is holding firm after posting its first weekly gain in four weeks, helped by easing oil prices and some reduction in inflation pressure. However, the U.S. dollar remains near a seven-week high, Treasury yields are around 5%, and markets still price roughly a 55% chance of another Fed hike in October.
Technical Analysis
On H1, Gold remains constructive after the recent bullish BOS, but price is now approaching the 4,395–4,410 BSL / major resistance.
The cleaner continuation setup is a controlled pullback into the 4,348–4,368 OB + Fibo zone. If buyers defend this area, the next bullish wave could retest upper liquidity.
Volume Profile also shows an important lower balance area around 4,300–4,318 POC.
Important Key Levels
4,395–4,410 — BSL / Major Resistance
4,348–4,368 — OB + Fibo
4,300–4,318 — POC
4,235–4,250 — SSL / Major Support
Trading Scenario
Buy priority remains on a pullback into 4,348–4,368 followed by bullish H1 confirmation.
Target: 4,395–4,410 BSL.
Invalidation: H1 acceptance below the OB + Fibo zone.
Overall View
The short-term structure remains constructive, but buying directly below BSL offers less attractive positioning. A pullback into support could provide the cleaner continuation setup.
Will Gold retest the OB + Fibo first before breaking 4,400? Long 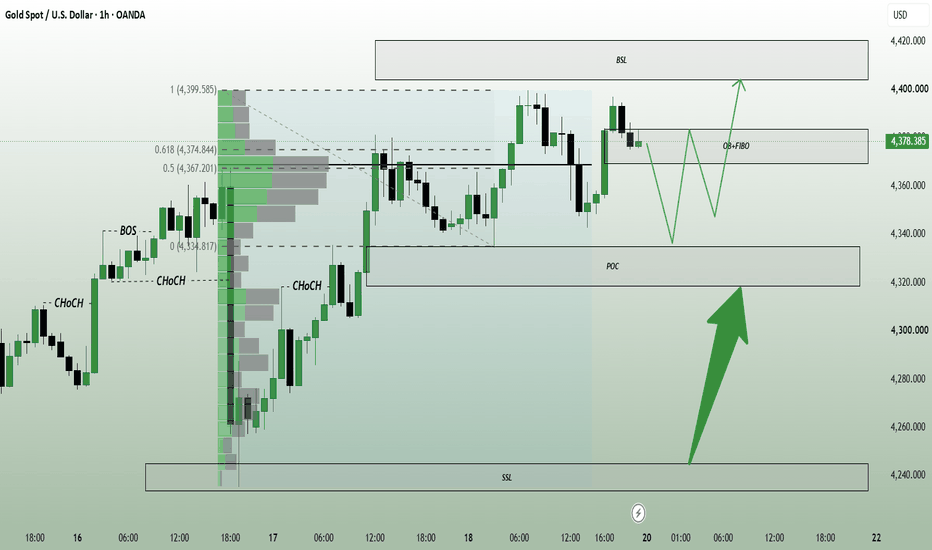
 Long
Long
 Long
Long
AVALON Fresh Breakout with Strong Volume🔥 Avalon Technologies: Fresh Breakout with Strong Volume
📊 MARKET STRUCTURE SNAPSHOT | NSE: AVALON | DAILY
Closing Price: 2,537.70
Core Trend: Uptrend
Market State: Bullish Structure / Strong Price Expansion
Chart Pattern: No confirmed chart pattern
Candlestick Pattern: None detected
Price Structure: Price is trading above VWAP and all major EMAs, with a strongly developed bullish structure. The session recorded a 13.80% rise and closed at 2,537.70 after reaching 2,618.00, accompanied by exceptionally high volume.
Technicals: Bullish
Volume: Exceptionally High Participation — 4.31M vs 681.52K average
Moving Average Structure: Bullish — Full Bull Stack
CPR & Market Structure: Bullish — NR4 Active
Next Session CPR: Wide — Pivot 2,458.00 | Top 2,497.80 | Base 2,418.20
Model Reference: 2,618.00
Observation References: 3,263.50 | 3,909.10
Resistance References: 2,697.70 | 2,857.70 | 3,097.40
Support References: 2,228.00 | 2,058.30 | 1,898.30
📚 STWP EDUCATIONAL OBSERVATION
Avalon Technologies is showing a strong expansion in its existing bullish structure, with price positioned above VWAP and all major moving averages. The full bullish EMA stack, strong relative strength and exceptionally high volume add significant strength to the current technical structure, with volume reaching approximately 6.33× the average. RSI at 67.45 reflects strong momentum, while Stochastic at 87.41 and CCI at 241.76 indicate that the price is technically extended. The current chart therefore combines strong trend structure, substantial volume expansion and elevated momentum, while the projected wide CPR zone for the next session provides an important reference area for observing subsequent price behaviour.
📚 STWP EDUCATIONAL NOTE
This content is provided strictly for educational and informational purposes only and is intended to help readers understand technical analysis, market structure, price behaviour and related market concepts. The technical levels, reference levels, indicators, support and resistance areas and other observations are for educational study only and should not be construed as investment advice, research advice, financial advice, or a recommendation to buy, sell or hold any security.
Technical analysis and historical price behaviour cannot guarantee future market performance. Market conditions can change due to company developments, corporate results, economic conditions, industry trends, liquidity and broader market sentiment. Readers should conduct their own independent research and consult an appropriately SEBI-registered investment professional where required.
STWP and the author make no representation or guarantee regarding future price movements, returns, performance or outcomes. Past performance is not indicative of future results.  Long
Long
XAUUSD — 4,370 Retest Before 4,406?
Gold is trading around 4,386 after extending the M30 recovery above the rising trendline.
The short-term structure remains constructive, but price is now approaching an important resistance area.
The simple read
4,370 is the key breakout support.
If buyers defend this zone, Gold may continue toward 4,398–4,406.
A clean break above 4,406 could open the way toward the upper resistance around 4,437.
If 4,370 fails, the deeper structure support around 4,331 becomes the next important reaction area.
Key price zones
4,370 — breakout support
4,331 — key structure support
4,398–4,406 — major resistance
4,437 — upper resistance target
The M30 recovery is still healthy while price holds above the rising trendline.
But resistance is close.
Do not chase the candle.
Wait for the pullback.
Wait for reaction.
Can 4,370 hold and send Gold through 4,406? Long 


