XAUUSD Session 9EMA Last-Cross + Touch + Enter/R.Enter
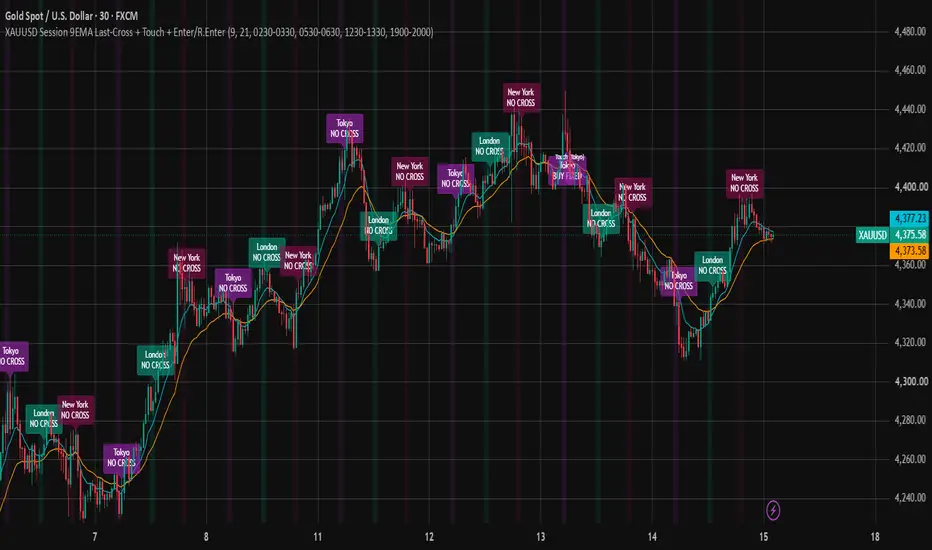
EMA Cross → EMA 9 Touch → Touch Candle Breakout (BOT) → Previous Swing Break (ENTER)
1. EMA setup
The script uses:
EMA 9 = fast EMA
EMA 21 = slow EMA
There are two possible directions:
Bullish
EMA 9 crosses above EMA 21.
This creates a BUY bias.
Bearish
EMA 9 crosses below EMA 21.
This creates a SELL bias.
The crossover itself is not the final entry.
2. Stage 1 — CROSS
After a fresh crossover, the system starts a new setup.
For BUY:
EMA 9 crosses above EMA 21
For SELL:
EMA 9 crosses below EMA 21
The script then waits for price to come back to the 9 EMA.
The previous swing is also captured at this point:
BUY → previous swing high
SELL → previous swing low
The default swing calculation is:
10 bars before the crossover.
3. Stage 2 — TOUCH
After the crossover, the script waits for a candle to touch the 9 EMA.
The condition is:
Low <= EMA 9 AND High >= EMA 9
So the candle's range must contain the 9 EMA.
For example:
BUY setup
Price
↑
│
EMA 9 ────────
│
Candle
touches
EMA 9
When this happens, the script records:
Touch candle high
Touch candle low
This candle becomes the reference candle for the next step.
4. Stage 3 — BOT
BOT means the touch candle's range gets broken.
For a BUY:
The high of the touch candle must be broken.
For a SELL:
The low of the touch candle must be broken.
Example BUY:
Touch candle
High ───────────────
│
│
EMA 9 ──────────────
│
Low ───────────────
↑
Price breaks
touch high
↓
BOT
Important:
The script checks:
high > touchHigh
for BUY.
And:
low < touchLow
for SELL.
So BOT happens when price moves beyond the touch candle's range.
5. Stage 4 — ENTER
BOT is still not the final entry.
After BOT, the script waits for price to break the previous swing level.
For BUY:
Candle CLOSE must be above the previous swing high.
For SELL:
Candle CLOSE must be below the previous swing low.
This is important because the script specifically uses the candle body/close, rather than accepting a wick.
BUY
Previous Swing High
──────────────────────
█
█ ← candle closes above
█
█
↑
ENTER
Condition:
close > swingLevel
SELL
Previous Swing Low
──────────────────────
█
█
█
↓
ENTER
Condition:
close < swingLevel
So the final sequence is:
BUY
9/21 bullish cross
→ 9 EMA touch
→ touch candle high broken (BOT)
→ previous swing high broken by CLOSE
→ ENTER BUY
SELL
9/21 bearish cross
→ 9 EMA touch
→ touch candle low broken (BOT)
→ previous swing low broken by CLOSE
→ ENTER SELL
6. Very important: the setup is sequential
The script uses a state machine:
Stage Meaning What it waits for
0 Idle New crossover
1 CROSS 9 EMA touch
2 TOUCH Touch candle breakout
3 BOT Previous swing breakout
4 ENTER Setup completed
Once ENTER happens, that setup is finished.
The script waits for a new EMA crossover before starting another setup.
7. What happens if the opposite EMA cross occurs?
A new crossover completely resets the setup.
For example:
BUY CROSS
↓
TOUCH
↓
BOT
↓
SELL CROSS
The previous BUY setup is abandoned.
The new SELL crossover starts a fresh setup.
8. The chart displays four different signals
You will see:
BUY / SELL
This is the EMA crossover, not the actual trade entry.
Yellow circle
This is the 9 EMA TOUCH.
BOT
This means the touch candle's high/low has been broken.
ENTER
This is the actual final entry signal.
So for your trading purposes, the most important signal is:
ENTER BUY / ENTER SELL
9. Alerts
The script has separate alerts for:
Cross BUY
Cross SELL
Touch
BOT
ENTER BUY
ENTER SELL
Therefore, if your goal is only to receive the actual trading signal, you would normally use:
ENTER BUY
and
ENTER SELL
rather than creating alerts for every intermediate stage.
10. Multi-Timeframe Table
The script also checks the same system on:
Weekly
1 Day
4 Hour
30 Minute
It displays:
Timeframe Stage Bias
Weekly CROSS/TOUCH/BOT/ENTER BUY/SELL
1 Day CROSS/TOUCH/BOT/ENTER BUY/SELL
4 Hour CROSS/TOUCH/BOT/ENTER BUY/SELL
30 Min CROSS/TOUCH/BOT/ENTER BUY/SELL
For example, you might see:
Timeframe Stage Bias
Weekly ENTER BUY
1 Day BOT BUY
4 Hour TOUCH BUY
30 Min CROSS BUY
That means each timeframe is independently running the same EMA 9/21 system.
11. One important detail about the swing level
This part is particularly important:
swingHighVal = ta.highest(high, swingLookback)[1]
swingLowVal = ta.lowest(low, swingLookback)[1]
With the default:
Swing Lookback = 10
the script takes the highest high / lowest low from the preceding 10 bars, excluding the current bar.
That level is stored when the EMA crossover happens.
It does not continuously move afterward.
So if the BUY crossover happens and the swing high is 10 bars back at 3340, the ENTER condition remains:
close > 3340
even if later candles create another higher high.
12. Example of a complete BUY trade
Suppose XAUUSD does this:
1. EMA 9 crosses above EMA 21
↓
BUY bias
2. Price pulls back
↓
3. Candle touches EMA 9
↓
TOUCH
4. Price breaks touch candle high
↓
BOT
5. Price continues higher
↓
6. Candle CLOSES above previous swing high
↓
ENTER BUY
Your actual entry is at step 6, not at the EMA crossover.
13. In simple words
Your indicator is looking for momentum + pullback + confirmation + structure breakout.
The philosophy is:
EMA crossover tells the direction → price pulls back to EMA 9 → price proves momentum by breaking the touch candle → price confirms the trend by breaking the previous swing → ENTER.
So the system is designed to avoid taking the trade immediately after an EMA crossover.
The complete logic
EMA 9 / EMA 21
│
┌─────────┴─────────┐
│ │
9 crosses UP 9 crosses DOWN
│ │
BUY bias SELL bias
│ │
└─────────┬─────────┘
↓
WAIT FOR TOUCH
│
Price touches EMA 9
│
↓
TOUCH
│
↓
Break touch candle
high / low
│
↓
BOT
│
↓
Break previous swing
with candle CLOSE
│
↓
ENTER
1. EMA setup
The script uses:
EMA 9 = fast EMA
EMA 21 = slow EMA
There are two possible directions:
Bullish
EMA 9 crosses above EMA 21.
This creates a BUY bias.
Bearish
EMA 9 crosses below EMA 21.
This creates a SELL bias.
The crossover itself is not the final entry.
2. Stage 1 — CROSS
After a fresh crossover, the system starts a new setup.
For BUY:
EMA 9 crosses above EMA 21
For SELL:
EMA 9 crosses below EMA 21
The script then waits for price to come back to the 9 EMA.
The previous swing is also captured at this point:
BUY → previous swing high
SELL → previous swing low
The default swing calculation is:
10 bars before the crossover.
3. Stage 2 — TOUCH
After the crossover, the script waits for a candle to touch the 9 EMA.
The condition is:
Low <= EMA 9 AND High >= EMA 9
So the candle's range must contain the 9 EMA.
For example:
BUY setup
Price
↑
│
EMA 9 ────────
│
Candle
touches
EMA 9
When this happens, the script records:
Touch candle high
Touch candle low
This candle becomes the reference candle for the next step.
4. Stage 3 — BOT
BOT means the touch candle's range gets broken.
For a BUY:
The high of the touch candle must be broken.
For a SELL:
The low of the touch candle must be broken.
Example BUY:
Touch candle
High ───────────────
│
│
EMA 9 ──────────────
│
Low ───────────────
↑
Price breaks
touch high
↓
BOT
Important:
The script checks:
high > touchHigh
for BUY.
And:
low < touchLow
for SELL.
So BOT happens when price moves beyond the touch candle's range.
5. Stage 4 — ENTER
BOT is still not the final entry.
After BOT, the script waits for price to break the previous swing level.
For BUY:
Candle CLOSE must be above the previous swing high.
For SELL:
Candle CLOSE must be below the previous swing low.
This is important because the script specifically uses the candle body/close, rather than accepting a wick.
BUY
Previous Swing High
──────────────────────
█
█ ← candle closes above
█
█
↑
ENTER
Condition:
close > swingLevel
SELL
Previous Swing Low
──────────────────────
█
█
█
↓
ENTER
Condition:
close < swingLevel
So the final sequence is:
BUY
9/21 bullish cross
→ 9 EMA touch
→ touch candle high broken (BOT)
→ previous swing high broken by CLOSE
→ ENTER BUY
SELL
9/21 bearish cross
→ 9 EMA touch
→ touch candle low broken (BOT)
→ previous swing low broken by CLOSE
→ ENTER SELL
6. Very important: the setup is sequential
The script uses a state machine:
Stage Meaning What it waits for
0 Idle New crossover
1 CROSS 9 EMA touch
2 TOUCH Touch candle breakout
3 BOT Previous swing breakout
4 ENTER Setup completed
Once ENTER happens, that setup is finished.
The script waits for a new EMA crossover before starting another setup.
7. What happens if the opposite EMA cross occurs?
A new crossover completely resets the setup.
For example:
BUY CROSS
↓
TOUCH
↓
BOT
↓
SELL CROSS
The previous BUY setup is abandoned.
The new SELL crossover starts a fresh setup.
8. The chart displays four different signals
You will see:
BUY / SELL
This is the EMA crossover, not the actual trade entry.
Yellow circle
This is the 9 EMA TOUCH.
BOT
This means the touch candle's high/low has been broken.
ENTER
This is the actual final entry signal.
So for your trading purposes, the most important signal is:
ENTER BUY / ENTER SELL
9. Alerts
The script has separate alerts for:
Cross BUY
Cross SELL
Touch
BOT
ENTER BUY
ENTER SELL
Therefore, if your goal is only to receive the actual trading signal, you would normally use:
ENTER BUY
and
ENTER SELL
rather than creating alerts for every intermediate stage.
10. Multi-Timeframe Table
The script also checks the same system on:
Weekly
1 Day
4 Hour
30 Minute
It displays:
Timeframe Stage Bias
Weekly CROSS/TOUCH/BOT/ENTER BUY/SELL
1 Day CROSS/TOUCH/BOT/ENTER BUY/SELL
4 Hour CROSS/TOUCH/BOT/ENTER BUY/SELL
30 Min CROSS/TOUCH/BOT/ENTER BUY/SELL
For example, you might see:
Timeframe Stage Bias
Weekly ENTER BUY
1 Day BOT BUY
4 Hour TOUCH BUY
30 Min CROSS BUY
That means each timeframe is independently running the same EMA 9/21 system.
11. One important detail about the swing level
This part is particularly important:
swingHighVal = ta.highest(high, swingLookback)[1]
swingLowVal = ta.lowest(low, swingLookback)[1]
With the default:
Swing Lookback = 10
the script takes the highest high / lowest low from the preceding 10 bars, excluding the current bar.
That level is stored when the EMA crossover happens.
It does not continuously move afterward.
So if the BUY crossover happens and the swing high is 10 bars back at 3340, the ENTER condition remains:
close > 3340
even if later candles create another higher high.
12. Example of a complete BUY trade
Suppose XAUUSD does this:
1. EMA 9 crosses above EMA 21
↓
BUY bias
2. Price pulls back
↓
3. Candle touches EMA 9
↓
TOUCH
4. Price breaks touch candle high
↓
BOT
5. Price continues higher
↓
6. Candle CLOSES above previous swing high
↓
ENTER BUY
Your actual entry is at step 6, not at the EMA crossover.
13. In simple words
Your indicator is looking for momentum + pullback + confirmation + structure breakout.
The philosophy is:
EMA crossover tells the direction → price pulls back to EMA 9 → price proves momentum by breaking the touch candle → price confirms the trend by breaking the previous swing → ENTER.
So the system is designed to avoid taking the trade immediately after an EMA crossover.
The complete logic
EMA 9 / EMA 21
│
┌─────────┴─────────┐
│ │
9 crosses UP 9 crosses DOWN
│ │
BUY bias SELL bias
│ │
└─────────┬─────────┘
↓
WAIT FOR TOUCH
│
Price touches EMA 9
│
↓
TOUCH
│
↓
Break touch candle
high / low
│
↓
BOT
│
↓
Break previous swing
with candle CLOSE
│
↓
ENTER

Disclaimer
The information and publications are not meant to be, and do not constitute, financial, investment, trading, or other types of advice or recommendations supplied or endorsed by TradingView. Read more in the Terms of Use.
Disclaimer
The information and publications are not meant to be, and do not constitute, financial, investment, trading, or other types of advice or recommendations supplied or endorsed by TradingView. Read more in the Terms of Use.