

Weekly (Bias Validation)
- Price between EMAs → ❌ Ranging
- Major Swing Point High: 158.880 Low: 146.543
D1 (Daily): Trend Bias
- Price below 200EMA & 50EMA on D1 → ✅ Bearish Bias
- Major Swing Point High: 154.804 Low: 146.543
- ✅ Break of Structure (BoS) + Volume Imbalance
- Price below Weekly VWAP → ✅ Bearish Bias
H4 (4-Hour): Trend Bias
- Price below 200EMA & 50EMA on D1 → ✅ Bearish Bias
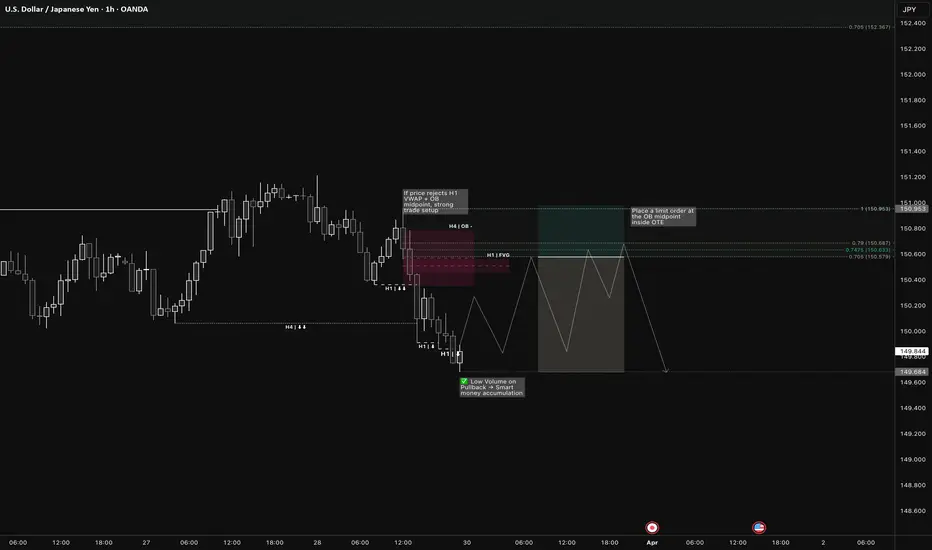
- Major Swing Point High: 151.214 Low: 149.684
- ✅ Break of Structure (BoS) + Volume Imbalance
- Price below Weekly VWAP → ✅ Bearish Bias
- High-Probability Entry Zones (H4 OTE)
- H4 OB (OTE)
H1 (1-Hour): Trend Bias
- Swing Point High: 150.953 Low: 149.684
- ✅ Break of Structure (BoS) + Volume Imbalance
- H4 OB → (OTE)
- H1 OB → (OTE)
🔲 Validate with VWAP: ✔ ✅ H1 VWAP must align with H4 OTE before entry ✔ ✅ If price rejects H1 VWAP + OB midpoint, strong trade setup
🔲 Entry Options: ✔ Option 1 (Limit Order Entry):
* Place a limit order at the OB midpoint inside OTE
* Set stop-loss below OB (for longs) / above OB (for shorts)
✔ Option 2 (EMA Confirmation Entry):
* ✅ Enter when 9EMA crosses 21EMA near OTE
* ✅ Must have Volume Imbalance Confirmation
🔲 Final Confirmation: ✔ ✅ High Volume on Structure Break → Confirms strong move ✔ ✅ Low Volume on Pullback → Smart money accumulation
- Price between EMAs → ❌ Ranging
- Major Swing Point High: 158.880 Low: 146.543
D1 (Daily): Trend Bias
- Price below 200EMA & 50EMA on D1 → ✅ Bearish Bias
- Major Swing Point High: 154.804 Low: 146.543
- ✅ Break of Structure (BoS) + Volume Imbalance
- Price below Weekly VWAP → ✅ Bearish Bias
H4 (4-Hour): Trend Bias
- Price below 200EMA & 50EMA on D1 → ✅ Bearish Bias
- Major Swing Point High: 151.214 Low: 149.684
- ✅ Break of Structure (BoS) + Volume Imbalance
- Price below Weekly VWAP → ✅ Bearish Bias
- High-Probability Entry Zones (H4 OTE)
- H4 OB (OTE)
H1 (1-Hour): Trend Bias
- Swing Point High: 150.953 Low: 149.684
- ✅ Break of Structure (BoS) + Volume Imbalance
- H4 OB → (OTE)
- H1 OB → (OTE)
🔲 Validate with VWAP: ✔ ✅ H1 VWAP must align with H4 OTE before entry ✔ ✅ If price rejects H1 VWAP + OB midpoint, strong trade setup
🔲 Entry Options: ✔ Option 1 (Limit Order Entry):
* Place a limit order at the OB midpoint inside OTE
* Set stop-loss below OB (for longs) / above OB (for shorts)
✔ Option 2 (EMA Confirmation Entry):
* ✅ Enter when 9EMA crosses 21EMA near OTE
* ✅ Must have Volume Imbalance Confirmation
🔲 Final Confirmation: ✔ ✅ High Volume on Structure Break → Confirms strong move ✔ ✅ Low Volume on Pullback → Smart money accumulation
Trade chiuso: obiettivo raggiunto

Declinazione di responsabilità
Le informazioni e le pubblicazioni non sono intese come, e non costituiscono, consulenza o raccomandazioni finanziarie, di investimento, di trading o di altro tipo fornite o approvate da TradingView. Per ulteriori informazioni, consultare i Termini di utilizzo.
Declinazione di responsabilità
Le informazioni e le pubblicazioni non sono intese come, e non costituiscono, consulenza o raccomandazioni finanziarie, di investimento, di trading o di altro tipo fornite o approvate da TradingView. Per ulteriori informazioni, consultare i Termini di utilizzo.