
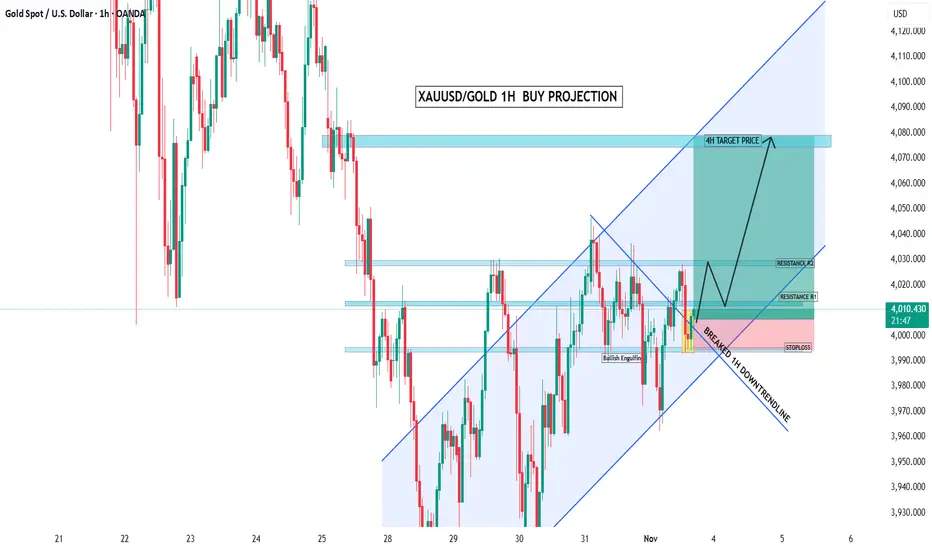
🟩 Technical Summary:
Structure: Price has broken out of a 1H downtrend line, signaling a potential bullish reversal.
Pattern Confirmation: A Bullish Engulfing candle confirms buying momentum.
Zones Marked:
Resistance R1: Around 4,020 zone
Resistance R2: Around 4,030–4,035 zone
4H Target Price: ~4,075–4,080 zone
Support Zone: Near 3,995–4,000 (Stoploss area).
📈 Projection Logic:
Price breaks 1H downtrend.
Retests near the trendline breakout zone (~4,000–4,010).
Pushes towards R1 and R2.
Final 4H target projected near 4,075–4,080.
🎯 Buy Setup Example:
Buy Entry: 4,005 – 4,010 (after retest)
Stoploss: 3,985 – 3,990
Target: 4,075 – 4,080
Risk–Reward: Roughly 1:3+
Structure: Price has broken out of a 1H downtrend line, signaling a potential bullish reversal.
Pattern Confirmation: A Bullish Engulfing candle confirms buying momentum.
Zones Marked:
Resistance R1: Around 4,020 zone
Resistance R2: Around 4,030–4,035 zone
4H Target Price: ~4,075–4,080 zone
Support Zone: Near 3,995–4,000 (Stoploss area).
📈 Projection Logic:
Price breaks 1H downtrend.
Retests near the trendline breakout zone (~4,000–4,010).
Pushes towards R1 and R2.
Final 4H target projected near 4,075–4,080.
🎯 Buy Setup Example:
Buy Entry: 4,005 – 4,010 (after retest)
Stoploss: 3,985 – 3,990
Target: 4,075 – 4,080
Risk–Reward: Roughly 1:3+

Declinazione di responsabilità
Le informazioni e le pubblicazioni non sono intese come, e non costituiscono, consulenza o raccomandazioni finanziarie, di investimento, di trading o di altro tipo fornite o approvate da TradingView. Per ulteriori informazioni, consultare i Termini di utilizzo.
Declinazione di responsabilità
Le informazioni e le pubblicazioni non sono intese come, e non costituiscono, consulenza o raccomandazioni finanziarie, di investimento, di trading o di altro tipo fornite o approvate da TradingView. Per ulteriori informazioni, consultare i Termini di utilizzo.