
## **Market Overview**
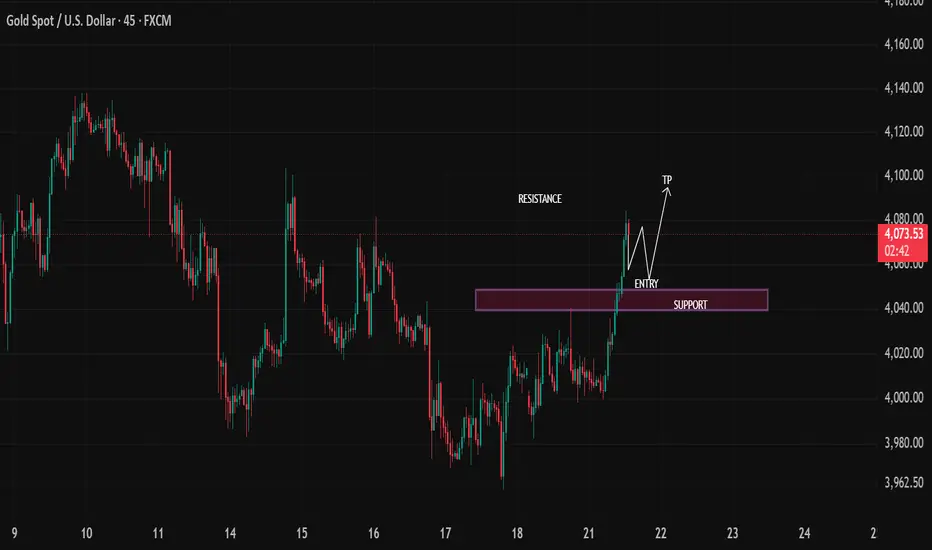
Gold has shifted from a short-term consolidation into a bullish impulse after breaking above a well-defined support/resistance zone. The strong bullish candles indicate buyers are currently in control, while the highlighted purple zone is likely to act as a demand area if price retraces.
The overall market structure has changed from **lower highs and lower lows** to **higher highs and higher lows**, suggesting increasing bullish momentum.
---
## **Market Structure**
* **Trend:** Short-term Bullish
* **Momentum:** Strong bullish breakout
* **Bias:** Buy on Pullback
Price has successfully broken above the previous resistance zone, which now has the potential to become new support. This is a classic **break-and-retest** setup often seen before continuation moves.
---
## **Key Technical Levels**
### **Resistance**
* **4,078 – 4,082**
* This is the immediate resistance where price is currently reacting.
* A confirmed breakout above this level could trigger another bullish expansion.
### **Support / Demand Zone**
* **4,035 – 4,045**
* Previously acted as resistance.
* Now expected to provide buying interest during a retracement.
* This area aligns with the highlighted purple zone.
---
## **Trading Scenario**
### **Preferred Setup: Buy on Pullback**
Wait for price to retrace into the **4,035–4,045** support zone.
Look for:
* Bullish rejection candles
* Bullish engulfing pattern
* Strong buying volume
* Higher low formation
Only enter after confirmation rather than placing a blind limit order.
---
## **Target Levels**
### **Entry**
* Around **4,040** after bullish confirmation.
### **Take Profit 1**
* **4,080**
### **Take Profit 2**
* **4,095**
### **Take Profit 3**
* **4,105**
If momentum remains strong, an extension toward **4,120** cannot be ruled out.
---
## **Risk Management**
**Suggested Stop Loss**
* Below **4,030**
* Conservative traders may place it below the recent swing low near **4,020**.
Aim for a **minimum Risk-to-Reward ratio of 1:2**, with **1:3 or better** preferred if targeting the higher resistance levels.
---
## **Bullish Confirmation**
The bullish outlook remains valid if:
* Price holds above the support zone.
* Higher lows continue to form.
* Buyers defend the breakout area.
---
## **Invalidation Scenario**
The bullish setup becomes weaker if:
* Price closes decisively below **4,035**.
* The breakout fails and price returns below the demand zone.
* Selling pressure produces a new lower low beneath the recent swing structure.
In that case, the market could revisit the **4,020–4,000** region before attempting another upward move.
---
# **Professional Outlook**
The chart presents a **high-probability bullish continuation setup**. Rather than chasing the breakout, the higher-probability approach is to **wait for a pullback into the former resistance (now support) zone**, then seek bullish price action confirmation before entering. If buyers successfully defend this area, the path toward **4,095–4,105** becomes increasingly favorable.
Gold has shifted from a short-term consolidation into a bullish impulse after breaking above a well-defined support/resistance zone. The strong bullish candles indicate buyers are currently in control, while the highlighted purple zone is likely to act as a demand area if price retraces.
The overall market structure has changed from **lower highs and lower lows** to **higher highs and higher lows**, suggesting increasing bullish momentum.
---
## **Market Structure**
* **Trend:** Short-term Bullish
* **Momentum:** Strong bullish breakout
* **Bias:** Buy on Pullback
Price has successfully broken above the previous resistance zone, which now has the potential to become new support. This is a classic **break-and-retest** setup often seen before continuation moves.
---
## **Key Technical Levels**
### **Resistance**
* **4,078 – 4,082**
* This is the immediate resistance where price is currently reacting.
* A confirmed breakout above this level could trigger another bullish expansion.
### **Support / Demand Zone**
* **4,035 – 4,045**
* Previously acted as resistance.
* Now expected to provide buying interest during a retracement.
* This area aligns with the highlighted purple zone.
---
## **Trading Scenario**
### **Preferred Setup: Buy on Pullback**
Wait for price to retrace into the **4,035–4,045** support zone.
Look for:
* Bullish rejection candles
* Bullish engulfing pattern
* Strong buying volume
* Higher low formation
Only enter after confirmation rather than placing a blind limit order.
---
## **Target Levels**
### **Entry**
* Around **4,040** after bullish confirmation.
### **Take Profit 1**
* **4,080**
### **Take Profit 2**
* **4,095**
### **Take Profit 3**
* **4,105**
If momentum remains strong, an extension toward **4,120** cannot be ruled out.
---
## **Risk Management**
**Suggested Stop Loss**
* Below **4,030**
* Conservative traders may place it below the recent swing low near **4,020**.
Aim for a **minimum Risk-to-Reward ratio of 1:2**, with **1:3 or better** preferred if targeting the higher resistance levels.
---
## **Bullish Confirmation**
The bullish outlook remains valid if:
* Price holds above the support zone.
* Higher lows continue to form.
* Buyers defend the breakout area.
---
## **Invalidation Scenario**
The bullish setup becomes weaker if:
* Price closes decisively below **4,035**.
* The breakout fails and price returns below the demand zone.
* Selling pressure produces a new lower low beneath the recent swing structure.
In that case, the market could revisit the **4,020–4,000** region before attempting another upward move.
---
# **Professional Outlook**
The chart presents a **high-probability bullish continuation setup**. Rather than chasing the breakout, the higher-probability approach is to **wait for a pullback into the former resistance (now support) zone**, then seek bullish price action confirmation before entering. If buyers successfully defend this area, the path toward **4,095–4,105** becomes increasingly favorable.

JOIN MY TELEGRAM CHANNEL FREE :
t.me/SMARTPROFITHUB2
t.me/SMARTPROFITHUB2
Declinazione di responsabilità
Le informazioni e le pubblicazioni non sono intese come, e non costituiscono, consulenza o raccomandazioni finanziarie, di investimento, di trading o di altro tipo fornite o approvate da TradingView. Per ulteriori informazioni, consultare i Termini di utilizzo.
JOIN MY TELEGRAM CHANNEL FREE :
t.me/SMARTPROFITHUB2
t.me/SMARTPROFITHUB2
Declinazione di responsabilità
Le informazioni e le pubblicazioni non sono intese come, e non costituiscono, consulenza o raccomandazioni finanziarie, di investimento, di trading o di altro tipo fornite o approvate da TradingView. Per ulteriori informazioni, consultare i Termini di utilizzo.