
Context, in plain language
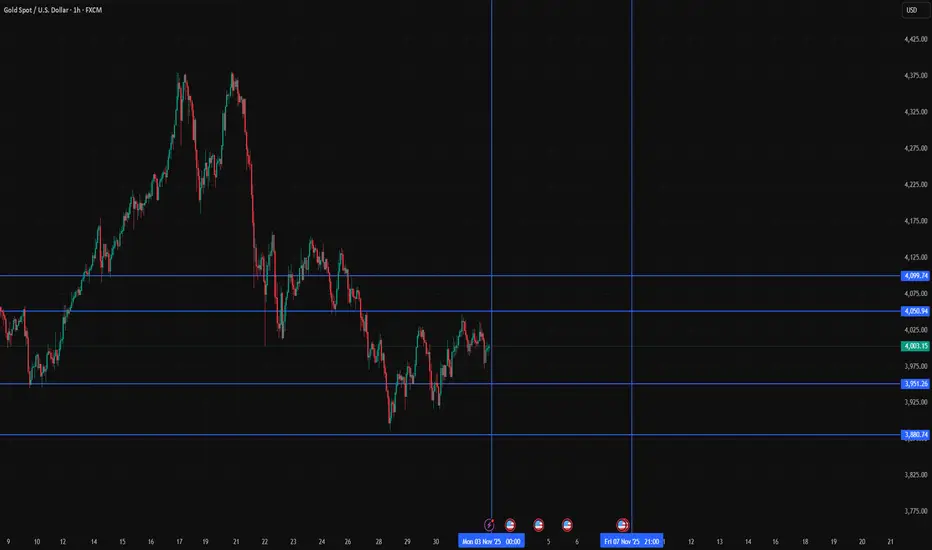
Gold finished Friday near 3 998.4 on my feed and sits right on the round 4 000 pivot. October was a runaway month with fresh records. In the final week of this rally phase the market will test whether price can live above four thousand or if it needs another breath. The plan below keeps things simple. I work from one decision line, a short event ladder, and a fixed risk template. Education only.
Why four thousand matters
Round numbers concentrate liquidity. They create noise on the first touch then clarity on the second. At four thousand you will see stop runs in both directions and you will see fast fades. The edge comes from trading acceptance rather than touch. Acceptance for me means two closes on the execution timeframe above or below the line. I use four hour for structure and fifteen minute for triggers. If you prefer one hour or five minute, keep the logic exactly the same and do not chase the first spike.
What can move price this week
It is a data led week. Monday brings ISM Manufacturing. Tuesday brings JOLTS. Wednesday brings ADP in the early morning and ISM Services late morning. Friday is the Employment Situation. The Federal Reserve cut the policy rate last week and said future steps depend on incoming data, so these releases are live for gold. I treat Monday as tone setting, Wednesday as positioning, and Friday as the weekly verdict. Times are Eastern. If you trade from Europe, align your session planning the night before.
Levels to work with if Friday’s close is your anchor
Immediate map
• 4 000 is the decision line.
• 4 050 to 4 060 is the first upside gate from the early October stall area.
• 4 100 opens if services data or jobs come in soft and real yields ease.
• 3 950 to 3 920 is first support on pullbacks where late sellers often get trapped.
• 3 880 to 3 800 is the larger retest zone from the September breakout.
I draw one bold line at 4 000. I shade two narrow boxes at 4 050 to 4 060 and 3 950 to 3 920. I leave the wider retest box lighter at 3 880 to 3 800. No extra overlays. No spaghetti. The clarity helps when the tape speeds up.
How I will trade it
Before New York I check two things. The dollar index trend. The ten year real yield tone. If both rise together I will be patient with longs and I will only buy strength that proves acceptance over four thousand with time. If both slip together I will allow a second test long that holds above four thousand and I will target the first gate at 4 050 to 4 060. If the event hits and the first move rips through four thousand I do nothing. I wait for the pause. The second test is the trade.
Triggers
Long idea
• Event passes and the second test holds above 4 000 with two closes on fifteen minute.
• Dollar fails to make a higher high on the hour.
• Target 4 050 to 4 060 first, then trail toward 4 100 only if the day opens up.
• Invalidation below 3 980 on a five minute close or a clear failure back inside the pre release range.
Short idea
• Clean rejection of 4 000 after the event.
• Dollar and real yields bid together.
• Target 3 950 to 3 920 first. Leave room for 3 880 only if the day does not bounce.
• Invalidation above 4 020 on a five minute close.
Risk template
I size so that a normal day’s pullback does not force me out. A simple rule is to keep per trade risk inside one third of the five day ATR. I place stops beyond the opposite edge of the zone I am trading. I never move a stop closer because the candle looks scary. I take partials into the first gate only when the day’s range is already near the expected move for that session. If spreads widen during the release I stand aside for five minutes. This alone will save you from many avoidable losses.
Common traps to avoid
Do not trade the first touch at four thousand. The tape loves to run stops there. Do not fade a break that holds for thirty minutes above the decision line. The whole edge is acceptance. Do not add size in front of Friday’s Employment Situation. This report resets everything. Finally do not forget that gold can gap through levels on macro surprises. The way to survive that is small size, predefined exits, and a plan to do nothing if liquidity is thin.
Event ladder for the week
Monday. ISM Manufacturing sets the opening tone.
Tuesday. JOLTS shapes labor cooling views.
Wednesday. ADP and ISM Services drive pre positioning into Friday.
Friday. Employment Situation at the open. I go reactive only after the first five minutes settle.
How to set up your chart
Timeframe four hour for structure. Timeframe fifteen minute for triggers. Draw a single line at 4 000. Shade the two narrow zones at 4 050 to 4 060 and 3 950 to 3 920. Add a lighter box at 3 880 to 3 800. Nothing else. If you must watch the dollar, keep it on a separate chart. The goal is to make the decision obvious when the release hits.
Three rule bullets that define the model
• Trade acceptance, not touch, at 4 000. Wait for two closes to confirm.
• Use the event ladder to scale risk. Light early. Normal only after the day’s release.
• Place invalidation beyond the opposite band of the zone you are trading.
Education and analytics only. No investment advice.
Gold finished Friday near 3 998.4 on my feed and sits right on the round 4 000 pivot. October was a runaway month with fresh records. In the final week of this rally phase the market will test whether price can live above four thousand or if it needs another breath. The plan below keeps things simple. I work from one decision line, a short event ladder, and a fixed risk template. Education only.
Why four thousand matters
Round numbers concentrate liquidity. They create noise on the first touch then clarity on the second. At four thousand you will see stop runs in both directions and you will see fast fades. The edge comes from trading acceptance rather than touch. Acceptance for me means two closes on the execution timeframe above or below the line. I use four hour for structure and fifteen minute for triggers. If you prefer one hour or five minute, keep the logic exactly the same and do not chase the first spike.
What can move price this week
It is a data led week. Monday brings ISM Manufacturing. Tuesday brings JOLTS. Wednesday brings ADP in the early morning and ISM Services late morning. Friday is the Employment Situation. The Federal Reserve cut the policy rate last week and said future steps depend on incoming data, so these releases are live for gold. I treat Monday as tone setting, Wednesday as positioning, and Friday as the weekly verdict. Times are Eastern. If you trade from Europe, align your session planning the night before.
Levels to work with if Friday’s close is your anchor
Immediate map
• 4 000 is the decision line.
• 4 050 to 4 060 is the first upside gate from the early October stall area.
• 4 100 opens if services data or jobs come in soft and real yields ease.
• 3 950 to 3 920 is first support on pullbacks where late sellers often get trapped.
• 3 880 to 3 800 is the larger retest zone from the September breakout.
I draw one bold line at 4 000. I shade two narrow boxes at 4 050 to 4 060 and 3 950 to 3 920. I leave the wider retest box lighter at 3 880 to 3 800. No extra overlays. No spaghetti. The clarity helps when the tape speeds up.
How I will trade it
Before New York I check two things. The dollar index trend. The ten year real yield tone. If both rise together I will be patient with longs and I will only buy strength that proves acceptance over four thousand with time. If both slip together I will allow a second test long that holds above four thousand and I will target the first gate at 4 050 to 4 060. If the event hits and the first move rips through four thousand I do nothing. I wait for the pause. The second test is the trade.
Triggers
Long idea
• Event passes and the second test holds above 4 000 with two closes on fifteen minute.
• Dollar fails to make a higher high on the hour.
• Target 4 050 to 4 060 first, then trail toward 4 100 only if the day opens up.
• Invalidation below 3 980 on a five minute close or a clear failure back inside the pre release range.
Short idea
• Clean rejection of 4 000 after the event.
• Dollar and real yields bid together.
• Target 3 950 to 3 920 first. Leave room for 3 880 only if the day does not bounce.
• Invalidation above 4 020 on a five minute close.
Risk template
I size so that a normal day’s pullback does not force me out. A simple rule is to keep per trade risk inside one third of the five day ATR. I place stops beyond the opposite edge of the zone I am trading. I never move a stop closer because the candle looks scary. I take partials into the first gate only when the day’s range is already near the expected move for that session. If spreads widen during the release I stand aside for five minutes. This alone will save you from many avoidable losses.
Common traps to avoid
Do not trade the first touch at four thousand. The tape loves to run stops there. Do not fade a break that holds for thirty minutes above the decision line. The whole edge is acceptance. Do not add size in front of Friday’s Employment Situation. This report resets everything. Finally do not forget that gold can gap through levels on macro surprises. The way to survive that is small size, predefined exits, and a plan to do nothing if liquidity is thin.
Event ladder for the week
Monday. ISM Manufacturing sets the opening tone.
Tuesday. JOLTS shapes labor cooling views.
Wednesday. ADP and ISM Services drive pre positioning into Friday.
Friday. Employment Situation at the open. I go reactive only after the first five minutes settle.
How to set up your chart
Timeframe four hour for structure. Timeframe fifteen minute for triggers. Draw a single line at 4 000. Shade the two narrow zones at 4 050 to 4 060 and 3 950 to 3 920. Add a lighter box at 3 880 to 3 800. Nothing else. If you must watch the dollar, keep it on a separate chart. The goal is to make the decision obvious when the release hits.
Three rule bullets that define the model
• Trade acceptance, not touch, at 4 000. Wait for two closes to confirm.
• Use the event ladder to scale risk. Light early. Normal only after the day’s release.
• Place invalidation beyond the opposite band of the zone you are trading.
Education and analytics only. No investment advice.

🔻Website: finaur.com/
🔻Strategies: finaur.com/lab/
🔻Blog: finaur.com/blog/
🔻Telegram : t.me/finaur_com/
🔻Trader Psychology Profile – thelumenism.com/
🔻Strategies: finaur.com/lab/
🔻Blog: finaur.com/blog/
🔻Telegram : t.me/finaur_com/
🔻Trader Psychology Profile – thelumenism.com/
Declinazione di responsabilità
Le informazioni e le pubblicazioni non sono intese come, e non costituiscono, consulenza o raccomandazioni finanziarie, di investimento, di trading o di altro tipo fornite o approvate da TradingView. Per ulteriori informazioni, consultare i Termini di utilizzo.
🔻Website: finaur.com/
🔻Strategies: finaur.com/lab/
🔻Blog: finaur.com/blog/
🔻Telegram : t.me/finaur_com/
🔻Trader Psychology Profile – thelumenism.com/
🔻Strategies: finaur.com/lab/
🔻Blog: finaur.com/blog/
🔻Telegram : t.me/finaur_com/
🔻Trader Psychology Profile – thelumenism.com/
Declinazione di responsabilità
Le informazioni e le pubblicazioni non sono intese come, e non costituiscono, consulenza o raccomandazioni finanziarie, di investimento, di trading o di altro tipo fornite o approvate da TradingView. Per ulteriori informazioni, consultare i Termini di utilizzo.