
Fundamental Analysis
Gold remains under pressure as traders continue to watch USD strength, Treasury yields, and upcoming U.S. macro data.
For now, the technical structure still favours sellers while price trades below the main EMA resistance area. Any recovery should be treated as a pullback unless gold can reclaim the EMA value zone with strong confirmation.
Technical Analysis
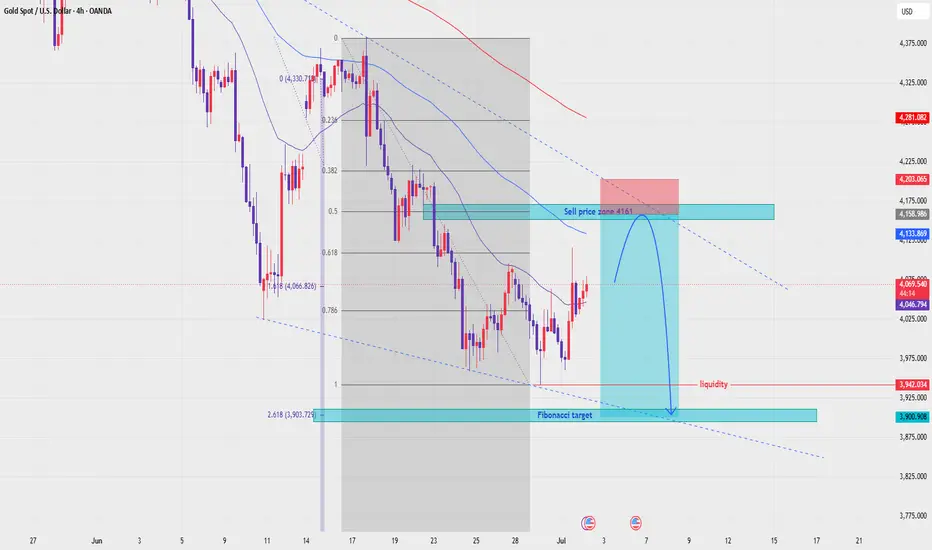
On the 4H chart, XAUUSD is still moving inside a bearish structure. EMA 34, EMA 89, and EMA 200 remain above price, showing that the main trend is still controlled by sellers.
Price is currently around 4,072 after reacting from the lower area. The recovery is approaching the Fibonacci value zone and EMA resistance area, where sellers may look for continuation entries.
The key sell zone is around 4,158 - 4,203. This area aligns with the Fibonacci retracement zone, EMA resistance, previous support turned resistance, and the descending trendline pressure.
If price reaches this zone and shows bearish rejection, the next downside focus is the liquidity zone around 3,942, followed by the Fibonacci target near 3,900.
Important Key Levels
Current price area: 4,072
Main sell value zone: 4,158 - 4,203
EMA resistance area: 4,133 - 4,281
Short-term reaction level: 4,046
Liquidity target: 3,942
Fibonacci target zone: 3,903 - 3,900
Invalidation area: above 4,203 - 4,220
Trading Scenario
Main Sell Scenario
Entry: 4,158 - 4,203
Stop Loss: 4,220
Take Profit 1: 4,046
Take Profit 2: 3,942
Take Profit 3: 3,903 - 3,900
Sell Condition
The preferred setup is to wait for gold to recover into the 4,158 - 4,203 Fibonacci value zone. This area is important because it aligns with EMA resistance and the previous bearish structure.
A sell setup becomes more valid if price forms bearish rejection from this zone, such as a long upper wick, bearish engulfing candle, failed breakout, or lower high below the EMA structure.
If price rejects from the sell zone and breaks back below 4,046, the bearish continuation view becomes stronger. The next downside target would be 3,942, followed by the Fibonacci target zone around 3,903 - 3,900.
Entry Conditions
Wait for price to retest 4,158 - 4,203.
Look for bearish rejection before entering sell.
Do not sell aggressively at the low without a pullback.
A break below 4,046 confirms stronger downside pressure.
If price breaks and holds above 4,220, the sell setup is invalid.
Overall, the main view remains bearish while XAUUSD trades below EMA 34, EMA 89, and EMA 200. The preferred plan is to wait for a pullback into the Fibonacci and EMA value zone, then look for sell confirmation toward 4,046, 3,942, and 3,900.
Do you share the same bearish view on gold, or are you waiting for a cleaner rejection from the Fibonacci value zone first?

📊 XAU Macro Pulse · XAUUSD · GBPUSD · EURUSD
Every setup earns its place on the chart.
🔔 Follow the structure. The rest is noise.
Personal analysis only t.me/+TxpetmVvKGhjZDhl
Every setup earns its place on the chart.
🔔 Follow the structure. The rest is noise.
Personal analysis only t.me/+TxpetmVvKGhjZDhl
Pubblicazioni correlate
Declinazione di responsabilità
Le informazioni e le pubblicazioni non sono intese come, e non costituiscono, consulenza o raccomandazioni finanziarie, di investimento, di trading o di altro tipo fornite o approvate da TradingView. Per ulteriori informazioni, consultare i Termini di utilizzo.
📊 XAU Macro Pulse · XAUUSD · GBPUSD · EURUSD
Every setup earns its place on the chart.
🔔 Follow the structure. The rest is noise.
Personal analysis only t.me/+TxpetmVvKGhjZDhl
Every setup earns its place on the chart.
🔔 Follow the structure. The rest is noise.
Personal analysis only t.me/+TxpetmVvKGhjZDhl
Pubblicazioni correlate
Declinazione di responsabilità
Le informazioni e le pubblicazioni non sono intese come, e non costituiscono, consulenza o raccomandazioni finanziarie, di investimento, di trading o di altro tipo fornite o approvate da TradingView. Per ulteriori informazioni, consultare i Termini di utilizzo.